• About
  • Nav Social Icons

  • Skip to primary navigation
  • Skip to main content
  • Skip to primary sidebar
  • Skip to footer
  • Home
  • About
  • Recipes
    • Blackstone
    • Breads
    • Breakfast
    • Drinks
    • Dessert
    • Dinner
    • Sides
    • Snacks
  • Shop
  • Cart
  • My account
  • Mobile Menu Widgets

    Connect

    Search

The Farmstyle

The Farmstyle

by Kayla Zenner

  • Home
  • About
  • Shop
  • Recipes
    • Blackstone
    • Breads
    • Breakfast
    • Drinks
    • Dessert
    • Dinner
    • Snacks
    • Sides
    • All Recipes
  • Cart

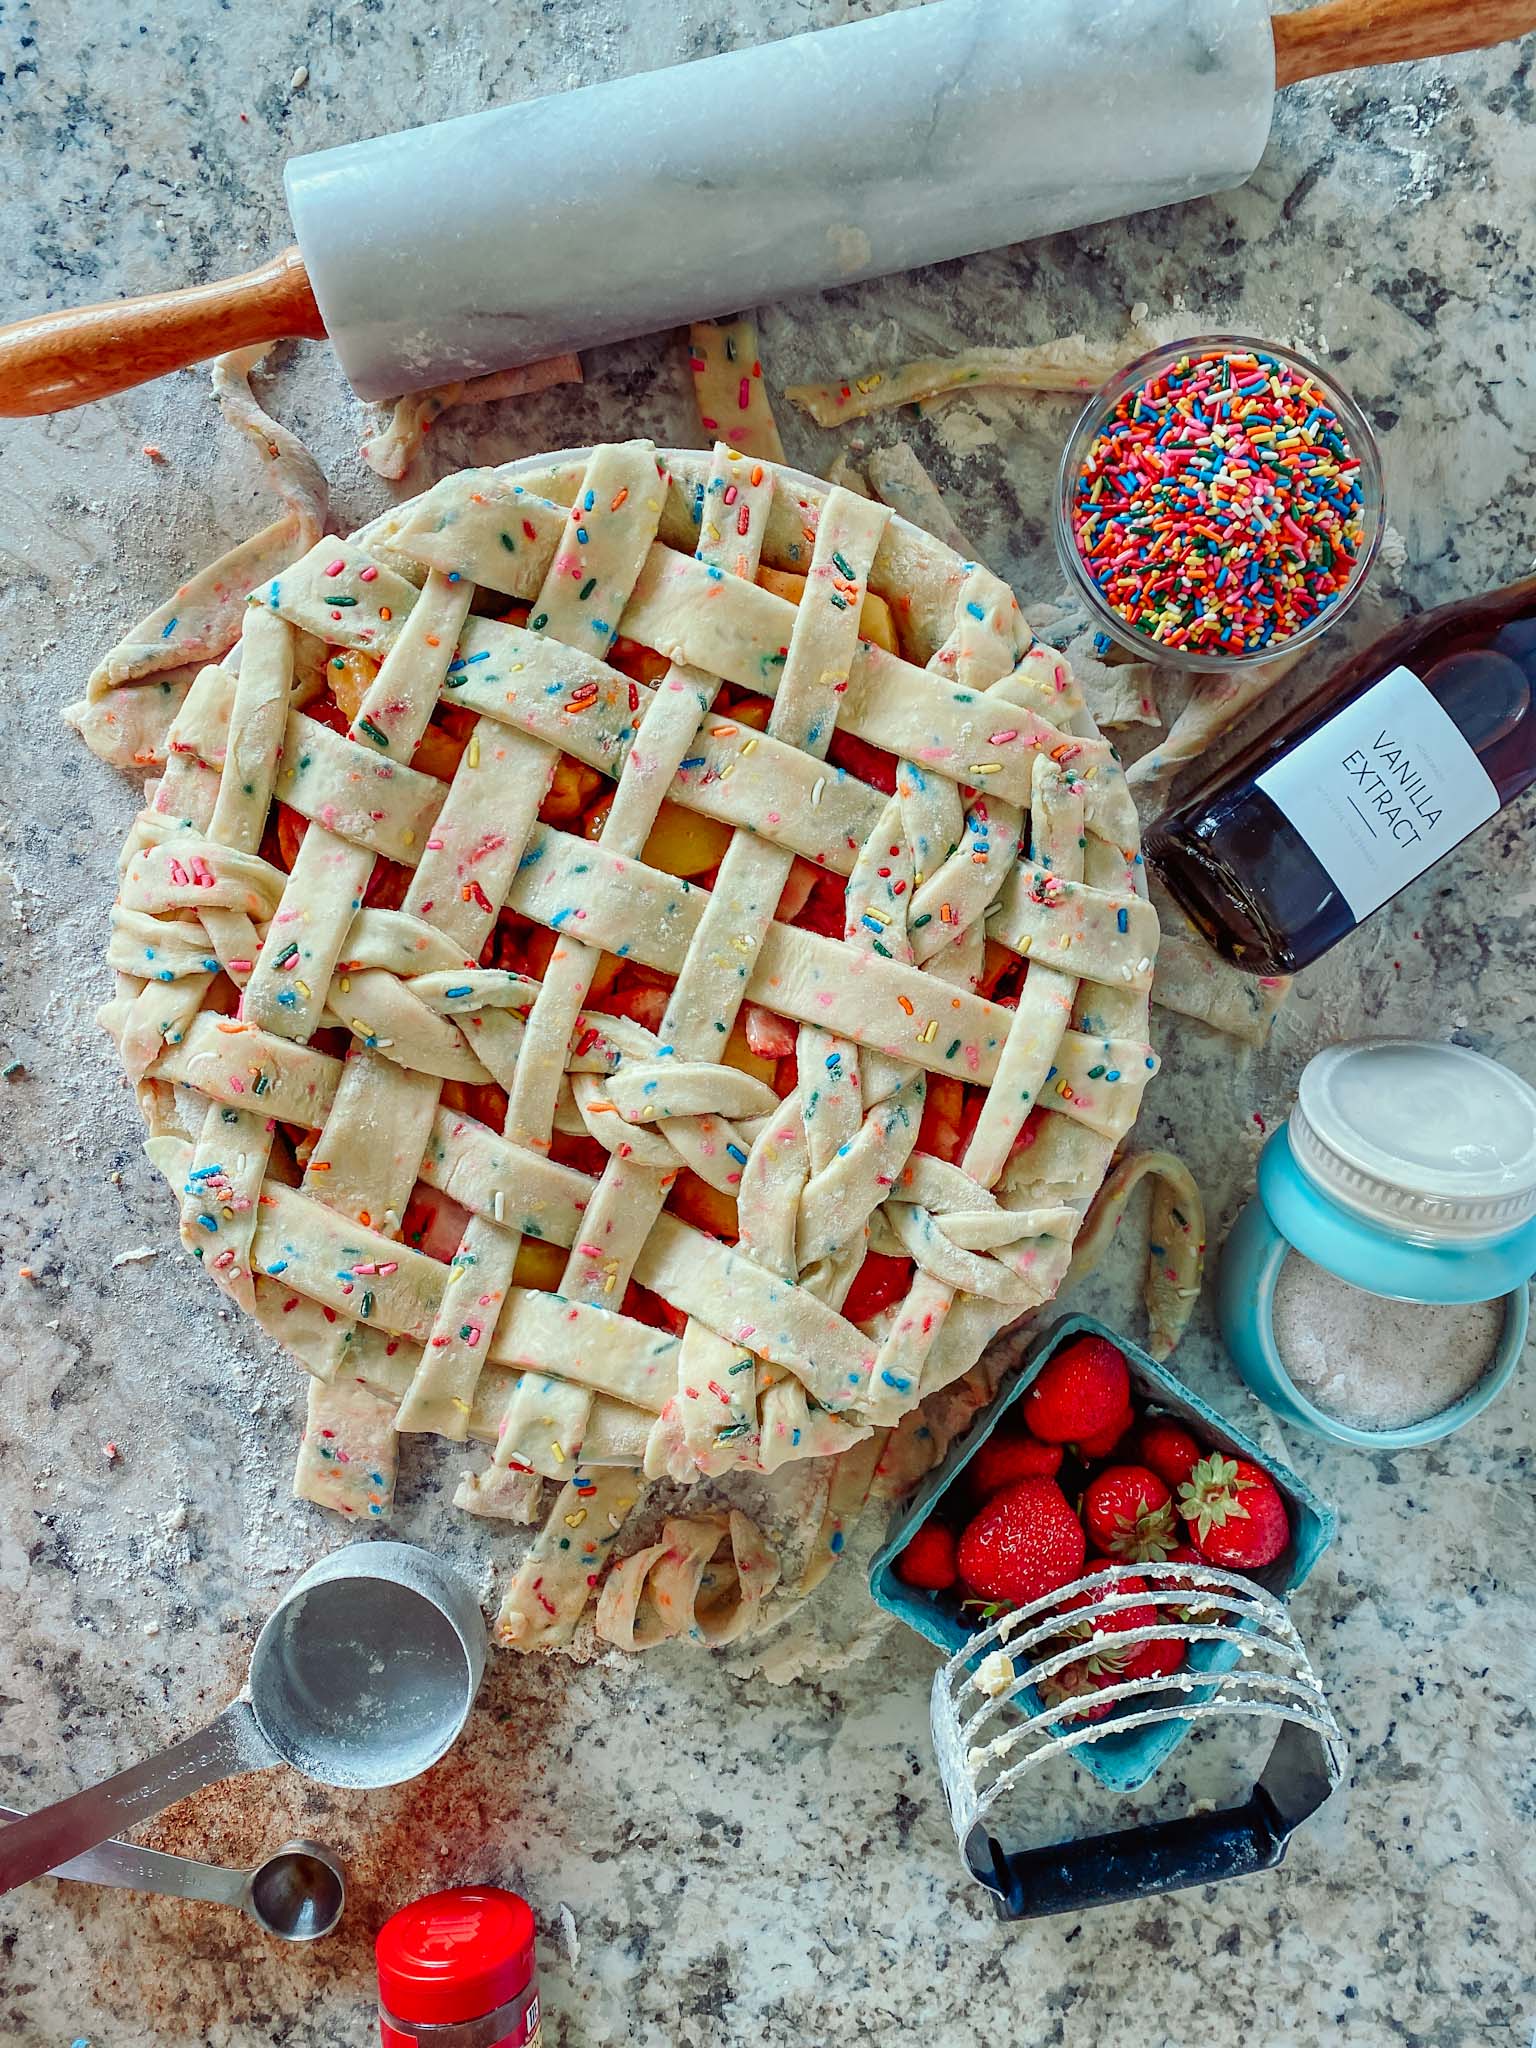
Confetti Pie Crust with Strawberry Peach Filling

August 10, 2022 · In: Dessert, Recipes

FacebookTweetPin
Jump to Recipe Print Recipe

This sprinkle confetti pie crust is made even more fun with a braided lattice top. Filled with a gooey strawberry peach pie filling this pie is a dream.

sprinkle pie crust with strawberries, vanilla extract, rolling pin, salt, sprinkles

First let’s talk about the star of the show, the sprinkle confetti pie crust! Not only is this pie crust flaky and buttery, who doesn’t like sprinkles? They make everything better, desserts prettier, and they just scream party. I’m also obsessed with sprinkle desserts in general. Funfetti cake, Funfetti cookies, Funfetti pie? Swap out the rainbow sprinkles you add in and this rainbow pie crust can easily be a festive holiday pie crust. Grab some orange, purple and black jimmies for a halloween inspired pie or Christmas sprinkles for your next holiday event. The options are endless!

If you have a family member who doesn’t particularly like cake, this pie would be PERFECT for a birthday cake alternative. I mean we should make birthday pie a new trend!

The sprinkle pie crust is seriously easy also! If you haven’t ever made a pie crust, I highly recommend giving it a try. The result is just unmatched of those from the store. A few simple ingredients such as butter, flour, salt, and water give you the best flavor and texture. Here are a few commonly asked questions about the pie crust.

How do I make a lattice crust?

While a lattice crust LOOKS complicated to make, it really isn’t bad to make at all! You will start by rolling your crust out and cutting it into strips. The thickness of your strips is completely up to you! Once you have your strips cut, you will take every other strip and place it on your pie. Spacing them a strip apart. I like to start in the middle and fold up every other pie strip. Place another strip perpendicular and fold the strips back down. Repeat this by folding up the other strips, placing a pie strip down and folding your strips back. You can see the process on my Instagram video here.

How do I make the braided piece?

If you can braid hair, you can braid crust! Take one of the strips from above (I like to cut the one I plan to braid a little thicker than the others) and cut it into three smaller strips. Then braid the three strips like you would your hair. A little tip to help make braiding a little easier is to NOT cut all the way through. Leave a section at the top of the pie strip where the three pieces are attached together. Again you can watch my video here to see this process.

Now onto the filling, I was originally planning to make a peach pie filling, however I didn’t quite have enough peaches to fill out the pie. I decided to add in some strawberries and the flavor melds together seamlessly. If you haven’t every tried strawberry and peach together in a pie you are seriously missing out! One of my favorite things about making a mixed fruit pie is that you can really use any ratio of fruit you want. For my pie I used 4 cups of sliced peaches and 2 cups of sliced strawberries, but use what you have! Now onto a few frequently asked questions when it comes to pie fillings.

How do I get the pie filling to not be runny?

When I first started making pies, I always ran into the problem that the interior was runny and watery. Since then I have learned a simple little trick to help this problem. To get your pie filling to not be runny you simply need to place the fruit in a colander to drain for 20-30 minutes after cutting. This juice is certainly delicious, but it also causes excess water in your pie filling. I also add in flour to the filling to help thicken it up a bit.

Can I use frozen fruit?

Absolutely! When using frozen fruit there are just two main things to keep in mind. First, you will want to make sure you are thawing the fruit beforehand. If not, the excess water will make your pie filling runny. You will also want to make sure to use my colander trick above, just to make sure you are getting the excess juice out. I would recommend just thawing the fruit in a colander.

I can’t wait for you try this pie! If you do make it PLEASE tag me over on Instagram (@thefarmstyle) or TikTok (@thefarmstyle).

sprinkle pie crust with strawberries, vanilla extract, rolling pin, salt, sprinkles

Sprinkle Pie Crust with Peach Strawberry Filling

No ratings yet
This sprinkle confetti pie crust is made even more fun with a braided lattice top. Filled with a gooey strawberry peach pie filling this pie is a dream.
Print Recipe Pin Recipe
Prep Time:25 minutes mins
Cook Time:47 minutes mins
Course: Dessert
Keyword: pie
Servings: 12
Calories: 390kcal

Ingredients

For the crust

  • 2 1/2 cups flour
  • 1/2 cup sprinkles
  • 1 cup cold butter cubed
  • 1 tsp salt
  • 6-8 tbsp ice water
  • 1 egg
  • 2 tbsp water

For the filling

  • 6 cups fruit sliced
  • 1/3 cup brown sugar
  • 1/3 cup granulate sugar
  • 1/3 cup flour
  • 1 tsp salt
  • 1 tsp cinnamon
  • 1/4 tsp nutmeg
  • 1 tsp vanilla
US Customary – Metric

Instructions

  • Preheat oven to 425 F.
  • Peal and slice your peaches, and slice your strawberries. Place them in a colander to drain for 20-30 minutes. This removes any excess juice helping to not make your filling watery.
  • In another bowl, combine flour, salt, and butter. Cut the butter into the flour using a pastry cutter, two knives, or a fork. You want the end result to be crumbled flour.
  • Add in sprinkles and water. Start with the lesser amount of water and mix until a dough forms. Split dough in half.
  • Roll half of the dough into a large circle and place into your pie pan. Using a knife trim the excess crust from the edges.
  • Add sliced and drained fruit to a large bowl and add in remaining ingredients. Mix until fruit is evenly coated and pour into lined pie pan.
  • Roll out second half of the dough and slice into strips for a lattice crust. Choose one or two slices of the lattice to braid and add to top of the pie.
  • In a small bowl combine egg and 2 tbsp of water, brush the egg wash on the top of the crust.
  • Bake in the oven for 40-50 minutes. Let cool before slicing.
  • Tip: add a cookie sheet below your pie pan to catch any of the filling that may bubble over.

Nutrition

Calories: 390kcal | Carbohydrates: 58g | Protein: 4g | Fat: 16g | Saturated Fat: 10g | Polyunsaturated Fat: 1g | Monounsaturated Fat: 4g | Trans Fat: 1g | Cholesterol: 54mg | Sodium: 523mg | Potassium: 156mg | Fiber: 3g | Sugar: 31g | Vitamin A: 851IU | Vitamin C: 3mg | Calcium: 24mg | Iron: 2mg

Share this:

  • Share on X (Opens in new window) X
  • Share on Facebook (Opens in new window) Facebook
  • Share on Pinterest (Opens in new window) Pinterest

Like this:

Like Loading...
FacebookTweetPin

By: Kayla · In: Dessert, Recipes

About Kayla

Hi! I'm Kayla. I'm here to help inspire busy moms to get back in the kitchen and feel beautiful along the way! I'm married to my high school sweetheart and live on a farm with our two busy boys.

you’ll also love

Cinnamon Roll Cookies
Cheesesteak Pot Roast
How to Make Homemade Vanilla Extract

Reader Interactions

Comments

  1. Courtney says

    August 24, 2022 at 6:28 am

    This is the most beautiful and fun pie! I can’t wait to make this with my kids!!!

    Loading...
    Reply
    • Kayla says

      August 24, 2022 at 6:59 am

      Thank you so much! It was so fun to make!

      Loading...
      Reply
  2. Susan says

    August 26, 2022 at 11:32 am

    This looks so pretty, yummy, and fun to make! Can’t wait to try it!

    Loading...
    Reply

Trackbacks

  1. Edible Cookie Dough - Farmstyle says:
    September 14, 2022 at 3:05 pm

    […] Take a look at the recipe below and don’t forget to check out some of my other favorite sweet treats like my coffee cake muffins or the confetti sprinkle pie crust. […]

    Loading...
    Reply
  2. Homemade Apple Cider Cinnamon Rolls | Favorite Fall Recipes - Farmstyle says:
    September 16, 2022 at 12:36 pm

    […] Want more sweet treats? Try my edible cookie dough, sourdough brownies, or strawberry peach pie. […]

    Loading...
    Reply

Leave a ReplyCancel reply

Next Post >

A Basic Makeup Kit for Beginners

Primary Sidebar

Meet Kayla

Meet Kayla
hello!

LIVING OURFARM(LIFE)STYLE WHERE WE ​JUGGLE THE CHAOS OF MOTHERHOOD ONE ​KITCHEN ADVENTURE AT A TIME!

Read More

Connect

join the list

Categories

  • Blog
  • Recipes

Follow Along

@thefarmstyle


Comment BURGER for all the recipe details.

Stree
Comment BURGER for all the recipe details. 

Street Corn Smash Burger Tacos feature crispy corn tortillas pressed with seasoned ground beef and topped with creamy Mexican street corn.

INGREDIENTS
6 corn tortillas
1 1/2 lb ground beef
1/2 tsp cumin
1/2 tsp salt
1/2 tsp paprika
STREET CORN
16 oz corn
1 bell pepper diced
1 bunch cilantro minced
1 jalapeno diced
1/2 red onion diced
1/2 cup cotija cheese
1/2 cup sour cream
2 limes juiced
1/2 tsp cumin
1/2 tsp paprika
1/2 tsp salt

INSTRUCTIONS
STREET CORN
On the griddle add a little oil or butter and cook corn until lightly charred.
In a large bowl add corn, bell pepper, cilantro, jalapeno, and onion.
In a small bowl add sour cream, lime juice, cumin, paprika, and salt.
Add the dressing and cheese to the corn mixture and mix well. Set aside.

TACOS
Preheat griddle to medium high heat.
Season ground beef with salt, cumin, and paprika then divide the ground beef into six portions. Press each portion directly onto a corn tortilla, spreading the beef evenly to the edges.
Add tortillas to the griddle meat side down and cook for 3-5 minutes before flipping and cooking for 1-2 minutes.
Top each taco with street corn dip and enjoy!


This Cereal Milk Latte is a nostalgic coffee drink
This Cereal Milk Latte is a nostalgic coffee drink made by infusing milk with cereal and adding espresso. A fun, easy homemade latte recipe that can be made with any cereal flavor.

Comment COFFEE for all the recipe details 

INGREDIENTS
1/2 cup cereal I used Lucky Charms
2 shots espresso
8 oz milk
VANILLA COLD FOAM (OPTIONAL)
3 tbsp heavy cream
2 tbsp milk
1 tbsp vanilla syrup

INSTRUCTIONS
MAKE THE CEREAL MILK
Add the cereal and milk to a small jar and stir to combine. Allow to sit for 5-10 minutes before straining the cereal out using a fine mesh strainer, pressing gently to release the flavorful milk.

MAKE THE COLD FOAM
In a small cup combine all the ingredients for the vanilla cold foam. Whisk together with a frother until mixture has thickened. Set Aside. The honey may take a minute to incorporate, but it will!

MAKE IT ICED
In a large cup add ice, then cereal milk and then espresso. Top with vanilla cold foam and a sprinkle of extra cereal (if desired) and enjoy!

MAKE IT HOT
Stream the cereal milk to desired temperature milk, pour into your coffee cup and then add espresso. Top with vanilla cold foam and a sprinkle of extra cereal (if desired) and enjoy!


This easy sheetpan tortellini is SO easy! It’s one
This easy sheetpan tortellini is SO easy! It’s one of those throw on a pan and bake meals that really simplify dinner time. Let me know in the comments what your favorite easy dinner is. 

INGREDIENTS
28 oz kielbasa, sliced
20 oz frozen tortellini 
32 oz frozen vegetables (broccoli or this mix from @costco are my favorite)
3-4 Tbsp olive or avocado oil
1 tsp garlic powder
1 tsp onion powder
1/2 tsp paprika
1 tsp salt
1/2 tsp pepper
1/2 cup parmesan cheese, shredded

INSTRUCTIONS
• Place all ingredients on a sheetpan. 
• Bake at 350 for 25-30 min. 
• Enjoy


A little peek behind the scenes of a typical day.
A little peek behind the scenes of a typical day. Recipe testing, filming, editing, cleaning the kitchen (again), and trying to remember to actually eat the food I make.

🛒Grocery Shopping @albertsons 
🧘🏼‍♀️Pilates @thepilatesstudioidaho 
📚School Pickup
🐄Cow Check
🧼Cleaning (never ending)
📸Editing/Filming
Then time to relax with the kids


Comment BAGEL for all the recipe details.

These
Comment BAGEL for all the recipe details. 

These French Onion Bagels are made with caramelized onions baked into chewy homemade bagels and topped with melted Gruyère cheese. A savory, bakery-style bagel recipe perfect for breakfast or brunch.

INGREDIENTS
FRENCH ONIONS
2 onions
2 tbsp butter
1/2 tsp salt
1/2 tsp dried thyme
2 clvoes garlic minced
1 tbsp Worcestershire sauce
1 tbsp balsamic vinegar
BAGELS
3 1/2 cups bread flour
1 tbsp brown sugar
2 1/4 tsp dry active yeast
1 1/4 cups water
1 1/2 tsp salt
1/4 cup honey (for boiling)
1 1/2 cup gruyere cheese shredded


This homemade Caramel Apple Pie is a fall favorite
This homemade Caramel Apple Pie is a fall favorite made with tender spiced apples, gooey caramel sauce, and a flaky double pie crust. A delicious twist on classic apple pie that’s perfect for holidays, cozy mornings, and dessert tables.

Ingredients
3 pounds apples I love using honey crisp
1/2 cup caramel syrup
1 cup brown sugar
1 teaspoons vanilla extract
1 tbsp lemon juice
⅓ cup all-purpose flour
1 teaspoon salt
2 teaspoons ground cinnamon
1 teaspoon ground nutmeg
½ teaspoon allspice
1 pie crust
1 egg

Instructions
Preheat oven to 400.
Core and slice apples and place into a large bowl. You may also peel if you prefer that.
Add in brown sugar, flour, vanilla extract, lemon juice, caramel sauce, salt and spices. Mix to combine.
Roll out pie crust and place first half into your pie dish.
Pour apple mixture into prepared pie pan.
Top apple mixture with the second half of the rolled out dough.
In a small bowl combine egg and 1 tbsp water. Brush the egg wash mixture on top of the pie crust. This helps to give a nice golden brown color to your pie.
Bake for 45-50 minutes. If your crust starts to get too brown cover with tin foil to stop the browning process.
Allow to cool before slicing as this allows all the extra juices to thicken. But to be honest we never can resist cutting into a warm apple pie.

#applepie #caramelapple


Footer

On the Blog

  • Blog
  • Recipes

Info

  • About
  • Disclosure, Privacy Policy, and Terms

Copyright © 2026 · Theme by 17th Avenue

%d

    Rate This Recipe

    Your vote:


    A rating is required
    A name is required
    An email is required
    We use cookies to ensure that we give you the best experience on our website. If you continue to use this site we will assume that you are happy with it.