• About
  • Nav Social Icons

  • Skip to primary navigation
  • Skip to main content
  • Skip to primary sidebar
  • Skip to footer
  • Home
  • About
  • Blog
    • Mom Life
    • Farm Life
    • Recipes
      • Breakfast
      • Dessert
      • Dinner
      • Sides
      • Snacks
  • Shop
    • Shop – Digital Books
  • Cart
  • My account
  • Mobile Menu Widgets

    Connect

    Search

The Farmstyle

The Farmstyle

by Kayla Zenner

  • Home
  • About
  • Shop
    • Shop – Meal Plans
    • Shop My Favorites
  • Blog
    • Breakfast
    • Dessert
    • Dinner
    • Snacks
    • Sides
    • All Recipes
  • Cart

The Best Sourdough Bagels

February 18, 2024 · In: Breads, Breakfast, Recipes

FacebookTweetPin
Jump to Recipe Print Recipe

The best sourdough bagels are soft, chewy, and so easy to make! Let them rise overnight for the perfect morning breakfast.

The Best Sourdough Bagels

There’s something magical about a well-made sourdough bagel. With their signature chew and tangy flavor, sourdough bagels are a breakfast staple in our house. Whether you enjoy them plain, toasted with cream cheese, or as the base for a loaded sandwich, a great sourdough bagel is a game-changer. Let’s dive into what makes them the best and how to make the ultimate sourdough bagels.

Why Sourdough?

Sourdough is different because it uses a natural fermentation process rather than commercial yeast. This process gives them a distinct tangy flavor and improves their texture. Additionally, sourdough fermentation breaks down gluten, making the bagels easier to digest while also enhancing their nutritional profile.

The Best Sourdough Bagels with cream cheese

What Makes the Best Sourdough Bagel?

Not all sourdough bagels are created equal. Here’s what to look for in a top-tier bagel:

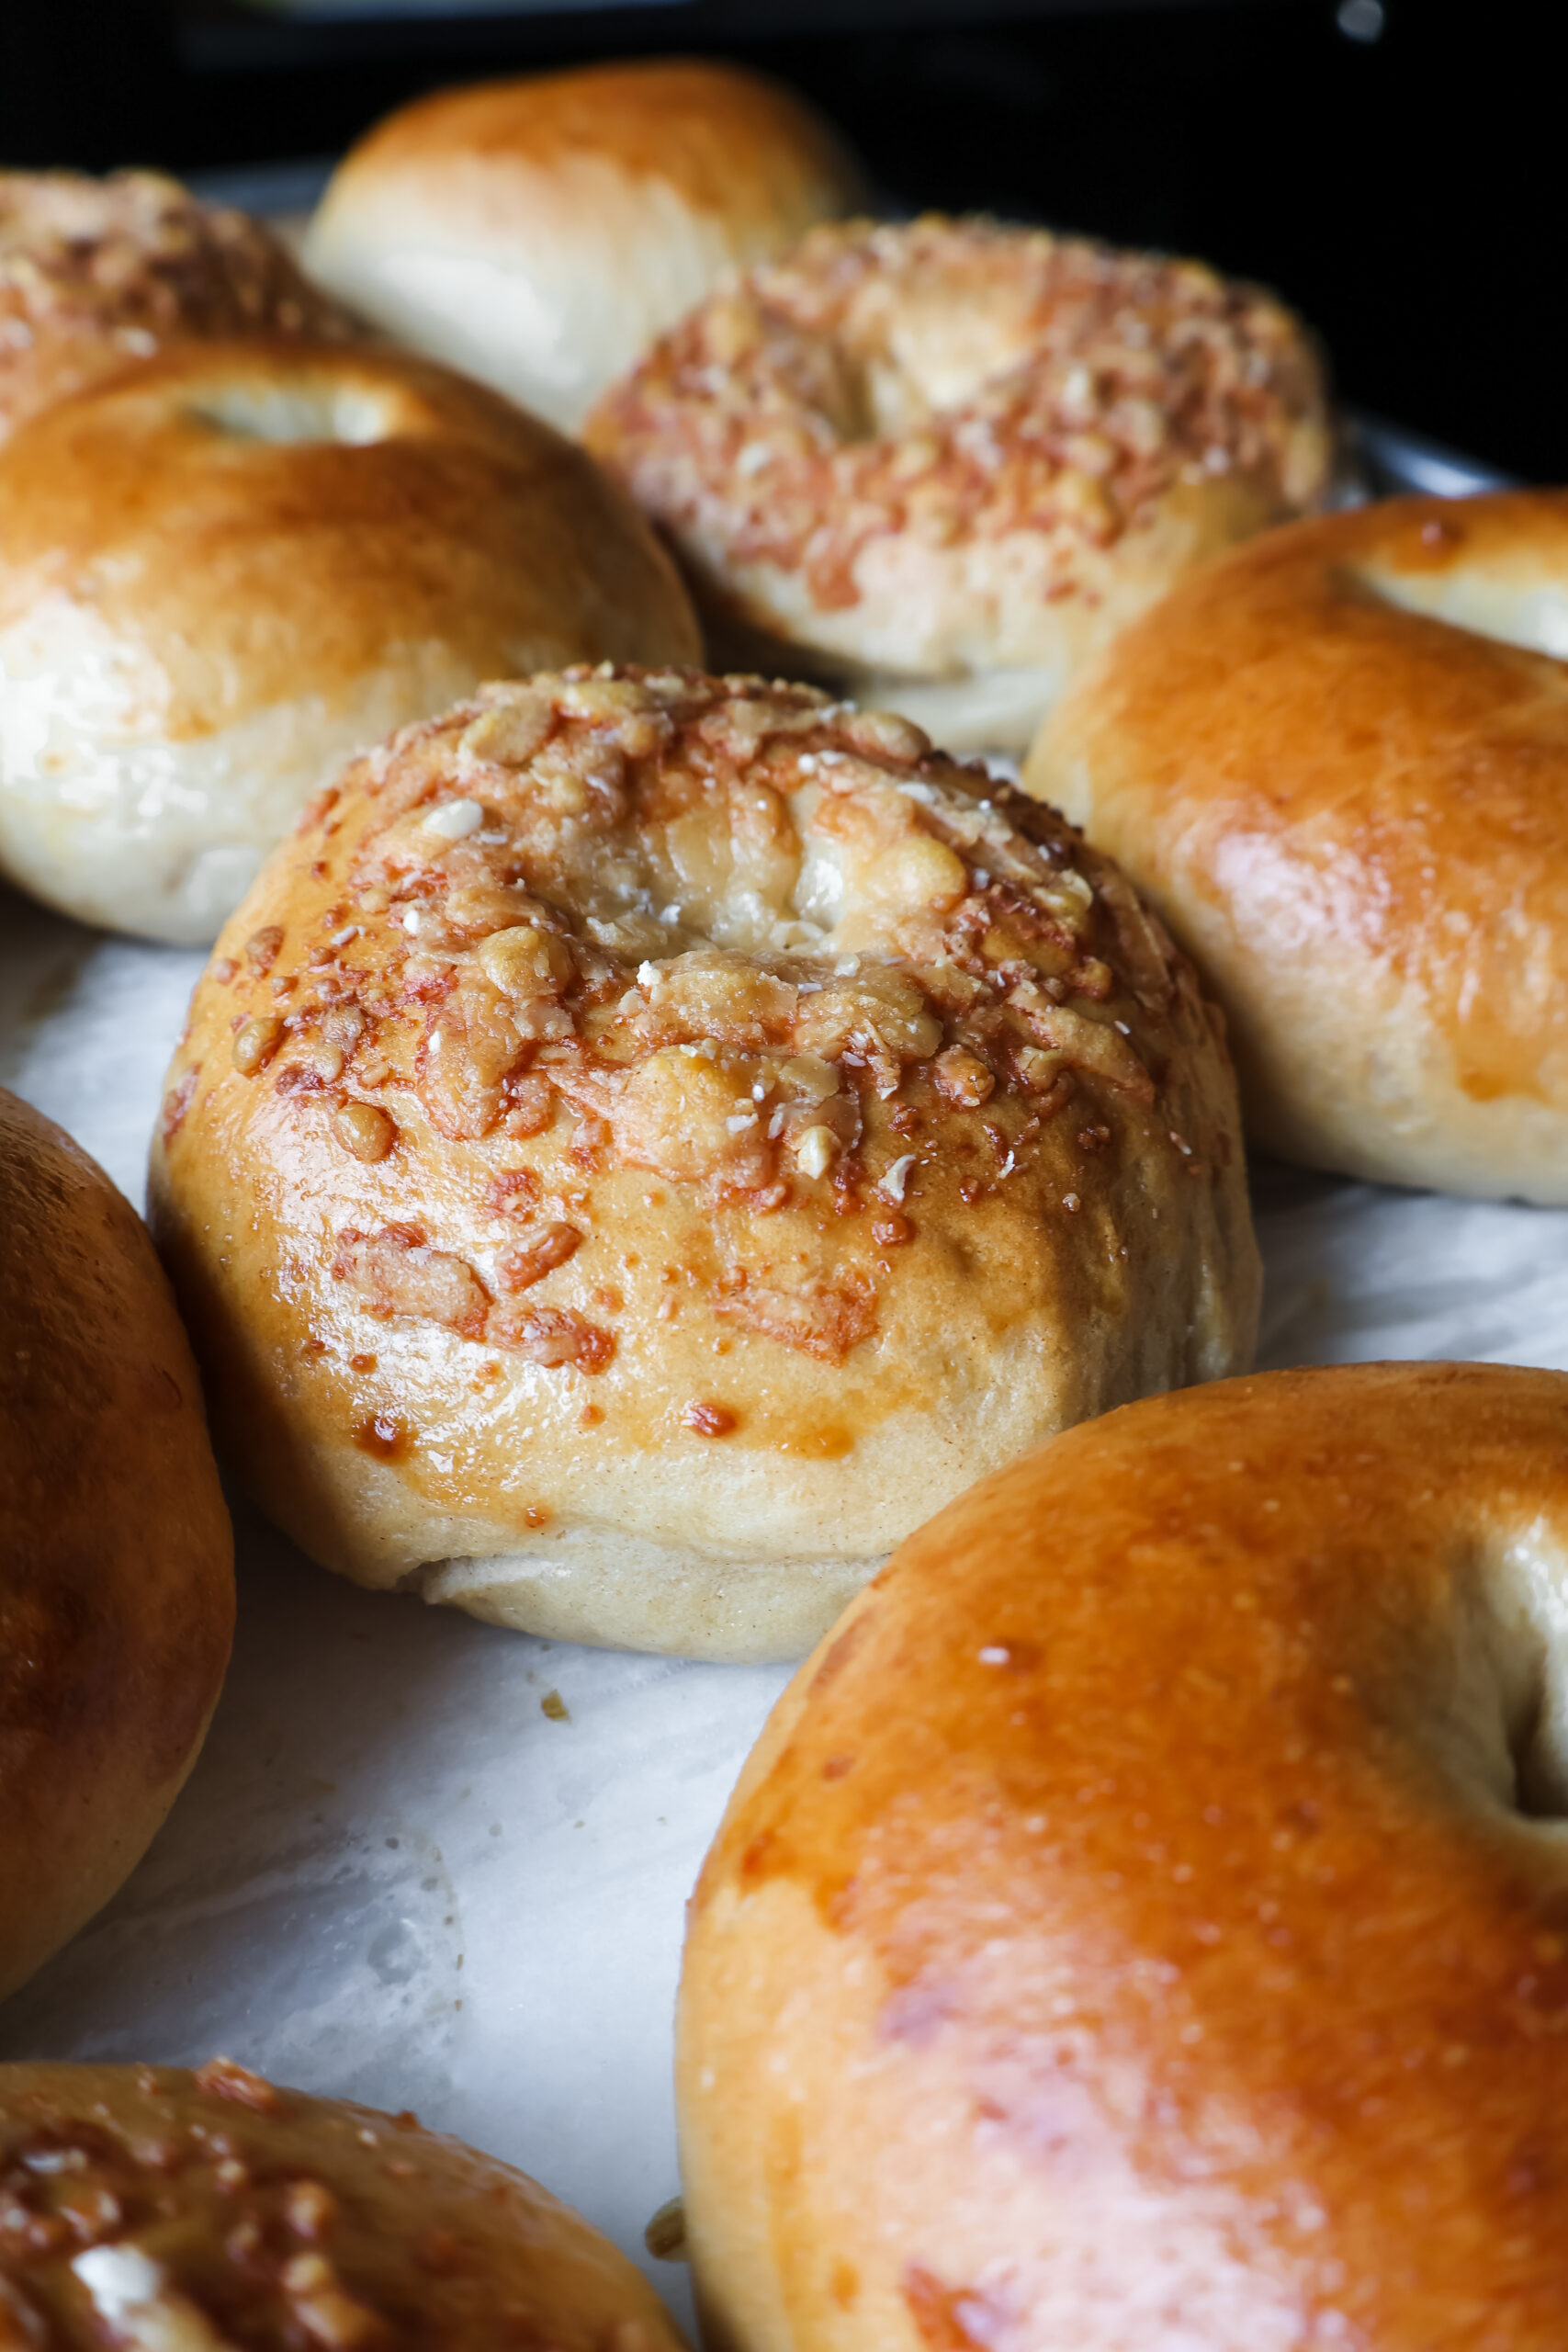
  • Chewy Texture: The hallmark of a perfect bagel is a dense yet airy interior with a chewy bite. A proper sourdough fermentation helps develop this texture.
  • Crispy, Golden Crust: A great bagel should have a slight crisp on the outside, achieved through boiling before baking.
  • Deep Flavor: Thanks to the slow fermentation, sourdough bagels have a complex, slightly tangy taste that enhances their natural sweetness.
  • Quality Ingredients: The best bagels start with simple, high-quality ingredients: flour, water, salt, and an active sourdough starter.
The Best Sourdough Bagels

Ingredients

  • Sourdough Starter – we use active starter in this recipe for the perfect results
  • Bread Flour – you can also use unbleached all purpose flour, but I love the extra chew that bread flour gives.
  • Water – room temperature, filtered water (or whatever you use for drinking water)
  • Salt – for flavor and structure of the dough
  • Honey – for a slight sweetness to the bagel.
  • Brown Sugar – for poaching the bagels.
The Best Sourdough Bagels

How to Make Your Own Sourdough Bagels

  • Combine warm water, honey, and sourdough starter. Mix to combine.
  • Add in the dry ingredients. Knead the dough until the dough starts to come together and form a smooth ball. This is a dryer dough, so it may take a little bit to combine all of the flour. I like to use my stand mixer to really work the dough for me.
  • Cover and let rise for 8-10 hours at room temperature (around 70 degrees).
  • Line a baking sheet with parchment paper.
  • Divide the dough into 6-8 equal pieces. Shape each portion into a round ball with your hands. Take your thumb and make a hole in the center of each ball and gently spread the hole out to form a bagel shape. Place on your prepared baking sheets. Cover the pans with cling wrap or a dish towel and place in a warm place to rise for an hour.
  • Preheat the oven to 425 and bring a pot of water to a boil.
  • Add brown sugar to boiling water. Use a spatula to gently drop the bagels into the boiling water one at a time.
  • Boil for about 1 minute before flipping over to the other side and boiling for another minute.
  • After they have boiled, place them on the prepared baking sheet.
  • If desired, you can place toppings on the top of your bagels. Simply sprinkle your desired seasonings over the top of the bagels and gently press on them so that they stick to the wet bagel. I love everything bagel seasoning, cheese, or cinnamon sugar!
  • Bake the bagels for 15 to 20 minutes, rotating the pans halfway through.
  • Allow the bagels to cool before slicing and serving with your desired spreads!
The Best Sourdough Bagels

Final Thoughts

Sourdough bagels are a treat worth seeking out or making at home. Their complex flavors, chewy texture, and crispy crust make them a perfect breakfast or snack option. Whether you’re visiting an artisan bakery or trying your hand at baking, the reward of a great sourdough bagel is well worth the effort. Happy bagel hunting—or baking!


Share Your Experience

I would love to hear about your experience making and enjoying my Sourdough Bagels! Feel free to tag me on Instagram or leave a review below. Your feedback helps me improve our recipes and provides inspiration to fellow home cooks.


Save this recipe for later by simply using the pin button on the recipe card or any of the photos above. Happy cooking! 

The Best Sourdough Bagels

No ratings yet
The best sourdough bagels are soft, chewy, and so easy to make! Let them rise overnight for the perfect morning breakfast.
Print Recipe Pin Recipe
Prep Time:30 minutes mins
Cook Time:20 minutes mins
Ferment Time:8 hours hrs
Course: Side Dish
Keyword: bread, breakfast
Servings: 6 bagels
Calories: 346kcal

Ingredients

  • 1/2 cup active sourdough starter
  • 1 cup water warmed
  • 4 cups bread flour
  • 1 1/2 tsp salt
  • 1 tbsp honey
  • 2 tbsp brown sugar or honey
US Customary – Metric

Instructions

  • Combine warm water, honey, and sourdough starter. Mix to combine.
  • Add in the dry ingredients. Knead the dough until the dough starts to come together and form a smooth ball.
  • Cover and let rise for 8-10 hours at room temperature (around 70 degrees).
  • Line a baking sheet with parchment paper.
  • Divide the dough into 6-8 equal pieces. Shape each portion into a round ball with your hands. Take your thyme and make a hole in the center of each ball and gently spread the hole out to form a bagel shape. Place on your prepared baking sheets. Cover the pans with cling wrap or a dish towel and place in a warm place to rise for an hour.
  • Preheat the oven to 425 and bring a pot of water to a boil.
  • Add brown sugar or honey to boiling water. Use a spatula to gently drop the bagels into the boiling water one at a time.
  • Boil for about 1 minute before flipping over to the other side and boiling for another minute.
  • After they have boiled, place them on the prepared baking sheet.
  • If desired, you can place toppings on the top of your bagels. Simply sprinkle your desired seasonings over the top of the bagels and gently press on them so that they stick to the wet bagel. I love everything bagel seasoning, cheese, or cinnamon sugar!
  • Bake the bagels for 15 to 20 minutes, rotating the pans halfway through.
  • Allow the bagels to cool before slicing and serving with your desired spreads!

Nutrition

Calories: 346kcal | Carbohydrates: 71g | Protein: 11g | Fat: 1g | Saturated Fat: 0.2g | Polyunsaturated Fat: 1g | Monounsaturated Fat: 0.1g | Sodium: 587mg | Potassium: 91mg | Fiber: 2g | Sugar: 7g | Vitamin A: 2IU | Vitamin C: 0.02mg | Calcium: 18mg | Iron: 1mg

Share this:

  • Click to share on X (Opens in new window) X
  • Click to share on Facebook (Opens in new window) Facebook
  • Click to share on Pinterest (Opens in new window) Pinterest

Like this:

Like Loading...
FacebookTweetPin

By: Kayla · In: Breads, Breakfast, Recipes

About Kayla

Hi! I'm Kayla. I'm here to help inspire busy moms to get back in the kitchen and feel beautiful along the way! I'm married to my high school sweetheart and live on a farm with our two busy boys.

you’ll also love

Super Simple Orange Chicken
Pumpkin Cinnamon Roll Cake
Honey Glazed Rainbow Carrots

Reader Interactions

Trackbacks

  1. Sourdough Bagels – The Farmstyle | My Meals are on Wheels says:
    February 19, 2024 at 5:17 am

    […] February 19, 2024 at 8:17 AM | Posted in Uncategorized | Leave a comment https://kaylazenner.com/sourdough-bagels […]

    Loading...
    Reply

Leave a ReplyCancel reply

Next Post >

Homemade Hamburger Buns

Primary Sidebar

Meet Kayla

Meet Kayla
hello!

LIVING OURFARM(LIFE)STYLE WHERE WE ​JUGGLE THE CHAOS OF MOTHERHOOD ONE ​KITCHEN ADVENTURE AT A TIME!

Read More

Connect

join the list

Categories

  • Blog
  • Recipes

Follow Along

@thefarmstyle


Let’s get those goals!


Homemade maple marshmallows are super simple, deli
Homemade maple marshmallows are super simple, delicious, and made better for you with swapping regular sugar for maple syrup. 

Comment MARSHMALLOW for all the details sent to your inbox. 

INGREDIENTS
1 cup cold water
3 tbsp powdered gelatin
1 1/4 cup maple syrup
1/4 tsp salt
1 tsp vanilla extract or seeds from 1 vanilla bean
powdered sugar for dusting

INSTRUCTIONS
You will want to have everything prepped and ready to go ahead of time. Once the marshmallows are ready to pour you need to work fast as everything starts to set up quick. Make sure to have whisk attachment ready for your stand mixer or hand mixer as well.
Line an 8”x8” pan with parchment paper ensuring the paper goes up all sides of the pan. Dust with powdered sugar.
In a large bowl (I use my stand mixer) add 1/2 cup of cold water with gelatin. Mix to combine and let sit to bloom.
In a medium saucepan add 1/2 cup cold water, maple syrup and salt. Mix to combine then place over medium heat until the mixture comes to a boil. DO NOT STIR after this point as that will encourage crystallization.
Allow mixture to boil until it reaches 240F-245F, this takes 15-20 minutes so be patient. Keep an eye on the mixture during this time as it can quickly boil over and cause a mess.
Quickly pout the mixture in the same bowl as the gelatin and begin to whisk.
Once everything starts to come together add in your vanilla extract or vanilla beans.
Continue whisking until mixture has tripled in size, the bowl is cool to the touch, and when the whisk is removed the drizzle holds its shape in the bowl.
Quickly pour mixture into prepared pan. You have about 30 seconds before everything sets up too much.
Allow marshmallows to set up completely (about 4 hours).
Remove marshmallows from the pan and sprinkle with additional powdered sugar. This helps your knife from sticking too much when cutting.
Cut marshmallows into desired size with a sharp knife. Dipping each marshmallow in additional powdered sugar to prevent them all from sticking to each other.
Store in an air tight container for up to 2 weeks.


The easiest homemade english muffins.  

Comment M
The easiest homemade english muffins.  

Comment MUFFIN for all the details sent to your inbox. 

INGREDIENTS
3 cups all purpose flour
1 - 1 1/2 cups water warm
2 1/4 tsp yeast
1 tsp salt
2 tbsp sugar
cornmeal

INSTRUCTIONS
In a bowl combine warm water, yeast and sugar. Mix and allow to sit for about 5 minutes. The mixture should start to become foamy. This is how you know your yeast is activated!

Add in flour and salt. Mix until combined adding in an additional 1/2 cup water as needed to get the dough to come together. Cover and let rise for an hour or until mixture has doubled in size.

Pour some cornmeal onto a baking sheet. Set aside.

Once dough has risen pour onto a floured surface. They dough will be sticky. Gently press into a circle and divide into 8-12 segments.

Gently form each of the segments into a ball and place onto the prepared baking sheet (This helps prevent them from sticking). Repeat with each segment. Cover balls and allow to rise for an additional 25-30 minutes.

Preheat oven to 350.

Heat a skillet(or large griddle) to medium heat. Place balls into the skillet and cook for about 5 minutes per side, then place onto a clean baking sheet. Repeat with remaining balls.

Bake in oven for 10-15 minutes and enjoy!

NOTES
While baking the English muffins ins’t always necessary, I find it difficult to cook them entirely on the stove top without burning the exterior. Finishing them off in the oven has helped a ton!


Bring cozy fall flavors home with this Pecan Pie L
Bring cozy fall flavors home with this Pecan Pie Latte topped with maple cold foam. 

Comment COFFEE for all the details sent to your inbox. 

INGREDIENTS
PECAN PIE SYRUP
1 cup pecans
1 cup brown sugar
1 cup water
1 tsp cinnamon
1 tsp vanilla extract
2 tbsp salted butter

PECAN PIE LATTE
2 shots espresso
1-2 tbsp pecan pie syrup
8 oz milk

MAPLE COLD FOAM
3 tbsp heavy cream
2 tbsp milk
1 tbsp maple syrup
INSTRUCTIONS

MAKE THE PECAN PIE SYRUP
Preheat oven to 350 F.
Add pecans to a sheet pan and roast for 5-10 minutes. Watching to ensure they don’t burn.
In a sauce pan combine the roasted pecans, brown sugar, and cinnamon. Bring mixture to a boil and allow to simmer for 10-15 minutes.
Add in butter and vanilla extract, stirring to combine.
Use a fine mesh strainer to separate the pecans from the syrup and pour into an air tight container and store int the refrigerator for 2-3 weeks.
MAKE THE LATTE
In a small cup combine all the ingredients for the maple cold foam. Whisk together with a frother until mixture has thickened. Set Aside.
FOR ICED LATTE: In a large cup add ice, then pecan pie syrup, milk, and then espresso. Top with maple cold foam and enjoy!
FOR HOT LATTE: Steam milk to desired temperature. Then add pecan pie syrup and espresso to the steamed milk. Top with maple cold foam and enjoy!

Made with homemade pecan pie syrup, espresso, and creamy maple foam, this latte tastes like a slice of pecan pie, perfect hot or iced.


This BBQ Hawaiian Chicken on the Blackstone Griddl
This BBQ Hawaiian Chicken on the Blackstone Griddle is a quick and easy favorite. Juicy chicken, caramelized pineapple, and veggies tossed in sweet barbecue sauce make a meal everyone will love.

Comment RECIPE for all the details sent to your inbox. 

INGREDIENTS

1.5 lb chicken breasts cut into 1” pieces
2 bell peppers cut into 1” pieces
1 red onion cut into 1” pieces
15 oz can pineapple chunks
1/2 cup bbq sauce
salt+ pepper
INSTRUCTIONS

Preheat griddle to medium heat.
Season chicken with salt and pepper and place onto half of the griddle. Cook until no longer pink.
Add peppers, onions, and pineapple to the other half of the griddle. Cook until softened.
Pour barbecue sauce over chicken and mix to combine. Remove everything from the griddle.
Enjoy with rice or on a tortilla.

#griddlecrew #griddlenation #blackstonegriddle #thefarmstyle


ad | We don’t always get the time to go out for da
ad | We don’t always get the time to go out for date night, so lately we’ve been bringing date night home, and honestly, I think I might love it even more this way.

A grilled ribeye, crispy Japanese sweet potato fries, and a bottle of @cakebreadcellars Cabernet Sauvignon. Simple, cozy, and a little something to look forward to at the end of a long week. 

Cakebread Cellars has been crafting wines in Napa Valley for over 50 years, and you can taste that care in every sip. Their Cabernet Sauvignon is bold but beautifully balanced, the kind of wine that pairs perfectly with grilled steak and good conversation.

It’s those small rituals, setting the table, lighting a candle, pouring a glass of wine, that make home feel like the best place to be. 

Comment DINNER for all the recipe details, and don’t forget to pour a glass of Cakebread Cabernet Sauvignon alongside.


Footer

On the Blog

  • Blog
  • Recipes

Info

  • About
  • Disclosure, Privacy Policy, and Terms

Copyright © 2025 · Theme by 17th Avenue

%d

    Rate This Recipe

    Your vote:


    A rating is required
    A name is required
    An email is required
    We use cookies to ensure that we give you the best experience on our website. If you continue to use this site we will assume that you are happy with it.