• About
  • Nav Social Icons

  • Skip to primary navigation
  • Skip to main content
  • Skip to primary sidebar
  • Skip to footer
  • Home
  • About
  • Blog
    • Mom Life
    • Farm Life
    • Recipes
      • Breakfast
      • Dessert
      • Dinner
      • Sides
      • Snacks
  • Shop
    • Shop – Digital Books
  • Cart
  • My account
  • Mobile Menu Widgets

    Connect

    Search

The Farmstyle

The Farmstyle

by Kayla Zenner

  • Home
  • About
  • Shop
    • Shop – Meal Plans
    • Shop My Favorites
  • Blog
    • Breakfast
    • Dessert
    • Dinner
    • Snacks
    • Sides
    • All Recipes
  • Cart

Homemade Hamburger Buns

February 12, 2024 · In: Breads, Recipes, Sides

FacebookTweetPin
Jump to Recipe Print Recipe

These homemade hamburger buns make store bought buns a thing of the past! They are super soft and fluffy and are perfect for your burgers at home.

Homemade Hamburger Buns

5 from 2 votes
Print Recipe
Prep Time:2 hours hrs
Cook Time:30 minutes mins
Course: Side Dish
Keyword: bread
Servings: 8 buns

Ingredients

  • 2 1/4 tsp yeast
  • 2 tbsp honey or sugar
  • 1/4 cup water warmed
  • 1 1/2 tsp salt
  • 3 tbsp butter
  • 1 egg
  • 3 cups flour
  • 1 cups milk

Instructions

  • Combine 1/4 cup warmed water with yeast and honey or sugar. Set aside until foamy.
  • In a large bowl combine remaining ingredients, except milk.
  • Add in yeast mixture and 1/2 cups milk. Mix together, adding in remaining milk a tablespoon at a time as needed. You want the the mixture to just pull away from the bowl.
  • Knead mixture for 7-10 minutes.
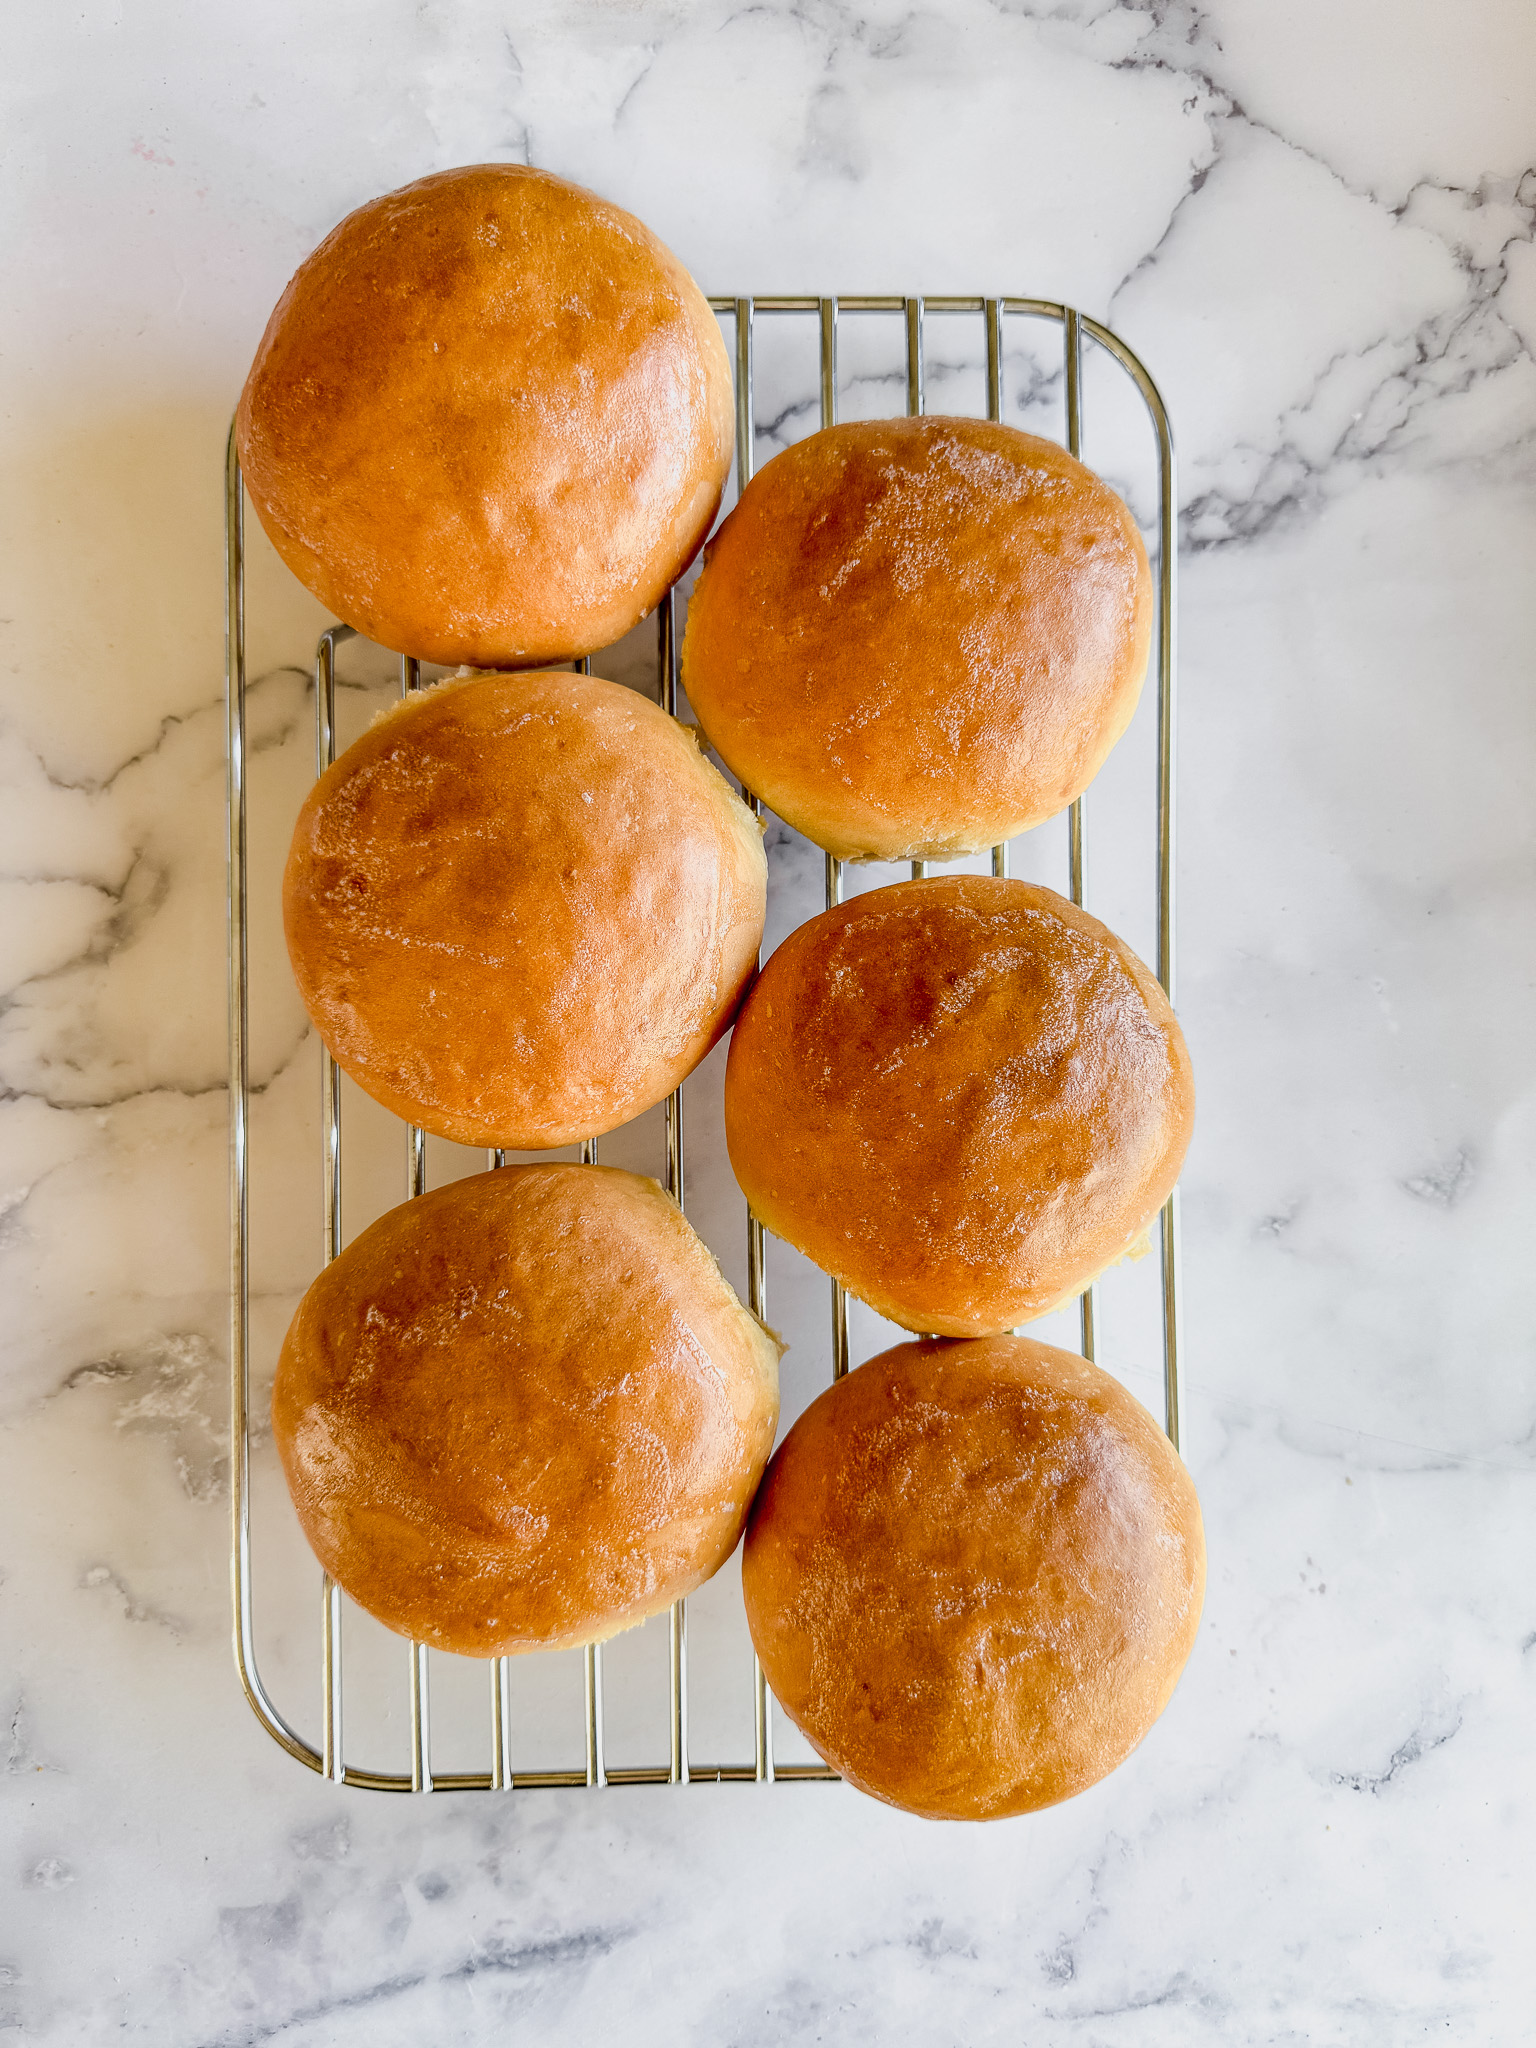
  • Divide dough into 8 sections and gently roll each section into a ball. Place on a parchment lined baking sheet and cover with a cloth and allow to rise for 30-40 minutes or doubled in size.
  • Bake at 350 for 20-25 minutes. Top with a little more butter if desired.

Notes

TIP: for a super soft crust cover with a tea bowl when removed from the oven for 10 minutes. 

Share this:

  • Click to share on X (Opens in new window) X
  • Click to share on Facebook (Opens in new window) Facebook
  • Click to share on Pinterest (Opens in new window) Pinterest

Like this:

Like Loading...
FacebookTweetPin

By: Kayla · In: Breads, Recipes, Sides

About Kayla

Hi! I'm Kayla. I'm here to help inspire busy moms to get back in the kitchen and feel beautiful along the way! I'm married to my high school sweetheart and live on a farm with our two busy boys.

you’ll also love

Zucchini Cobbler | The Surprise Apple Dessert
Cowboy Pasta
Cranberry Sticky Buns

Reader Interactions

Comments

  1. Kali B says

    April 19, 2024 at 6:46 pm

    5 stars
    Best recipe I have found yet!! Clean ingredients and easy to make!

    Loading...
    Reply
  2. Lisa says

    December 7, 2024 at 4:08 pm

    I have zero clue what I did wrong. Everything looked exactly how your video does, up until the balls rising. My yeast frothed. My kneading was fine. No clue how I messed them up.

    Loading...
    Reply
    • Kayla says

      December 7, 2024 at 5:46 pm

      5 stars
      If it was cold in your house it can take longer to rise. Try to find a warm spot for them to rise.

      Loading...
      Reply
  3. Susan Misener says

    April 9, 2025 at 7:31 am

    Can you freeze them before baking the hamburger buns

    Loading...
    Reply
    • Kayla says

      April 10, 2025 at 12:38 pm

      I have not tested, but I’m sure you could freeze after shaping and allow to rise at room tempurature when ready.

      Loading...
      Reply
  4. Marylou says

    May 18, 2025 at 9:48 am

    Hello! Is the butter supposed to be melted? The printable version of the recipe is different than what’s above.

    Loading...
    Reply
    • Kayla says

      May 19, 2025 at 9:45 am

      Hi! I have used both metled butter and regular softened butter. I find that if I am using my stand mixer then adding in just softened butter is easier to do, but if I am mixing everything up by hand I use melted butter because it is easier to mix in. I hope that helps!

      Loading...
      Reply
  5. Grace says

    July 12, 2025 at 1:00 pm

    Does quick rise yeast work the same in this recipe?

    Loading...
    Reply
    • Kayla says

      July 15, 2025 at 10:32 am

      Quick rise yeast works, but typically instant yeast does not need to proof prior to using. So you can add the yeast in with the flour instead of mixing with water and sugar.

      Loading...
      Reply

Trackbacks

  1. Chicken Caesar Burger - The Farmstyle says:
    June 24, 2024 at 7:39 am

    […] Buns – my homemade hamburger buns are perfect for […]

    Loading...
    Reply
  2. Creamy Garlic Burger - The Farmstyle says:
    June 28, 2024 at 6:12 am

    […] Buns – my homemade burger buns really take this over the top, or buy your favorite at the […]

    Loading...
    Reply

Leave a ReplyCancel reply

Next Post >

Homemade Croutons

Primary Sidebar

Meet Kayla

Meet Kayla
hello!

LIVING OURFARM(LIFE)STYLE WHERE WE ​JUGGLE THE CHAOS OF MOTHERHOOD ONE ​KITCHEN ADVENTURE AT A TIME!

Read More

Connect

join the list

Categories

  • Blog
  • Recipes

Follow Along

@thefarmstyle


Help me get to my big goal before 2026.


Comment RECIPE for all the details sent to your in
Comment RECIPE for all the details sent to your inbox. 

These Individual Chicken Pot Pies are the ultimate cozy comfort food with a flaky homemade pie crust, creamy chicken filling, and perfectly portioned for easy serving.

Ingredients
Chicken Pot Pie Filling
3 cups rotisserie chicken shredded
1 onion diced
1/2 cup carrots diced
4 tbsp butter
1/4 cup flour
1/4 cup heavy cream
2 cups chicken broth
1 tsp onion powder
1 tsp garlic powder
1/2 tsp rosemary
Pie Crust
2 cups butter cold
4 cups all purpose flour
2 tsp salt
1/4 cup ice cold water

Instructions
Preheat oven to 425 F.

Make the Pie Crust
In a large bowl add cubed butter, salt and flour. Using a pastry cutter or two knives cut together the flour and butte until it resembles crumbly flour.
Slowly add in the ice cold water until the dough starts to come together. Once the dough starts to come together pour onto a counter and use your hands to combine the dough.
Split the dough in 12 section and place onto a floured surface and roll out half the pie crusts to fit your pie pan. If the dough starts to stick to the rolling pin, sprinkle a little flour on top.
Transfer the rolled-out crust to your pie pan, pressing it gently to fit the bottom and sides.

Make the Pot Pie Filling
Melt butter in a cast iron pan and add in onion and carrot. Cook over medium heat until soft. 
Add in flour. Cook for 1-2 minutes.
Add in chicken stock, seasonings, chicken, and heavy cream. Simmer for 5 minutes to thicken sauce. 
Top with biscuits and bake according to biscuit instructions.

Assemble the Pot Pies
Add about 1 cup of filling to each of the prepared pie pans.
Roll out remaining pie crust and place on top of filled pie pans.
Crimp the edges and bake pies for 25-30 minutes, or until crust is golden brown.

Make Ahead Option
After assembling the pit pies, place onto a sheet pan and freeze for 1-2 hours. Wrap each in plastic wrap and freeze for later. 
Bake from frozen at 400F for 45-55 minutes. Covering with foil if the tops brown too fast.


Comment BREAKFAST for all the recipe details.

Th
Comment BREAKFAST for all the recipe details. 

These viral sausage gravy bombs are perfect for Christmas morning! Combining the classic biscuit and gravy into a portable breakfast creation, they are a family favorite!

Ingredients
1 lb ground sausage
1/3 cup flour
2 cups milk
1 Tbsp Roasted Chicken Better than Bouillon
pepper to taste
1 pkg refrigerator biscuits

Instructions
In a large skillet cook the sausage.
Add in flour, stir to coat the sausage and cook for about 2 minutes. Add in milk boulion and pepper. Simmer until thickened.
Roll the biscuits into a small circle, then fill with about 1/4 cup gravy. Pinch up to middle to seal and place seam side down on a baking sheet. Repeat with remaining biscuits.
NOTE: if making these ahead of time you can place these in the refrigerator overnight. Then bake the next morning. 
Bake according to biscuit package.

TIP: I like to double this recipe and freeze the remaining. Pull out what I want the night before to thaw in the fridge, then place in oven on broil for a few minutes to crisp the biscuit up. BECAREFUL not to forget them in the oven and watch carefully.

#christmasbreak #makeaheadbreakfast #biscuitsandgravy


Nothing beats a room full of flour-dusted hands an
Nothing beats a room full of flour-dusted hands and people excited to learn.

Our pie and sugar cookie class with Wendy @thepeacefulhomestead gave 12 students the confidence (and the recipes) to bake treats everyone will be raving about.

These classes are always so much fun and I look forward to it every year.


(ad) A little peek into my everyday life:

School
(ad) A little peek into my everyday life:

School drop-off → recipe testing → editing → errands → cow chores and somewhere in between, I grab a @drinkolipop to keep things moving.

It’s not coffee. It’s not water. It’s just that happy moment in the middle of my day that feels like a treat and supports my wellness goals.

Today’s pick: Ginger Ale

Tomorrow? Who knows — the OLIPOP drawer stays stocked. 😉

Which flavor should I try next?

#OLIPOPpartner #DITL


So excited to get started with my new @breville Ba
So excited to get started with my new @breville Barista Touch! 

Not a perfect shot because I forgot to set the grind size to the correct spot, but stay tuned for tomorrow! 

#breville #espresso


Footer

On the Blog

  • Blog
  • Recipes

Info

  • About
  • Disclosure, Privacy Policy, and Terms

Copyright © 2025 · Theme by 17th Avenue

%d

    Rate This Recipe

    Your vote:


    A rating is required
    A name is required
    An email is required
    We use cookies to ensure that we give you the best experience on our website. If you continue to use this site we will assume that you are happy with it.