• About
  • Nav Social Icons

  • Skip to primary navigation
  • Skip to main content
  • Skip to primary sidebar
  • Skip to footer
  • Home
  • About
  • Blog
    • Mom Life
    • Farm Life
    • Recipes
      • Breakfast
      • Dessert
      • Dinner
      • Sides
      • Snacks
  • Shop
    • Shop – Digital Books
  • Cart
  • My account
  • Mobile Menu Widgets

    Connect

    Search

The Farmstyle

The Farmstyle

by Kayla Zenner

  • Home
  • About
  • Shop
    • Shop – Meal Plans
    • Shop My Favorites
  • Blog
    • Breakfast
    • Dessert
    • Dinner
    • Snacks
    • Sides
    • All Recipes
  • Cart

Zucchini Cobbler | The Surprise Apple Dessert

July 28, 2023 · In: Dessert, Recipes

FacebookTweetPin
Jump to Recipe Print Recipe

Zucchini cobbler tastes so much like apple cobbler. No one will ever know that you swapped out the fruit for a vegetable in tonight’s dessert. 

mock apple pie with zucchini

This zucchini cobbler recipe came as a saving grace one summer from my husband’s aunt. I was swimming in zucchini from my garden (much like I am again this year) and tried to pawn some off on her. She politely declined, but gave me the best recipe to use up A LOT of zucchini in one delicious dessert.

When I first heard the words zucchini cobbler I was very hesitant. I mean what kind of dessert is made with vegetables? But I trusted her when she said it tastes exactly like apple cobbler, and guess what?! This zucchini in dessert form tastes exactly like apple cobbler. Can we say mock apple cobbler to entice the naysayers some more?

mock apple pie with zucchini

How to make mock apple cobbler

Step 1: Make the Zucchini Cobbler Filling

This step is the most important part of making our mock apple cobbler. To make the zucchini pass as apples, first make sure you peel the skin off (so the dark green doesn’t tip anyone off) and then remove any seeds. Then we will cook up the zucchini with lemon juice to give it a little tang and help it taste more like apples. Finishing it off with brown sugar, cinnamon, and nutmeg makes this just like an apple pie filling.

Zucchini can be a bit watery at times, so I like to add in a little bit of flour to zucchini apple pie filling to help thicken it up. If your zucchini mixture isn’t very watery after mixing in the brown sugar mixture then you may not need to add the flour.

Step 2: Make the Cobbler Dough

I find that a lot of cobbler recipes call for an almost biscuit type topper. It can lean towards the dry side and not really my favorite. My cobbler recipe is more on the cake side. It is light, fluffy, and all around delicious! Sprinkled with a little extra brown sugar, I’m drooling just thinking about it.

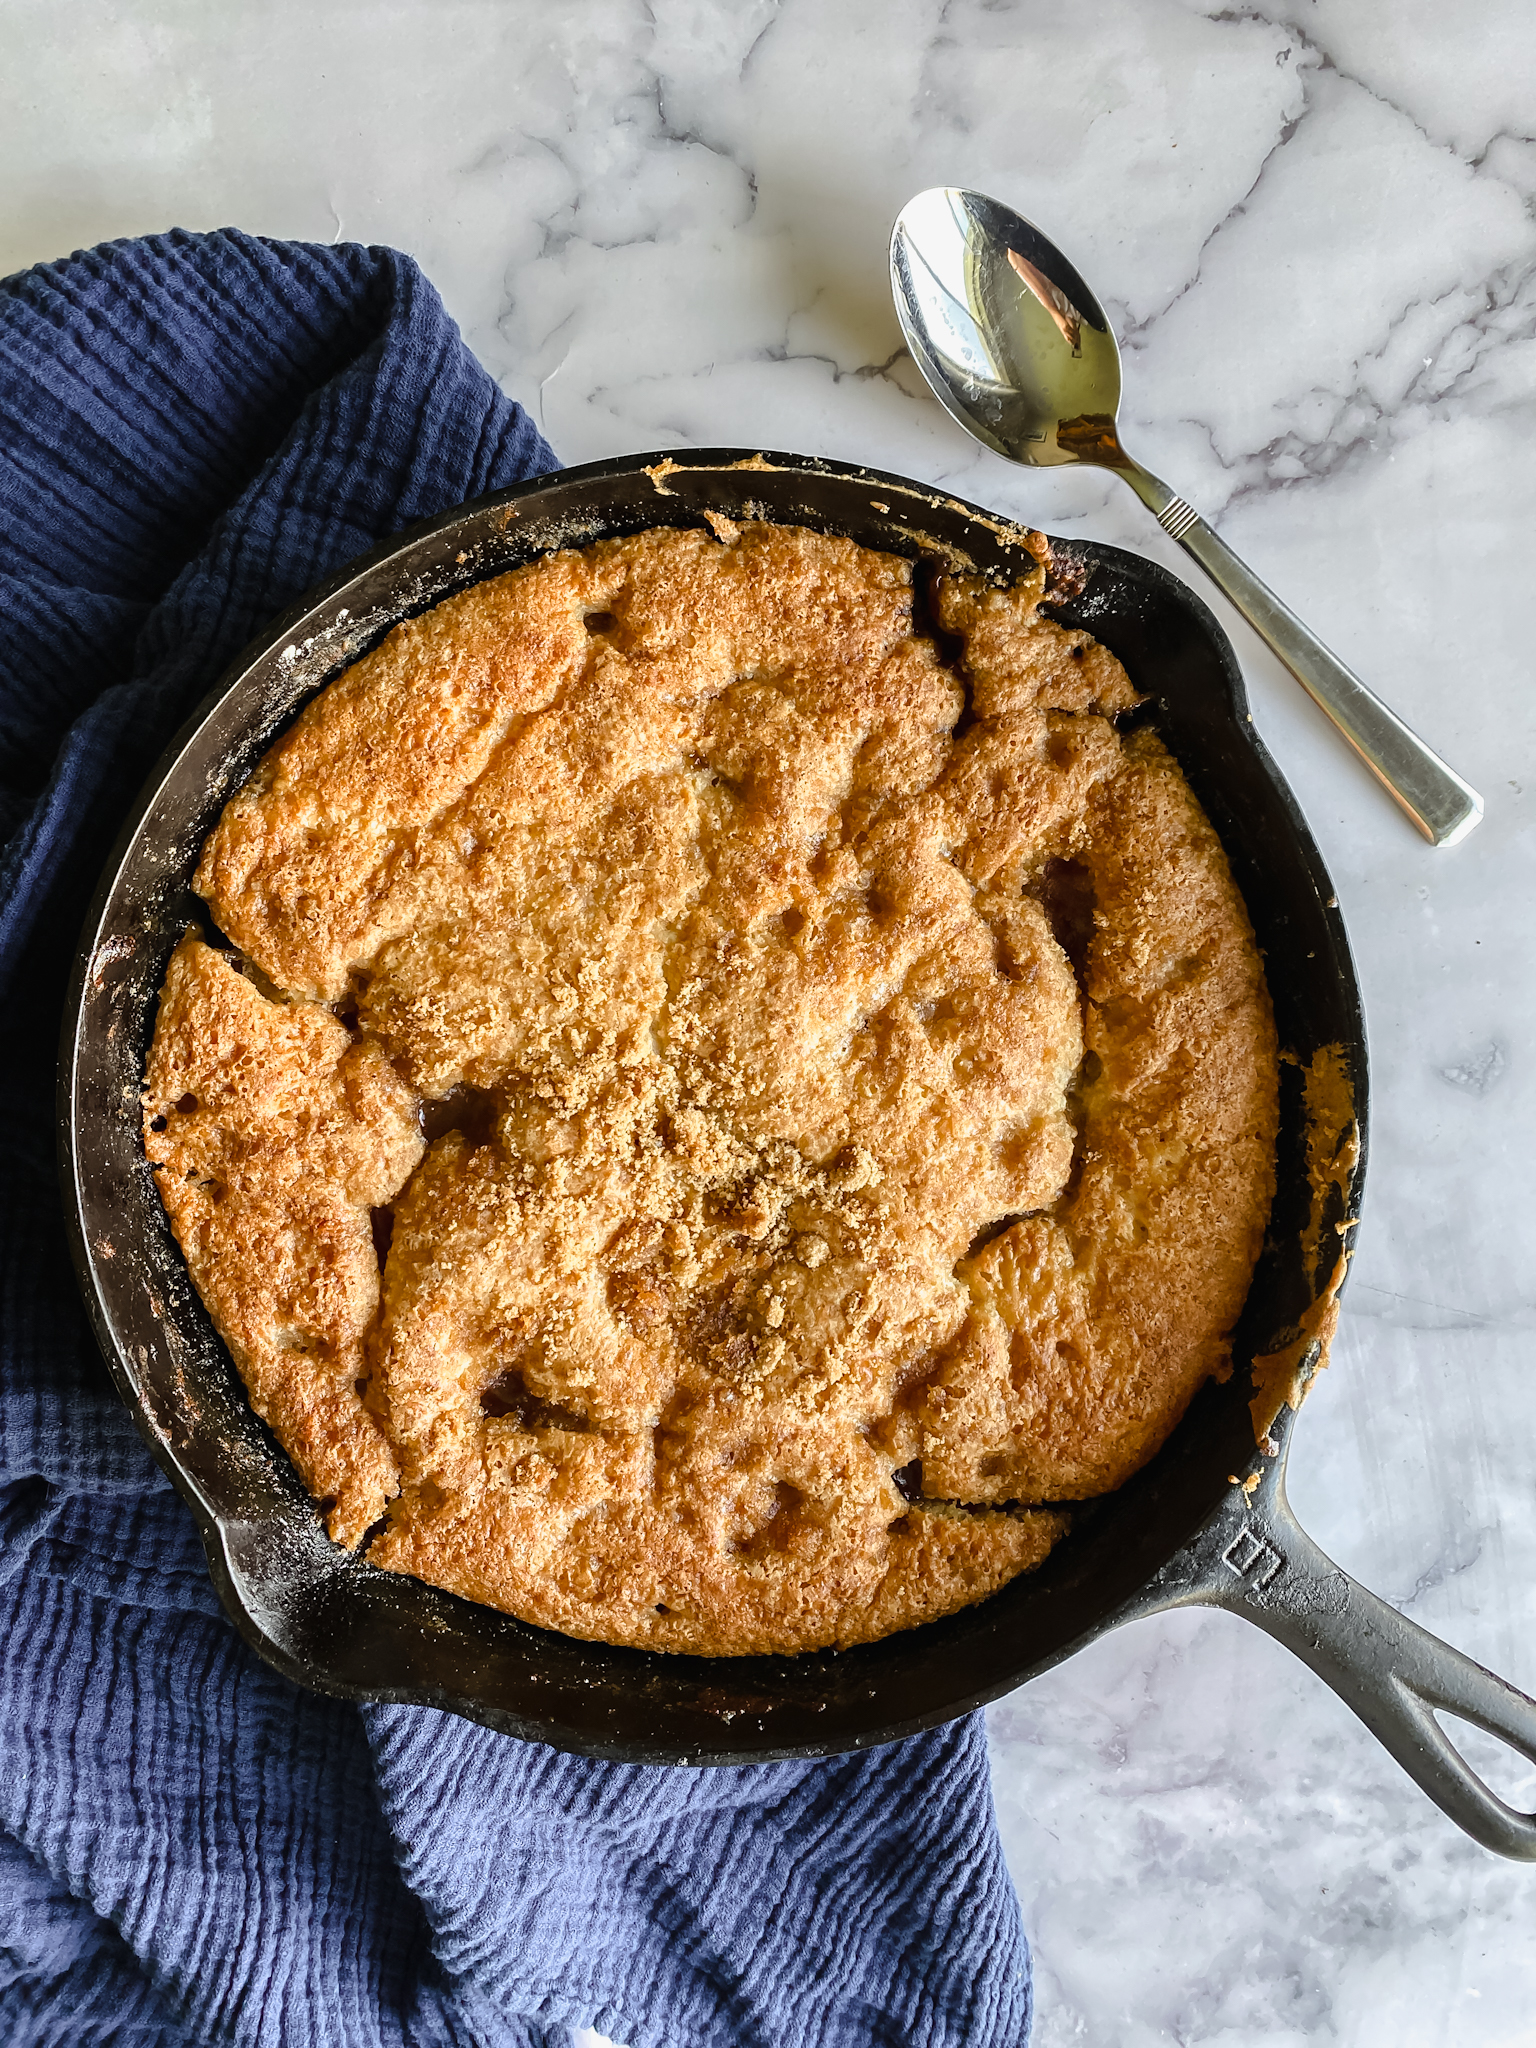
Step 3: Bake and Enjoy!

To keep things simple we bake the zucchini filling in a cast-iron skillet. Any time I can eliminate a dish to wash I am happy. However, if you do not have a cast-iron skillet just transfer the zucchini filling to a baking dish or large pie dish after cooking. Both will work great!

Want more zucchini recipes?

Jalapeño Popper Zucchini Boats
Jalapeño Popper Zucchini Boats are a delicious way to use up your zucchini this summer. This low carb side dish or appetizer has all the goodness of a jalapeño popper, but with the extra goodness of zucchini. 
Check out this recipe
Cheesy Garlic Zucchini Bites
These cheesy garlic zucchini bites are a delicious and healthy snack or appetizer. They are made with simple ingredients that you probably already have on hand, and can easily be made gluten free.
Check out this recipe
Creamy Zucchini Bake
This Creamy Zucchini Bake is the ultimate summer side dish! Zucchini slices are covered with an easy cream sauce and baked until bubbly and golden.
Check out this recipe

Zucchini Cobbler

No ratings yet
Zucchini cobbler tastes EXACTLY like apple cobbler. No one will ever know that you are swapping out the fruit for a vegetable in their dessert tonight.
Print Recipe Pin Recipe

Ingredients

Zucchini Filling

  • 8 cups zucchini peeled, seeded, and chopped
  • 2/3 cup lemon juice
  • 1 cup brown sugar
  • 1 tsp cinnamon
  • 1/2 tsp nutmeg
  • 2 tbsp flour

Cobbler Dough

  • 1/2 cup butter melted
  • 1 cup flour
  • 1/2 cup sugar
  • 2 tsp baking powder
  • 3/4 cup milk
  • 1/2 cup brown sugar

Instructions

Zucchini Filling

  • In a large cast-iron skillet combined zucchini and lemon juice. Cook over medium heat for 15-20 minutes.
  • Add in brown sugar, flour, cinnamon, and nutmeg, cook for an additional minute. Then set aside.

Cobbler Dough

  • Preheat oven to 350.
  • In a large bowl combine the flour, sugar baking powder, and milk. Mix to combine.
  • Pour melted butter over the cooked zucchini.
  • Pour the dough mixture over the top of the cooked zucchini and melted butter. Do not stir everything together. Then sprinkle with brown sugar.
  • Bake for 40-45 minutes.
  • Top with vanilla ice cream or homemade maple whipped cream for an extra treat.

Share this:

  • Click to share on X (Opens in new window) X
  • Click to share on Facebook (Opens in new window) Facebook
  • Click to share on Pinterest (Opens in new window) Pinterest

Like this:

Like Loading...
FacebookTweetPin

By: Kayla · In: Dessert, Recipes · Tagged: zucchini

About Kayla

Hi! I'm Kayla. I'm here to help inspire busy moms to get back in the kitchen and feel beautiful along the way! I'm married to my high school sweetheart and live on a farm with our two busy boys.

you’ll also love

Easy One Bowl Zucchini Bread
Jalapeño Popper Zucchini Boats | Summer Side DishJalapeño Popper Zucchini Boats | Best Summer Side Dish
Cheesy Garlic Zucchini Bites

Reader Interactions

Leave a ReplyCancel reply

Next Post >

Jalapeño Popper Zucchini Boats | Best Summer Side Dish

Primary Sidebar

Meet Kayla

Meet Kayla
hello!

LIVING OURFARM(LIFE)STYLE WHERE WE ​JUGGLE THE CHAOS OF MOTHERHOOD ONE ​KITCHEN ADVENTURE AT A TIME!

Read More

Connect

join the list

Categories

  • Blog
  • Recipes

Follow Along

@thefarmstyle


Let’s get those goals!


Homemade maple marshmallows are super simple, deli
Homemade maple marshmallows are super simple, delicious, and made better for you with swapping regular sugar for maple syrup. 

Comment MARSHMALLOW for all the details sent to your inbox. 

INGREDIENTS
1 cup cold water
3 tbsp powdered gelatin
1 1/4 cup maple syrup
1/4 tsp salt
1 tsp vanilla extract or seeds from 1 vanilla bean
powdered sugar for dusting

INSTRUCTIONS
You will want to have everything prepped and ready to go ahead of time. Once the marshmallows are ready to pour you need to work fast as everything starts to set up quick. Make sure to have whisk attachment ready for your stand mixer or hand mixer as well.
Line an 8”x8” pan with parchment paper ensuring the paper goes up all sides of the pan. Dust with powdered sugar.
In a large bowl (I use my stand mixer) add 1/2 cup of cold water with gelatin. Mix to combine and let sit to bloom.
In a medium saucepan add 1/2 cup cold water, maple syrup and salt. Mix to combine then place over medium heat until the mixture comes to a boil. DO NOT STIR after this point as that will encourage crystallization.
Allow mixture to boil until it reaches 240F-245F, this takes 15-20 minutes so be patient. Keep an eye on the mixture during this time as it can quickly boil over and cause a mess.
Quickly pout the mixture in the same bowl as the gelatin and begin to whisk.
Once everything starts to come together add in your vanilla extract or vanilla beans.
Continue whisking until mixture has tripled in size, the bowl is cool to the touch, and when the whisk is removed the drizzle holds its shape in the bowl.
Quickly pour mixture into prepared pan. You have about 30 seconds before everything sets up too much.
Allow marshmallows to set up completely (about 4 hours).
Remove marshmallows from the pan and sprinkle with additional powdered sugar. This helps your knife from sticking too much when cutting.
Cut marshmallows into desired size with a sharp knife. Dipping each marshmallow in additional powdered sugar to prevent them all from sticking to each other.
Store in an air tight container for up to 2 weeks.


The easiest homemade english muffins.  

Comment M
The easiest homemade english muffins.  

Comment MUFFIN for all the details sent to your inbox. 

INGREDIENTS
3 cups all purpose flour
1 - 1 1/2 cups water warm
2 1/4 tsp yeast
1 tsp salt
2 tbsp sugar
cornmeal

INSTRUCTIONS
In a bowl combine warm water, yeast and sugar. Mix and allow to sit for about 5 minutes. The mixture should start to become foamy. This is how you know your yeast is activated!

Add in flour and salt. Mix until combined adding in an additional 1/2 cup water as needed to get the dough to come together. Cover and let rise for an hour or until mixture has doubled in size.

Pour some cornmeal onto a baking sheet. Set aside.

Once dough has risen pour onto a floured surface. They dough will be sticky. Gently press into a circle and divide into 8-12 segments.

Gently form each of the segments into a ball and place onto the prepared baking sheet (This helps prevent them from sticking). Repeat with each segment. Cover balls and allow to rise for an additional 25-30 minutes.

Preheat oven to 350.

Heat a skillet(or large griddle) to medium heat. Place balls into the skillet and cook for about 5 minutes per side, then place onto a clean baking sheet. Repeat with remaining balls.

Bake in oven for 10-15 minutes and enjoy!

NOTES
While baking the English muffins ins’t always necessary, I find it difficult to cook them entirely on the stove top without burning the exterior. Finishing them off in the oven has helped a ton!


Bring cozy fall flavors home with this Pecan Pie L
Bring cozy fall flavors home with this Pecan Pie Latte topped with maple cold foam. 

Comment COFFEE for all the details sent to your inbox. 

INGREDIENTS
PECAN PIE SYRUP
1 cup pecans
1 cup brown sugar
1 cup water
1 tsp cinnamon
1 tsp vanilla extract
2 tbsp salted butter

PECAN PIE LATTE
2 shots espresso
1-2 tbsp pecan pie syrup
8 oz milk

MAPLE COLD FOAM
3 tbsp heavy cream
2 tbsp milk
1 tbsp maple syrup
INSTRUCTIONS

MAKE THE PECAN PIE SYRUP
Preheat oven to 350 F.
Add pecans to a sheet pan and roast for 5-10 minutes. Watching to ensure they don’t burn.
In a sauce pan combine the roasted pecans, brown sugar, and cinnamon. Bring mixture to a boil and allow to simmer for 10-15 minutes.
Add in butter and vanilla extract, stirring to combine.
Use a fine mesh strainer to separate the pecans from the syrup and pour into an air tight container and store int the refrigerator for 2-3 weeks.
MAKE THE LATTE
In a small cup combine all the ingredients for the maple cold foam. Whisk together with a frother until mixture has thickened. Set Aside.
FOR ICED LATTE: In a large cup add ice, then pecan pie syrup, milk, and then espresso. Top with maple cold foam and enjoy!
FOR HOT LATTE: Steam milk to desired temperature. Then add pecan pie syrup and espresso to the steamed milk. Top with maple cold foam and enjoy!

Made with homemade pecan pie syrup, espresso, and creamy maple foam, this latte tastes like a slice of pecan pie, perfect hot or iced.


This BBQ Hawaiian Chicken on the Blackstone Griddl
This BBQ Hawaiian Chicken on the Blackstone Griddle is a quick and easy favorite. Juicy chicken, caramelized pineapple, and veggies tossed in sweet barbecue sauce make a meal everyone will love.

Comment RECIPE for all the details sent to your inbox. 

INGREDIENTS

1.5 lb chicken breasts cut into 1” pieces
2 bell peppers cut into 1” pieces
1 red onion cut into 1” pieces
15 oz can pineapple chunks
1/2 cup bbq sauce
salt+ pepper
INSTRUCTIONS

Preheat griddle to medium heat.
Season chicken with salt and pepper and place onto half of the griddle. Cook until no longer pink.
Add peppers, onions, and pineapple to the other half of the griddle. Cook until softened.
Pour barbecue sauce over chicken and mix to combine. Remove everything from the griddle.
Enjoy with rice or on a tortilla.

#griddlecrew #griddlenation #blackstonegriddle #thefarmstyle


ad | We don’t always get the time to go out for da
ad | We don’t always get the time to go out for date night, so lately we’ve been bringing date night home, and honestly, I think I might love it even more this way.

A grilled ribeye, crispy Japanese sweet potato fries, and a bottle of @cakebreadcellars Cabernet Sauvignon. Simple, cozy, and a little something to look forward to at the end of a long week. 

Cakebread Cellars has been crafting wines in Napa Valley for over 50 years, and you can taste that care in every sip. Their Cabernet Sauvignon is bold but beautifully balanced, the kind of wine that pairs perfectly with grilled steak and good conversation.

It’s those small rituals, setting the table, lighting a candle, pouring a glass of wine, that make home feel like the best place to be. 

Comment DINNER for all the recipe details, and don’t forget to pour a glass of Cakebread Cabernet Sauvignon alongside.


Footer

On the Blog

  • Blog
  • Recipes

Info

  • About
  • Disclosure, Privacy Policy, and Terms

Copyright © 2025 · Theme by 17th Avenue

%d

    Rate This Recipe

    Your vote:


    A rating is required
    A name is required
    An email is required
    We use cookies to ensure that we give you the best experience on our website. If you continue to use this site we will assume that you are happy with it.