• About
  • Nav Social Icons

  • Skip to primary navigation
  • Skip to main content
  • Skip to primary sidebar
  • Skip to footer
  • Home
  • About
  • Recipes
    • Blackstone
    • Breads
    • Breakfast
    • Drinks
    • Dessert
    • Dinner
    • Sides
    • Snacks
  • Shop
  • Cart
  • My account
  • Mobile Menu Widgets

    Connect

    Search

The Farmstyle

The Farmstyle

by Kayla Zenner

  • Home
  • About
  • Shop
  • Recipes
    • Blackstone
    • Breads
    • Breakfast
    • Drinks
    • Dessert
    • Dinner
    • Snacks
    • Sides
    • All Recipes
  • Cart

Italian Meatball and Tortellini Sheet Pan Dinner

November 13, 2023 · In: Dinner, Recipes

FacebookTweetPin
Jump to Recipe Jump to Video Print Recipe

This easy sheet pan Italian meatballs and tortellini is SO easy! It’s one of those throw on a pan and bake meals that really simplify dinner time.

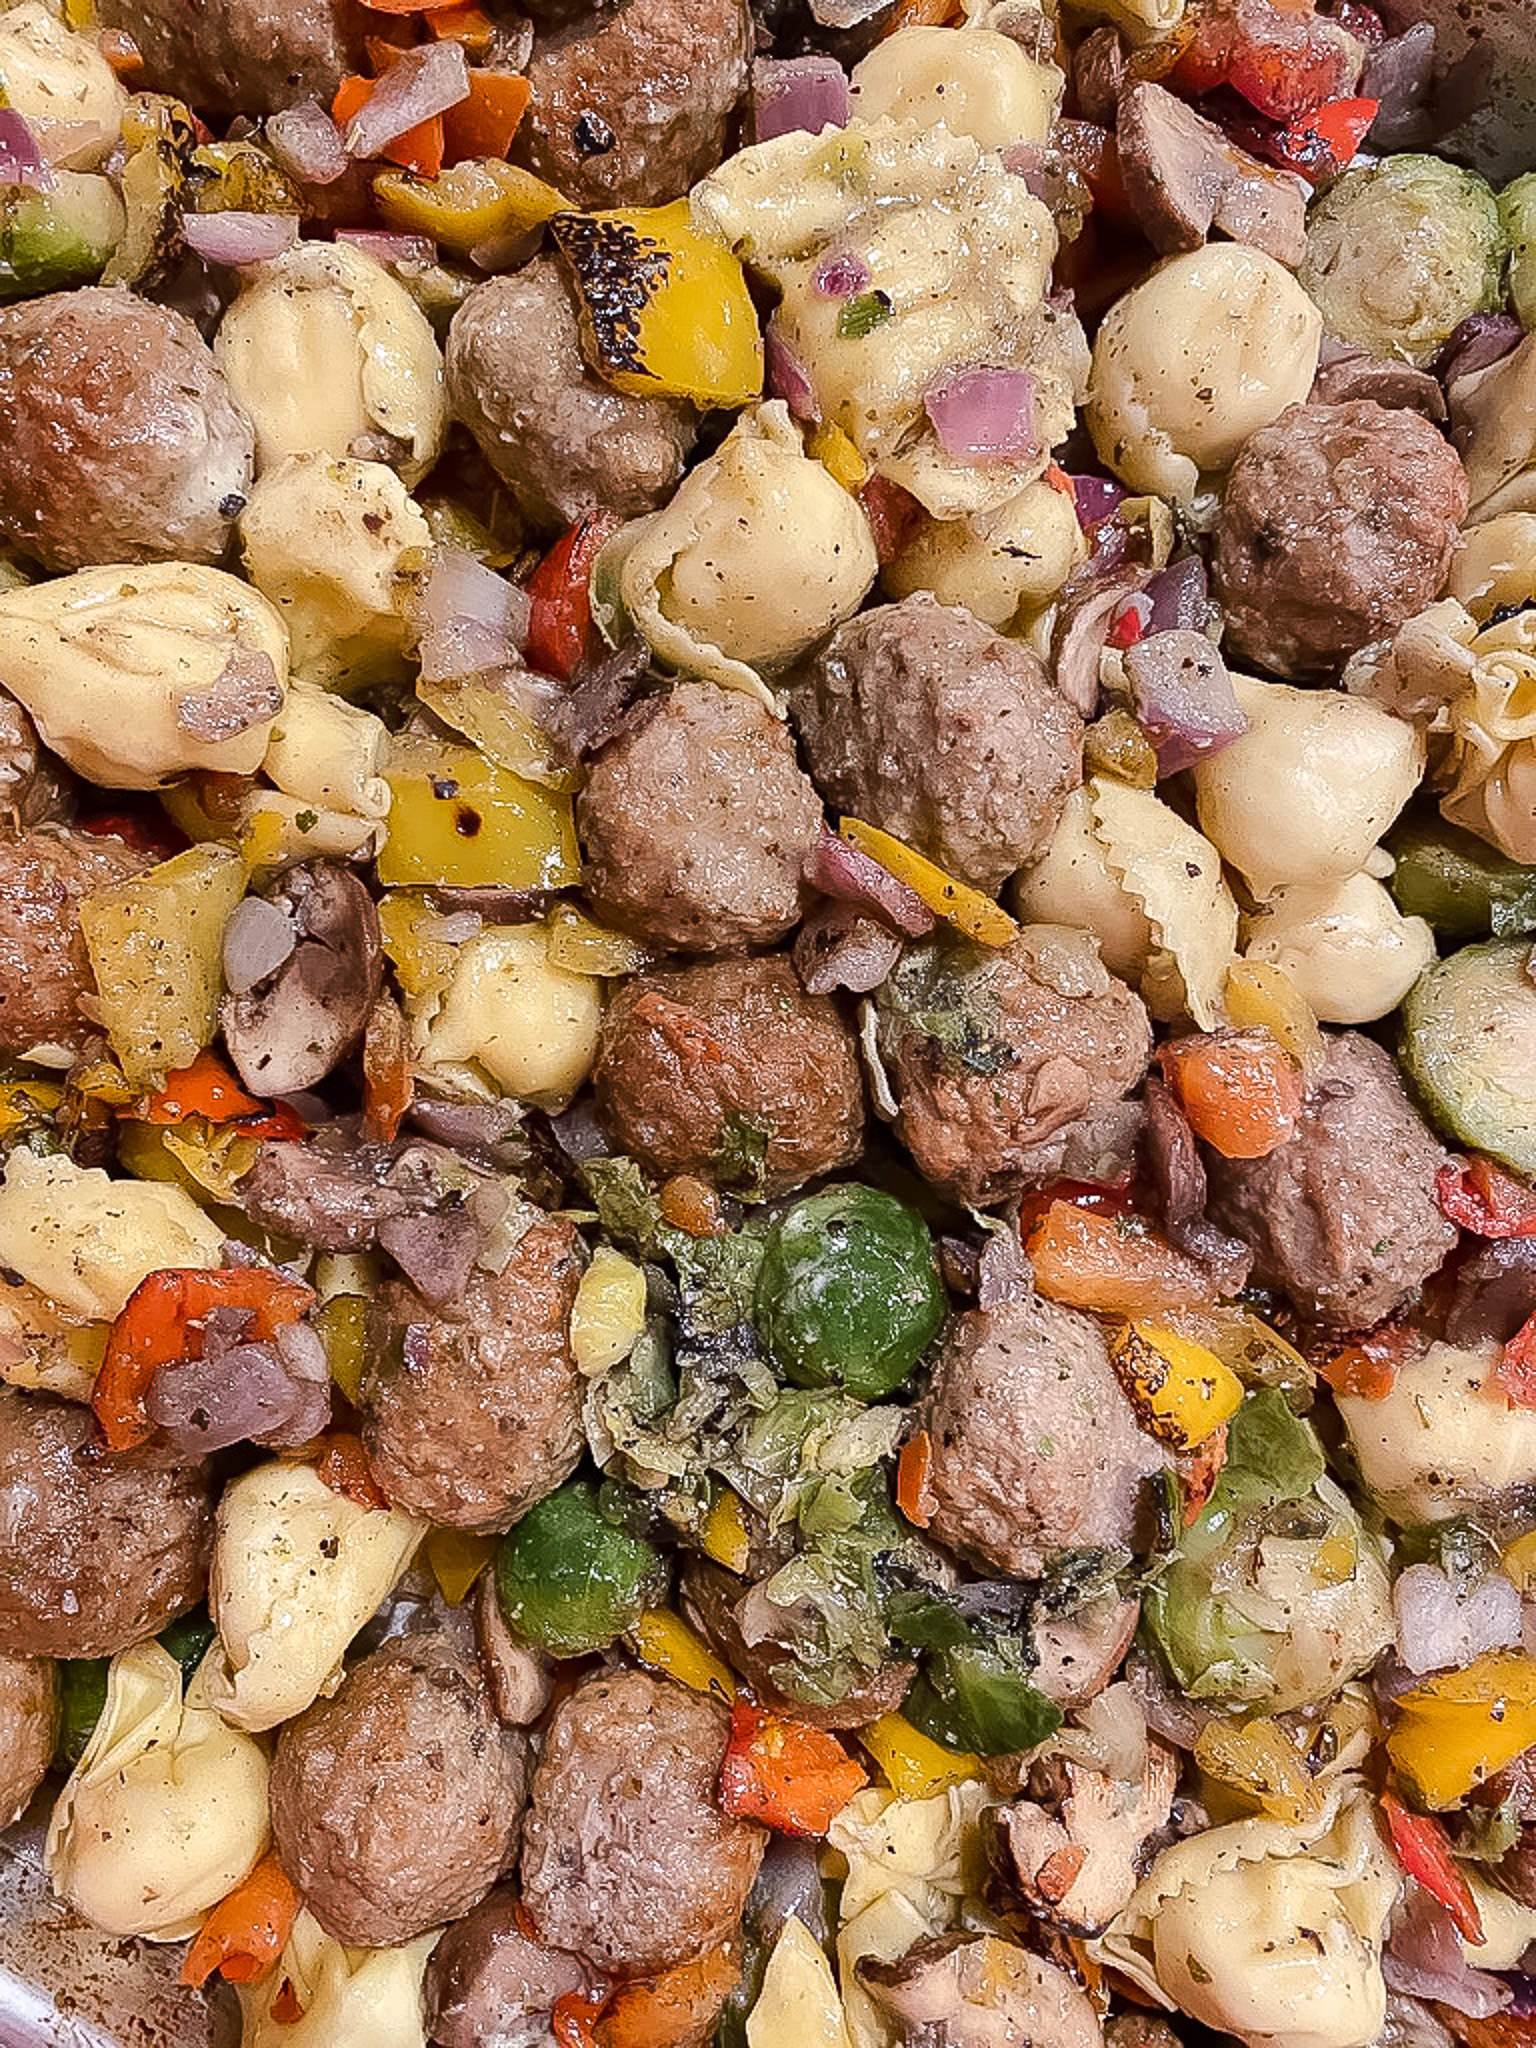
Are you looking for a hassle-free dinner idea that delivers on flavor? Look no further than this easy sheet pan tortellini and meatball dinner. With just a few simple ingredients and minimal prep, you can have a mouthwatering meal on the table in no time.

Ingredients:

  • Tortellini: I use fresh or frozen. If using boxed, you will need to boil it beforehand so that it isn’t hard. 
  • Meatballs: I love to use frozen for ease, but you can use homemade also
  • Frozen Vegetables: the steam that comes off of the frozen vegetables will help keep your tortellini from becoming crunchy. I like to use broccoli or there is a mix from Costco that I really like also. 
  • Oil: I like to use olive or avocado
  • Seasoning: salt, pepper, Italian seasoning, garlic powder, onion powder
  • Creamy Italian Dressing: to add a nice extra flavor

Instructions:

  1. Place all ingredients on a sheetpan, except for the dressing.
  2. Cover with aluminum foil.
  3. Bake at 350 for 25-30 min then remove foil and stir everything together.
  4. Cook an additional 20 minutes uncovered.
  5. Remove from oven, drizzle with Italian dressing and mix again.
  6. Enjoy!

This easy sheet pan tortellini and meatball dinner is not only a time-saver, but it’s also a crowd-pleaser. The flavors from the meatballs and roasted vegetables infuse into the tortellini and creamy Italian dressing, creating a harmonious combination that will satisfy even the pickiest eaters. Plus, the vibrant colors make this dish a feast for the eyes as well.

So why spend unnecessary time and effort in the kitchen when you can whip up a delicious meal like this one? Give it a try and let your taste buds be amazed by the simplicity and flavor of this easy sheet pan tortellini and meatball dinner. Enjoy!

Share Your Experience

I would love to hear about your experience making and enjoying my Sheet Pan Dinner Recipe! Feel free to tag me on Instagram or leave a review below. Your feedback helps me improve our recipes and provides inspiration to fellow bakers.

Save this recipe for later by simply using the pin button on the recipe card or any of the photos above. Happy cooking!

Sheet Pan Creamy Italian Meatballs and Tortellini

No ratings yet
This easy sheetpan tortellini is SO easy! It’s one of those throw on a pan and bake meals that really simplify dinner time. Let me know in the comments what your favorite easy dinner is.
Print Recipe
Prep Time:10 minutes mins
Cook Time:50 minutes mins
Course: dinner, Main Course
Keyword: meatballs, one pan, SHEET PAN
Servings: 6 people

Ingredients

  • 32 oz frozen meatballs
  • 20 oz frozen tortellini
  • 32 oz frozen vegetables broccoli or I love the sheet pan mix from Costco
  • 3-4 Tbsp olive or avocado oil
  • 1 tsp garlic powder
  • 1 tsp onion powder
  • 1 tsp Italian seasoning
  • 1 tsp salt
  • 1/2 tsp pepper
  • 1/2 cup creamy Italian dressing

Instructions

  • Place all ingredients on a sheetpan, except for the dressing.
  • Cover with aluminum foil.
  • Bake at 350 for 25-30 min then remove foil and stir everything together.
  • Cook an additional 20 minutes uncovered.
  • Remove from oven, drizzle with Italian dressing and mix again.
  • Enjoy

Video

View this post on Instagram

A post shared by Kayla Zenner | family friendly meals from the farm (@thefarmstyle)

Share this:

  • Share on X (Opens in new window) X
  • Share on Facebook (Opens in new window) Facebook
  • Share on Pinterest (Opens in new window) Pinterest

Like this:

Like Loading...
FacebookTweetPin

By: Kayla · In: Dinner, Recipes

About Kayla

Hi! I'm Kayla. I'm here to help inspire busy moms to get back in the kitchen and feel beautiful along the way! I'm married to my high school sweetheart and live on a farm with our two busy boys.

you’ll also love

Classic Chicken Fried Steak with Creamy Country Gravy
Blueberry Breakfast Cookie Recipe
Watermelon Fries with Vanilla Lime Yogurt Dip

Reader Interactions

Comments

  1. Elizabeth says

    October 17, 2024 at 4:25 pm

    I’ve got to be honest, I didn’t have high hopes for this recipe but thought I’d try it with how quick and easy it seemed to throw it together; but man do I owe you an apology because IT IS BANGIN’! Will definitely be making it again! The dressing really pulls it all together and adds incredible flavor (not at all in a way reminiscent of salad, like I thought it might) – we used Ken’s brand. Thank you for your ingenuity!

    Loading...
    Reply
    • Kayla says

      October 17, 2024 at 6:29 pm

      So glad you enjoyed it!! Thank you for sharing .

      Loading...
      Reply
  2. Deborah says

    October 10, 2025 at 6:40 am

    I have fresh Italian meatballs. Should I cook them first

    Loading...
    Reply
    • Kayla says

      October 10, 2025 at 6:40 am

      You can bake them in the oven!

      Loading...
      Reply

Trackbacks

  1. Ricotta Meatball Bake - The Farmstyle says:
    April 17, 2024 at 6:31 pm

    […] Italian Meatball and Tortellini Sheet Pan […]

    Loading...
    Reply

Leave a ReplyCancel reply

Next Post >

Make Ahead Mashed Potatoes

Primary Sidebar

Meet Kayla

Meet Kayla
hello!

LIVING OURFARM(LIFE)STYLE WHERE WE ​JUGGLE THE CHAOS OF MOTHERHOOD ONE ​KITCHEN ADVENTURE AT A TIME!

Read More

Connect

join the list

Categories

  • Blog
  • Recipes

Follow Along

@thefarmstyle


100,000 of you. I’m honestly still trying to wrap
100,000 of you. I’m honestly still trying to wrap my head around that.

What started as me just sharing what I was making for my family, little moments, and pieces of my life has turned into this incredible community, and that’s because of YOU. 

The comments, the messages, the times you’ve made my recipes in your own kitchens… it all means more than I can put into words.

Thank you for being here, for supporting me, and for growing alongside me. I don’t take a single one of you for granted.

We’re just getting started 🤍


Comment GARDEN and I’ll send you all the details t
Comment GARDEN and I’ll send you all the details to your inbox. 

The best thing about these garden beds is that they can be made to any dimension that you want! I created four 4x8 beds, two 3x8 beds, and two 2x3 beds using the exact same method each time!

Materials (for ONE 4x8 bed)
* (4) 2x8 boards, cut to 8 ft long
* (4) 2x8 boards, cut to 4 ft long 
* (24) 3” exterior wood screws 
* (4) 2x4 boards, cut to 14” long

Instructions
1. Cut Your Boards (if needed)
Cut your boards to length before assembling. We had (4) 12’ boards, we cut into an 8’ board and 4’ board. However, you can also buy (6) 8’ boards and then cut 2 of them in half. 

2. Drill Pilot Holes (optional)
On each 8’ board measure ¾” in from each end and Drill 2 pilot holes per end, spaced about 2–3” from the top and bottom
This helps prevent the wood from splitting when you add screws.

3. Build the First Layer (Bottom Frame)
Lay out:
 * (2) 8 ft boards (long sides)
 * (2) 4 ft boards (short sides)
Form a rectangle with the short boards sitting inside the long boards. Then attach the boards using 3” screws into the pilot holes you created in the previous step. 

4. Stack the Second Layer
Repeat process by placing the second set of boards directly on top of the first frame, lining up edges carefully

5. Add Corner Supports 
Place the 2x4 board inside each corner
These should sit flush with the bottom and sit an inch below the top. 
Screw through the outside boards into the 2x4 board once in the top 2x8 board and once in the bottom 2x8 board. 

 Pro Tips
Use untreated cedar for best longevity, however I used fir for a more cost effective version. These may only last me 5 years, BUT the cost of cedar deterred me from going that route. 

Avoid pressure-treated wood unless it’s labeled safe for gardens

Use a garden safe stain on the interior before filling to help with board longevity.


Comment SALAD for all the recipe details.

Spring
Comment SALAD for all the recipe details. 

Spring salads > everything else right now 🥗🌸

Fresh, colorful, and actually satisfying… these are the kind of salads you crave (not just eat because you feel like you should).

Save this for your weekly menu + tell me which one you’re making first.

Strawberry Balsamic Salad
Blueberry Summer Salad
Streak Harvest Salad
Citrus Kale Salad
Summer Fruit Salad
Greek Pasta Salad
Rainbow Pasta Salad


Comment SMOOTHIE for all the recipe details.

Thi
Comment SMOOTHIE for all the recipe details. 

This Blackberry Coconut Smoothie is creamy, refreshing, and dairy-free, made with coconut milk, frozen blackberries, and coconut yogurt. A quick and easy smoothie recipe ready in just 5 minutes.


Comment RECIPE for all the details!

These cheese
Comment RECIPE for all the details! 

These cheesesteak quesadillas scored ⭐️⭐️⭐️⭐️⭐️ from my kids! BONUS: they are so easy to make on the @blackstoneproducts griddle.


Help me restore my @blackstoneproducts griddle aft
Help me restore my @blackstoneproducts griddle after being a tiny bit neglectful the past few months. 
#blackstonegriddle #griddlenation


Footer

On the Blog

  • Blog
  • Recipes

Info

  • About
  • Disclosure, Privacy Policy, and Terms

Copyright © 2026 · Theme by 17th Avenue

%d

    Rate This Recipe

    Your vote:


    A rating is required
    A name is required
    An email is required
    We use cookies to ensure that we give you the best experience on our website. If you continue to use this site we will assume that you are happy with it.