• About
  • Nav Social Icons

  • Skip to primary navigation
  • Skip to main content
  • Skip to primary sidebar
  • Skip to footer
  • Home
  • About
  • Blog
    • Mom Life
    • Farm Life
    • Recipes
      • Breakfast
      • Dessert
      • Dinner
      • Sides
      • Snacks
  • Shop
    • Shop – Digital Books
  • Cart
  • My account
  • Mobile Menu Widgets

    Connect

    Search

The Farmstyle

The Farmstyle

by Kayla Zenner

  • Home
  • About
  • Shop
    • Shop – Meal Plans
    • Shop My Favorites
  • Blog
    • Breakfast
    • Dessert
    • Dinner
    • Snacks
    • Sides
    • All Recipes
  • Cart

Creme Brûlée Stuffed French Toast

December 16, 2023 · In: Breakfast, Recipes

FacebookTweetPin
Jump to Recipe Jump to Video Print Recipe

This stuffed French toast is made the night before and creates the best breakfast for Christmas morning.

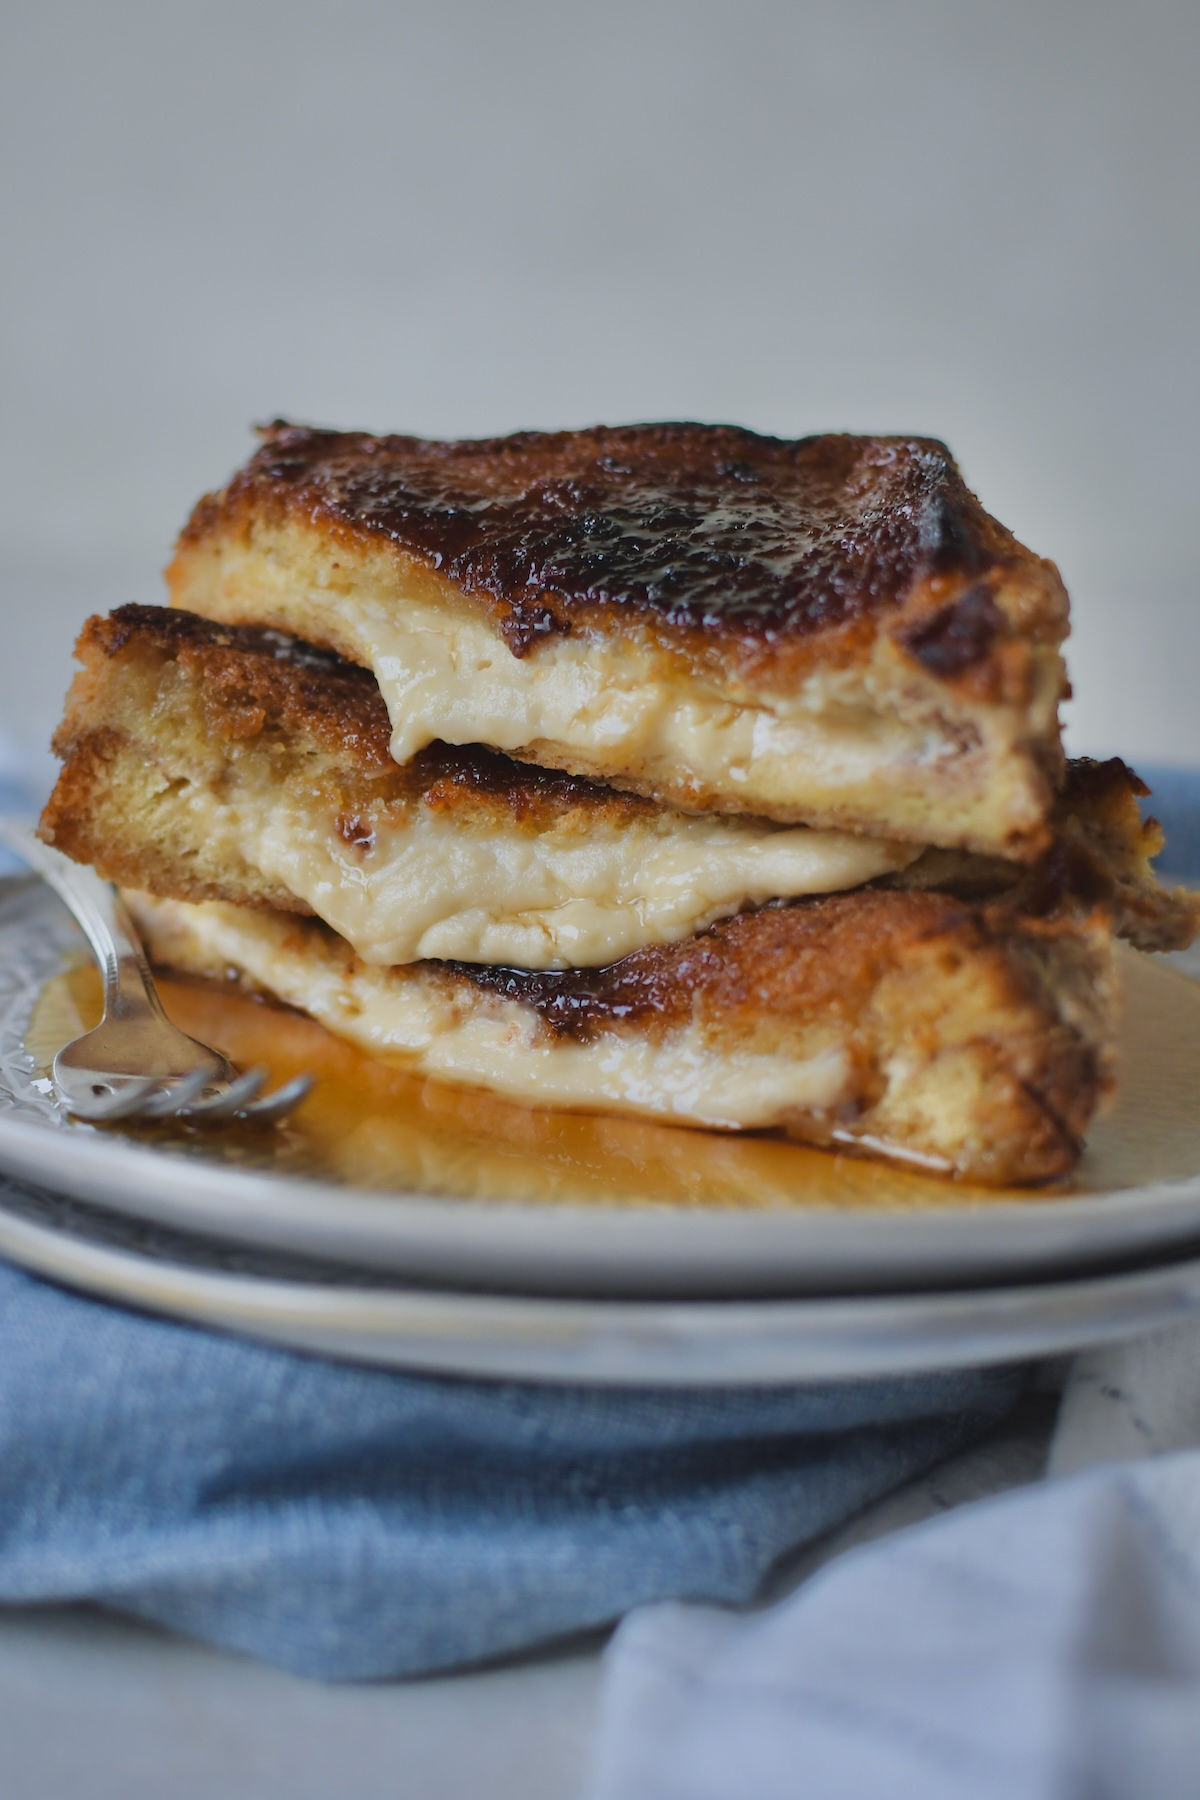
Looking for a new Christmas morning breakfast? Look no further than this overnight Creme Brûlée Stuffed French Toast. Make life easier by making breakfast up the night before so that you just have to pop it in the oven the next morning. The caramelized top to this stuffed french toast really takes it over the top and will make everyone think you spent hours making breakfast!

Ingredients for Overnight Creme Brûlée Stuffed French Toast

For the Filling

  • Creme Cheese – this is the perfect creamy middle for our stuffed french toast
  • Vanilla Extract – for the perfect warm flavor
  • Maple Syrup – to sweeten the filling
  • Optional – you can truly customize this french toast by adding in your favorite fruit as well!

For the Casserole

  • Brioche – a total of 12 slices are needed. Store bought or homemade if you are feeling extra
  • Eggs – for the custard filling
  • Heavy Creme – for the custard filling, you can swap this for milk if you want to lighten it up some
  • Vanilla Extract – the measure with your heart of all baking
  • Cinnamon – optional. If you don’t like cinnamon in your french toast leave this out
  • Brown Sugar – for the caramelized top
  • Butter – to mix with the brown sugar to caramelize the top of your french toast.

How to make Creme Brûlée French Toast

  • In a medium size bowl combine cream cheese, vanilla extract, and maple syrup. Mix to combine. Set aside for later.
  • Combine the melted butter and brown sugar. Pour into the bottom of a 9×13 casserole dish. Set aside for later.
  • On half the brioche bread spread cream cheese mixture. Keeping to the center of the bread. Layer the second half of the brioche bread on top. Set the brioche sandwiches in the casserole dish on top of the sugar mixture.
  • In a medium sized bowl combine eggs, heavy cream, vanilla extract, and cinnamon. Mix to combine, pour over top of the bread.
  • Cover the casserole dish and place in the fridge overnight (let the mixture combine for at least 6 hours).
  • Preheat oven to 350. Place casserole dish in the oven and bake for 30-35 minutes. Remove from oven, flip over each piece and then place back in the oven on broil until the tops have browned. Watch carefully. DO NOT WALK AWAY. Do not be like me. Resist the urge to walk away and watch carefully. Once brown remove from the oven.
  • Top with maple syrup and enjoy!

Share Your Experience

I would love to hear about your experience making and enjoying my Overnight Creme Brûlée Stuffed French Toast! Feel free to tag me on Instagram or leave a review below. Your feedback helps me improve our recipes and provides inspiration to fellow home cooks.

Save this recipe for later by simply using the pin button on the recipe card or any of the photos above. Happy cooking!

Creme Brûlée Stuffed French Toast

This stuffed French toast is made the night before and creates the best breakfast for Christmas morning.
No ratings yet
Print Recipe Pin Recipe Add to Collection Go to Collections
Prep Time 20 minutes mins
Cook Time 40 minutes mins
Wait Time 6 hours hrs
Total Time 7 hours hrs
Course Breakfast
Servings 6 people
Calories 819 kcal

Ingredients


For the Filling

  • 8 oz cream cheese softened
  • 1 tsp vanilla extract
  • 1/4 cup maple syrup

For the Casserole

  • 1 loaf brioche bread 12 slices
  • 6 eggs
  • 1 cup heavy cream
  • 1 tsp vanilla extract
  • 1 tsp cinnamon
  • 1/2 cup brown sugar
  • 1/2 cup butter melted

Instructions
 

  • In a medium size bowl combine cream cheese, vanilla extract, and maple syrup. Mix to combine. Set aside for later.
  • Combine the melted butter and brown sugar. Pour into the bottom of a 9×13 casserole dish. Set aside for later.
  • On half the brioche bread spread cream cheese mixture. Keeping to the center of the bread. Layer the second half of the brioche bread on top. Set the brioche sandwiches in the casserole dish on top of the sugar mixture.
  • In a medium sized bowl combine eggs, heavy cream, vanilla extract, and cinnamon. Mix to combine, pour over top of the bread.
  • Cover the casserole dish and place in the fridge overnight (let the mixture combine for at least 6 hours).
  • Preheat oven to 350. Place casserole dish in the oven and bake for 30-35 minutes.
  • Remove from oven, flip over each piece and then place back in the oven on broil until the tops have browned. Watch carefully. DO NOT WALK AWAY. Do not be like me. Resist the urge to walk away and watch carefully. Once brown remove from the oven.
  • Top with maple syrup and enjoy!

Video

View this post on Instagram

A post shared by Kayla Zenner | family friendly meals from the farm (@thefarmstyle)

Nutrition

Calories: 819kcalCarbohydrates: 57gProtein: 16gFat: 60gSaturated Fat: 35gPolyunsaturated Fat: 3gMonounsaturated Fat: 13gTrans Fat: 1gCholesterol: 384mgSodium: 579mgPotassium: 211mgFiber: 0.2gSugar: 29gVitamin A: 2288IUVitamin C: 0.3mgCalcium: 158mgIron: 2mg
Tried this recipe?Let us know how it was!

Share this:

  • Click to share on X (Opens in new window) X
  • Click to share on Facebook (Opens in new window) Facebook
  • Click to share on Pinterest (Opens in new window) Pinterest

Like this:

Like Loading...

Related

FacebookTweetPin

By: Kayla · In: Breakfast, Recipes

About Kayla

Hi! I'm Kayla. I'm here to help inspire busy moms to get back in the kitchen and feel beautiful along the way! I'm married to my high school sweetheart and live on a farm with our two busy boys.

you’ll also love

Bacon Cheeseburger Soup | A Hearty Fall Meal
easy sheet pan kielbasa tortellini dinnerEasy Sheet Pan Kielbasa and Tortellini Dinner
Mint Chip Ice Cream with Fresh Mint

Top Posts & Pages

Chicken Bacon Ranch Skillet on the Blackstone
Easy Sheet Pan Kielbasa and Tortellini Dinner
Soft and Fluffy Sandwich Bread

Join the List

Stay up to date & receive the latest posts in your inbox.

Reader Interactions

Comments

  1. Michelle Hochstedler says

    December 16, 2024 at 6:25 pm

    Is the 30 to 35 min bake covered or uncovered? Also wondering if it’s ok if this sits prepared in the fridge for 18 hours?

    Loading...
    Reply
    • Kayla says

      December 16, 2024 at 6:28 pm

      Bake uncovered. Yes 18 hours should be fine. I usually make it before bed and bake about 12 hours later.

      Loading...
      Reply
      • Michelle Hochstedler says

        December 16, 2024 at 7:36 pm

        Thank you Kayla. Looking forward to making this.

        Loading...
        Reply

Trackbacks

  1. The Best Homemade Brioche Bread - The Farmstyle says:
    January 22, 2024 at 5:59 am

    […] bread to use in french toast, check out my Stuffed Peach Pie French Toast and my family favorite Creme Brûlée Stuffed French Toast. There is something so great about the soft and buttery bread that you can’t go wrong! I […]

    Loading...
    Reply

Leave a ReplyCancel reply

Next Post >

Cheesy Garlic Pull Apart Christmas Tree

Primary Sidebar

Meet Kayla

Meet Kayla
hello!

LIVING OURFARM(LIFE)STYLE WHERE WE ​JUGGLE THE CHAOS OF MOTHERHOOD ONE ​KITCHEN ADVENTURE AT A TIME!

Read More

Connect

join the list

Categories

  • Blog
  • Recipes

Follow Along

@thefarmstyle


Homemade butter is one of the easiest things you c
Homemade butter is one of the easiest things you can make at home! It requires one simple ingredient and can be done in a few minutes!

Comment BUTTER for all the details sent straight to your inbox. 

INGREDIENTS 
2 cups heavy cream 
1/2 tsp salt optional

INSTRUCTIONS
Add heavy cream to the bowl of a stand mixer with the whisk attachment.

Gradually increase the speed of the mixer to high and whip until the butter and buttermilk separate. This timing depends on several different factors, but typically when I’m making butter it takes about 15-20 minutes.

You should start to notice your cream has turned into fluffy whipped cream around the 5 minute mark. At this point I will stop the mixer every 5 minutes or so to scrape down the sides of the bowl to make sure that everything gets incorporated.

Once it looks like the cream is starting to break I will place a towel over my stand mixer. As soon as the butter and buttermilk separate the liquid will splash and you will make a mess of the kitchen.

Remove the butter from the liquid (Do not throw the liquid out, this is buttermilk and can be used in other recipes). Gently press the butter between your hands until you get most of the liquid out. Removing all the excess buttermilk will help your butter stay fresher longer.

Once you have pressed as much of the buttermilk out as possible rinse in ice water.

If you want to have salted butter this is where you add it.

Now you have fresh made butter!


This chicken bacon ranch pasta is the ultimate com
This chicken bacon ranch pasta is the ultimate comfort food with a homemade alfredo seasoned with ranch seasoning and topped off with crispy bacon, you cannot get any better.

Comment RANCH for all the details to your inbox. 

INGREDIENTS
2 chicken breasts
1/2 tsp salt
1/2 tsp garlic powder
1/2 tsp onion powder
1/2 tsp parika
1/2 lb bacon
1/2 cup butter
1 and 1/2 cups heavy cream
4 cloves garlic minced
2 cups parmesan cheese freshly grated
2 tbsp dry ranch seasoning
2 cup pasta

INSTRUCTIONS
In a large pot boil salted water and cook pasta according to package. Drain and set aside for later, reserving 1/2 cup of pasta water for later.

In a large skillet over medium heat cook bacon until crispy. Remove from pan and drain grease. Chop bacon into smaller pieces.

Slice chicken or cube chicken into small pieces and season with salt, garlic powder, onion powder, and paprika. Add to pan that you cooked the bacon in. Cooking until the chicken has reached an internal temperature of at least 165.

Remove chicken from the pan and add butter and heavy cream. Simmer over low for 2-3 minutes.

Whisk in garlic and ranch seasoning. Then add in shredded parmesan cheese. Whisking until fully melted. Add in pasta water a few tablespoons at a time if the sauce seems too thick.

Add in cooked pasta, chicken, and bacon. Serve immediately.

#weeknightdinner #weeknightmeals #weeknightdinners #chickenbacon


This super easy sheet pan lasagna is stacked full
This super easy sheet pan lasagna is stacked full of all the lasagna flavors without needing cook the noodles and hassle with layering!

Comment LASAGNA for all the details to your inbox. 

INGREDIENTS
1 lb ground Italian sausage
1 lb ground beef
28 oz marinara
1 & 1/2 cup ricotta cheese
2 tsp italian seasoning
1 tsp garlic powder
1 tsp onion powder
1 egg
2 cups mozzarella cheese shredded
1 cup parmesan cheese shredded

INSTRUCTIONS
Preheat oven to 350.

In a large skillet brown ground beef and Italian sausage until no longer pink. Add in jar of marinara.

In a small bowl combine ricotta, egg, 1/2 cup mozzarella cheese, garlic powder, onion powder, and Italian seasoning. Mix to combine.

Add half of the meat mixture to a large sheet pan (I used a half sheet pan), then break up the noodles into bite size pieces and layer on top of meat mixture.

Add remaining meat mixture and spread evenly over noodles. Since we did not precook the noodles, you will want to ensure that all of the noodles are covered in the sauce.

Sprinkle with remaining mozzarella and parmesan cheese, then dollop ricotta mixture on top.

Bake for 20-30 minutes until cheese is melted and noodles are fully cooked.

OPTIONAL: Broil the mixture for the last 2-3 minutes to crisp up the top.


#ad | This Strawberry No Bake Cheesecake is super
#ad | This Strawberry No Bake Cheesecake is super easy to create using the @zwilling_usa XTEND Cordless System. One battery works across the entire suite, allowing you to navigate the kitchen without the need for an outlet. This is the product you didn’t know you needed.
 
Comment CHEESECAKE for all the details straight to your inbox. 

INGREDIENTS
16 oz cream cheese
1/2 cup granulated sugar
1 cup heavy cream
1 tsp vanilla extract
1 cup strawberries
12 sheets graham crackers
1/2 cup melted butter

INSTRUCTIONS
In a large bowl add cream cheese and sugar. Mix with the Zwilling XTEND Cordless Hand Mixer until light and fluffy. Set aside. 

In another bowl add heavy cream and whip until stiff peaks form using the Zwilling Xtend Hand Blender with the whisk attachment. Set aside. 

Using the Zwilling XTEND Cordless Hand Blender blend strawberries until smooth. 

Add whipped cream and half of the strawberry puree to the cream cheese mixture. Mix to combine.

Using the mini chopper attachment of the Zwilling XTEND Cordless Hand Blender add graham cracker sheets and pulse until fine crumbs form. Add in melted butter and pulse until well combined.

Add the graham cracker mixture to an 10” springform pan and gently press into the springform pan.

Top graham crackers with cream cheese mixture, then drizzle remaining strawberry puree.

Serve immediately for a softer texture or cool in refrigerator for a few hours to set.
 
#zwilling1731 #xtend


I’ve been working all week to get my kitchen gar
I’ve been working all week to get my kitchen garden in and absolutely cannot wait for it to turn into my little piece of summer paradise. 

This year I’m growing peppers, cucumbers, tomatoes, carrots, radishes, zucchini, pumpkins, all the herbs, and flowers galore! Anything else I’m missing?


Homemade brioche bread is our absolute favorite. I
Homemade brioche bread is our absolute favorite. It’s super easy to make and the extra step of letting the dough rise in the refrigerator is really worth the flavor pay off. 

Comment BRIOCHE for all the details to your inbox. 

INGREDIENTS
2 1/4 tsp active dry yeast
¼ cup milk lukewarm
2 tbsp sugar
3 eggs
2.5 cups all-purpose flour
1 tsp salt
½ cup butter chilled and cut into small cubes

INSTRUCTIONS
Mix the yeast, lukewarm milk, and sugar, and let it sit for 5 minutes until foaming.
In the bowl of a stand mixer add flour, salt, and eggs. Once the yeast mixture is foamy add to the flour mixture as well. Mix to combine using the dough hook on the stand mixer.
Add the butter in pieces and knead for another 15 minutes at speed level 2 (your dough should be sticky but comes easily from the bowl using a silicone spatula).
Place the dough in a greased bowl, cover with a damp tea towel, and let it rise at room temperature for one hour. Refrigerate for 4-16 hours. This is what makes your brioche soft & airy.
Take the dough out of the fridge, place on a lightly floured surface, divide into six pieces. Gently form each piece into a small roll and place to fill a 9x5 loaf pan. Let rise at room temperature for another 1.5-2 hours
Preheat the oven to 400 F. Bake for 30-35 minutes until brown. Allow the brioche to cool down on a cooling rack before slicing.


Footer

On the Blog

  • Blog
  • Recipes

Info

  • About
  • Disclosure, Privacy Policy, and Terms

Copyright © 2025 · Theme by 17th Avenue

%d

    Rate This Recipe

    Your vote:


    A rating is required
    A name is required
    An email is required
    We use cookies to ensure that we give you the best experience on our website. If you continue to use this site we will assume that you are happy with it.Ok