• About
  • Nav Social Icons

  • Skip to primary navigation
  • Skip to main content
  • Skip to primary sidebar
  • Skip to footer
  • Home
  • About
  • Blog
    • Mom Life
    • Farm Life
    • Recipes
      • Breakfast
      • Dessert
      • Dinner
      • Sides
      • Snacks
  • Shop
    • Shop – Digital Books
  • Cart
  • My account
  • Mobile Menu Widgets

    Connect

    Search

The Farmstyle

The Farmstyle

by Kayla Zenner

  • Home
  • About
  • Shop
    • Shop – Meal Plans
    • Shop My Favorites
  • Blog
    • Breakfast
    • Dessert
    • Dinner
    • Snacks
    • Sides
    • All Recipes
  • Cart

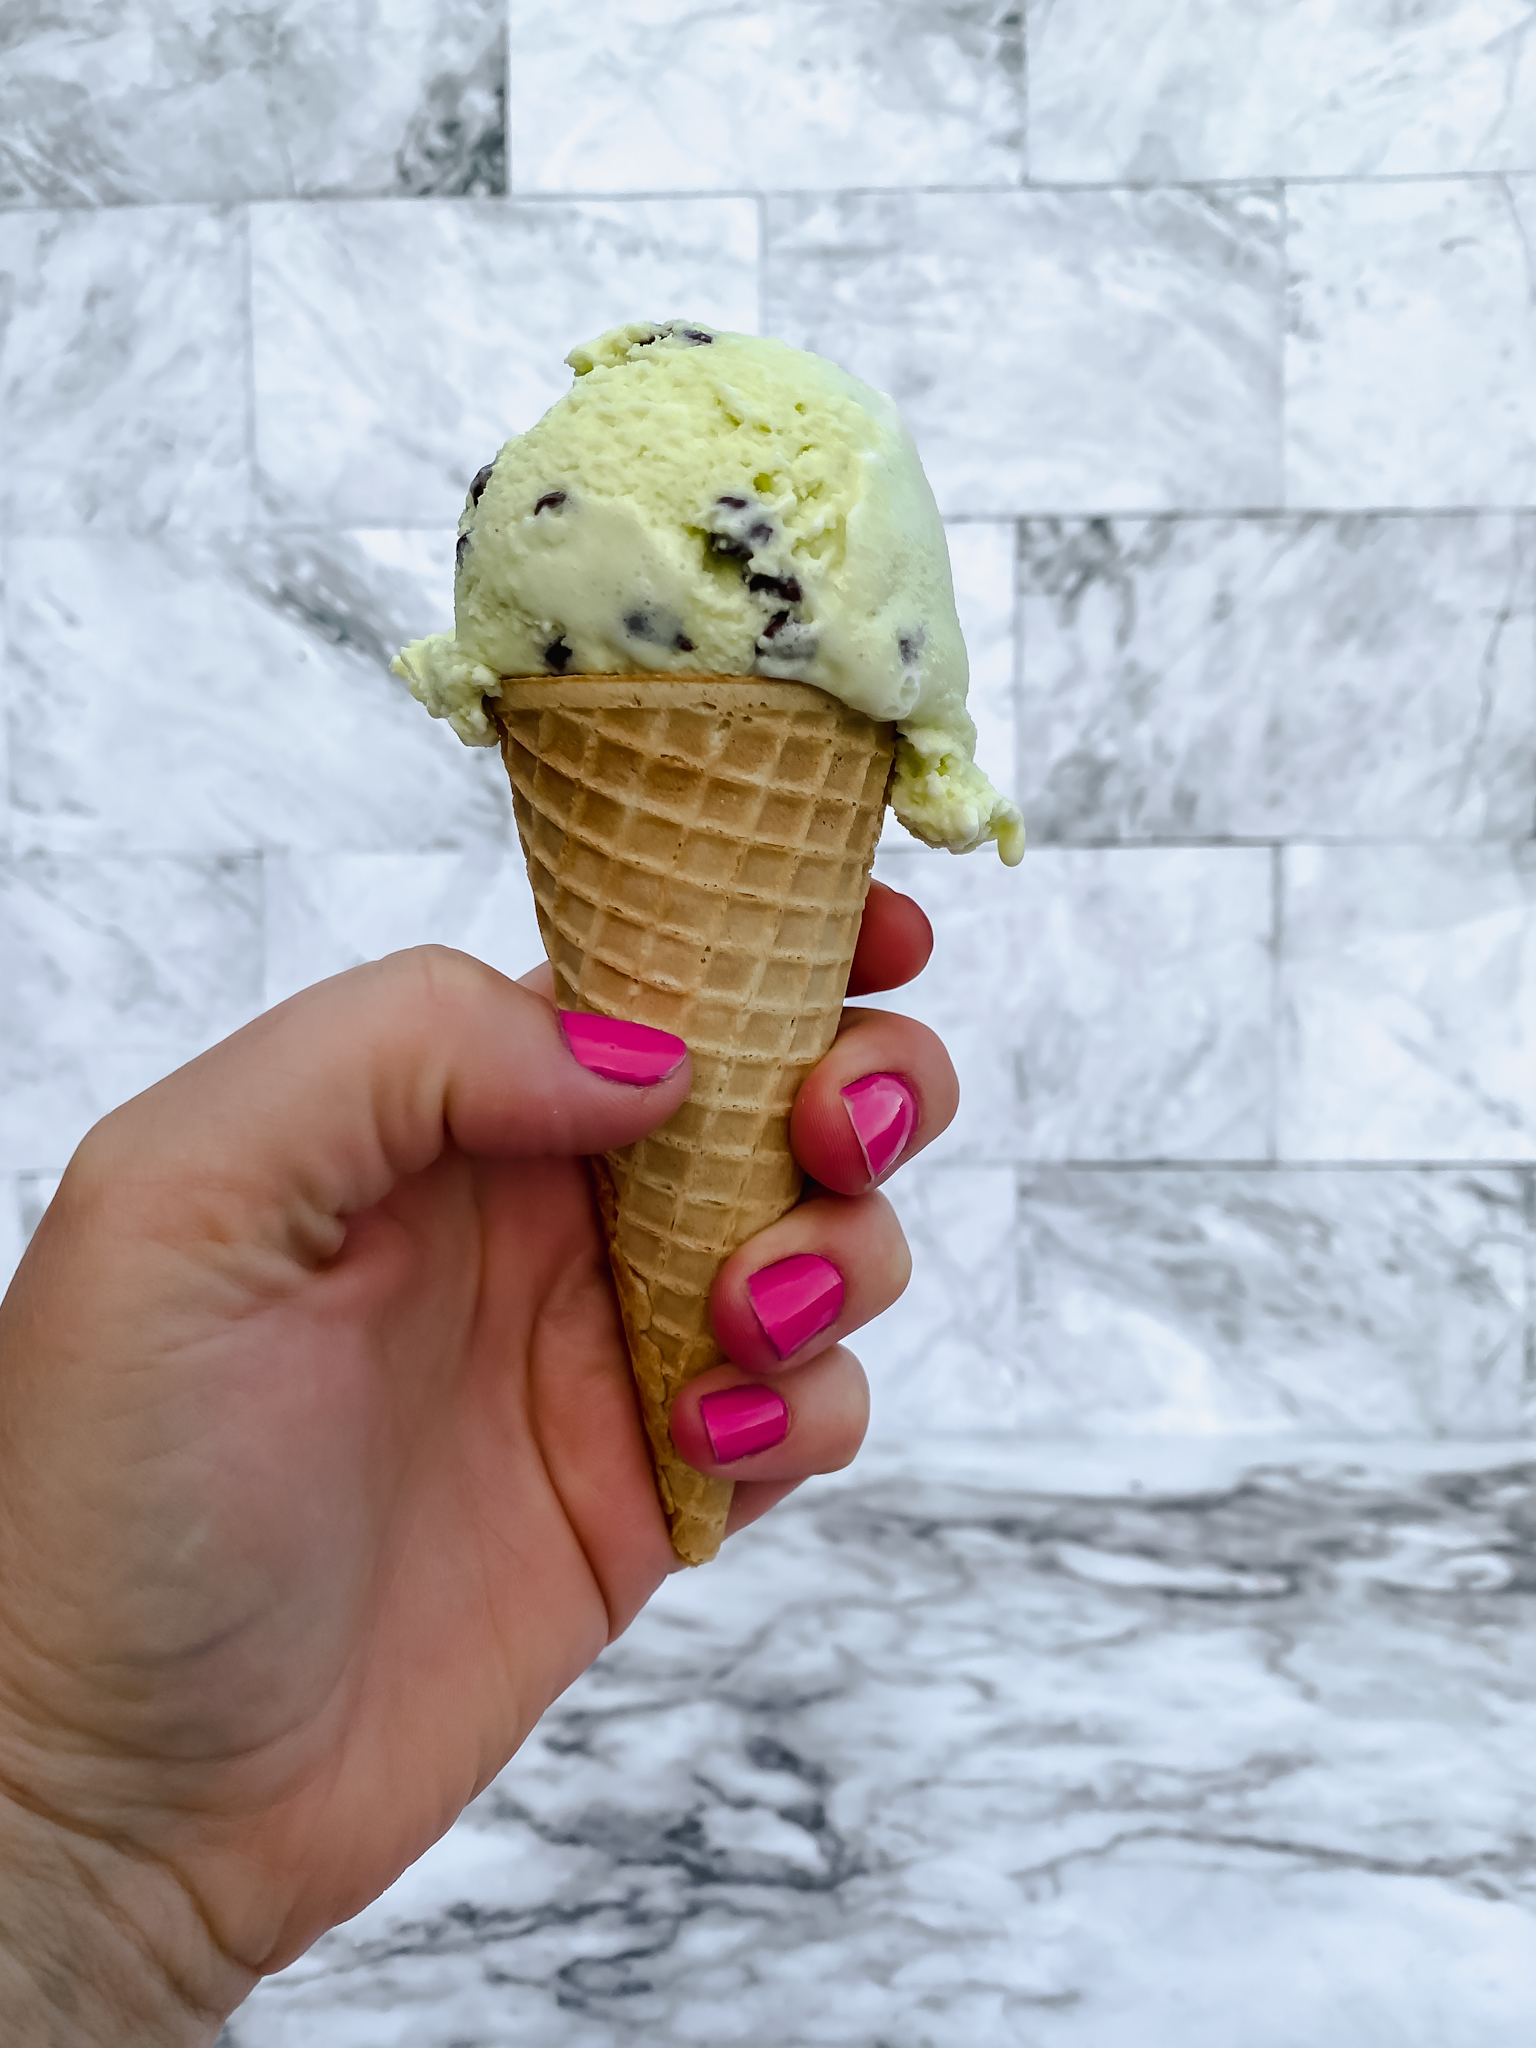
Mint Chip Ice Cream with Fresh Mint

July 16, 2023 · In: Dessert, Recipes

FacebookTweetPin
Jump to Recipe Print Recipe

Fresh mint ice cream naturally flavored with mint leaves will make this the best ice cream you have ever made. 

mint chip ice cream on a sugar cone

Mint and chip ice cream is made even better by naturally flavoring it with fresh mint leaves. Mint Chip Ice Cream is my husband’s favorite. Usually I will use mint extract instead of fresh mint, but when the garden is in full swing I can’t resit using fresh mint in the ice cream!

I used peppermint in this batch of ice cream, but any variety of mint that you like will work for this recipe! Just know that mint flavor will change slightly depending on the type of mint you use.

ingredients for mint chip ice cream with vital farms eggs and Straus heavy cream

Mint Chip Ice Cream Ingredients

Milk: I use whole milk to help make the ice cream more creamy. If you want super creamy ice cream swap this for half and half.

Heavy Cream: The more fat the creamier the ice cream.

Egg Yolks: We will be making a custard base for this ice cream so egg yolks are a must.

Sugar: I like to keep the ice cream slightly sweet. If you like a sweeter ice cream add more sugar.

Mint Leaves: Using fresh mint allows us to naturally flavor the ice cream.

Vanilla Extract: Gives an extra note of vanilla to the ice cream base

Mini Chocolate Chips: you can also add in chopped chocolate if you want.

ice cream scoop of mint chip ice cream

How to make mint chip ice cream

Making ice cream isn’t hard, it just requires time and patience. There is a lot of time spent waiting for things to cool in this recipe, but the hands on time is fairly minimal.

In this recipe we start by heating the milk and cream to steep the mint leaves in. It is important to not allow your milk and cream mixture to boil. Doing so may result in separation and curdling in your mixture. Letting the mint leaves steep for at least an hour gets as much flavor infused as possible. You can also rip up the leaves to get even more of the natural oil infused.

After the milk mixture is fully infused we will make our custard base with the egg yolks, sugar, and strained milk mixture. Heating this just enough to cook the eggs and then transferring to a container to cool in the refrigerator. Before placing in the refrigerator you can add in the vanilla extract and green coloring (if using). You can also utilize the freezer to speed up the cooling process, but do not forget about the mixture and allow it to freeze.

After the mixture has cooled you can transfer it to your ice cream maker and allow to churn according the the instructions. I use the kitchen aid attachment and allow mine to churn for about 30 minutes. Towards the end of churning I like to add in the mini chocolate chips to mix in. However, you can mix these in by hand after the churning is done.

Finally, you will put the ice cream back into the freezer to harden up for a few hours. You will then have a nice and creamy naturally flavored mint chip ice cream to enjoy.

Fresh Mint Chip Ice Cream

No ratings yet
Fresh mint ice cream naturally flavored with mint leaves will make this the best ice cream you have ever made.
Print Recipe Pin Recipe
Prep Time:20 minutes mins
Cook Time:20 minutes mins
Wait Time:6 hours hrs
Total Time:6 hours hrs 40 minutes mins
Servings: 1 qt

Equipment

  • 1 Ice Cream Maker I use my ice cream attachment for my kitchen aid.

Ingredients

  • 2 cup whole milk
  • 1 cup heavy cream
  • 1 cup fresh mint leaves
  • 4 egg yolks
  • 1/2 cup sugar
  • 1 tbsp vanilla extract
  • 3/4 cup mini chocolate chips
  • green food coloring optional

Instructions

  • In a small pot scald heavy cream and milk. Do not allow to boil.
  • Add in mint leaves and cover. Let steep for at least 1 hour. If you want more mint flavor rip up the leaves to get as much oil into the cream mixture and let steep for longer.
  • In a large sauce pan add egg yolks and sugar. Mix to combine.
  • Strain the milk mixture of the mint leaves and add to sugar and egg yolk mixture.
  • Heat over medium heat to 165. Add in vanilla extract and green coloring (if using).
  • Transfer to container and allow to cool in the fridge for several hours. You can use the freezer to speed up the process but do not allow the mixture to freeze.
  • Add the cooled mixture to the ice cream churner and mix according to the ice cream instructions.
  • Add in chocolate chips at the end of churning or hand mix in.
  • Transfer to a freezer container and allow to harden in the freezer for several more hours.

Share this:

  • Click to share on X (Opens in new window) X
  • Click to share on Facebook (Opens in new window) Facebook
  • Click to share on Pinterest (Opens in new window) Pinterest

Like this:

Like Loading...
FacebookTweetPin

By: Kayla · In: Dessert, Recipes

About Kayla

Hi! I'm Kayla. I'm here to help inspire busy moms to get back in the kitchen and feel beautiful along the way! I'm married to my high school sweetheart and live on a farm with our two busy boys.

you’ll also love

Mini Chocolate Bundt Cakes
Pumpkin Coffee Cake Bakery Style Cookies
Lazy Lasagna

Reader Interactions

Leave a ReplyCancel reply

Next Post >

Cinnamon Maple Banana Bread

Primary Sidebar

Meet Kayla

Meet Kayla
hello!

LIVING OURFARM(LIFE)STYLE WHERE WE ​JUGGLE THE CHAOS OF MOTHERHOOD ONE ​KITCHEN ADVENTURE AT A TIME!

Read More

Connect

join the list

Categories

  • Blog
  • Recipes

Follow Along

@thefarmstyle


Help me get to my big goal before 2026.


Comment RECIPE for all the details sent to your in
Comment RECIPE for all the details sent to your inbox. 

These Individual Chicken Pot Pies are the ultimate cozy comfort food with a flaky homemade pie crust, creamy chicken filling, and perfectly portioned for easy serving.

Ingredients
Chicken Pot Pie Filling
3 cups rotisserie chicken shredded
1 onion diced
1/2 cup carrots diced
4 tbsp butter
1/4 cup flour
1/4 cup heavy cream
2 cups chicken broth
1 tsp onion powder
1 tsp garlic powder
1/2 tsp rosemary
Pie Crust
2 cups butter cold
4 cups all purpose flour
2 tsp salt
1/4 cup ice cold water

Instructions
Preheat oven to 425 F.

Make the Pie Crust
In a large bowl add cubed butter, salt and flour. Using a pastry cutter or two knives cut together the flour and butte until it resembles crumbly flour.
Slowly add in the ice cold water until the dough starts to come together. Once the dough starts to come together pour onto a counter and use your hands to combine the dough.
Split the dough in 12 section and place onto a floured surface and roll out half the pie crusts to fit your pie pan. If the dough starts to stick to the rolling pin, sprinkle a little flour on top.
Transfer the rolled-out crust to your pie pan, pressing it gently to fit the bottom and sides.

Make the Pot Pie Filling
Melt butter in a cast iron pan and add in onion and carrot. Cook over medium heat until soft. 
Add in flour. Cook for 1-2 minutes.
Add in chicken stock, seasonings, chicken, and heavy cream. Simmer for 5 minutes to thicken sauce. 
Top with biscuits and bake according to biscuit instructions.

Assemble the Pot Pies
Add about 1 cup of filling to each of the prepared pie pans.
Roll out remaining pie crust and place on top of filled pie pans.
Crimp the edges and bake pies for 25-30 minutes, or until crust is golden brown.

Make Ahead Option
After assembling the pit pies, place onto a sheet pan and freeze for 1-2 hours. Wrap each in plastic wrap and freeze for later. 
Bake from frozen at 400F for 45-55 minutes. Covering with foil if the tops brown too fast.


Comment BREAKFAST for all the recipe details.

Th
Comment BREAKFAST for all the recipe details. 

These viral sausage gravy bombs are perfect for Christmas morning! Combining the classic biscuit and gravy into a portable breakfast creation, they are a family favorite!

Ingredients
1 lb ground sausage
1/3 cup flour
2 cups milk
1 Tbsp Roasted Chicken Better than Bouillon
pepper to taste
1 pkg refrigerator biscuits

Instructions
In a large skillet cook the sausage.
Add in flour, stir to coat the sausage and cook for about 2 minutes. Add in milk boulion and pepper. Simmer until thickened.
Roll the biscuits into a small circle, then fill with about 1/4 cup gravy. Pinch up to middle to seal and place seam side down on a baking sheet. Repeat with remaining biscuits.
NOTE: if making these ahead of time you can place these in the refrigerator overnight. Then bake the next morning. 
Bake according to biscuit package.

TIP: I like to double this recipe and freeze the remaining. Pull out what I want the night before to thaw in the fridge, then place in oven on broil for a few minutes to crisp the biscuit up. BECAREFUL not to forget them in the oven and watch carefully.

#christmasbreak #makeaheadbreakfast #biscuitsandgravy


Nothing beats a room full of flour-dusted hands an
Nothing beats a room full of flour-dusted hands and people excited to learn.

Our pie and sugar cookie class with Wendy @thepeacefulhomestead gave 12 students the confidence (and the recipes) to bake treats everyone will be raving about.

These classes are always so much fun and I look forward to it every year.


(ad) A little peek into my everyday life:

School
(ad) A little peek into my everyday life:

School drop-off → recipe testing → editing → errands → cow chores and somewhere in between, I grab a @drinkolipop to keep things moving.

It’s not coffee. It’s not water. It’s just that happy moment in the middle of my day that feels like a treat and supports my wellness goals.

Today’s pick: Ginger Ale

Tomorrow? Who knows — the OLIPOP drawer stays stocked. 😉

Which flavor should I try next?

#OLIPOPpartner #DITL


So excited to get started with my new @breville Ba
So excited to get started with my new @breville Barista Touch! 

Not a perfect shot because I forgot to set the grind size to the correct spot, but stay tuned for tomorrow! 

#breville #espresso


Footer

On the Blog

  • Blog
  • Recipes

Info

  • About
  • Disclosure, Privacy Policy, and Terms

Copyright © 2025 · Theme by 17th Avenue

%d

    Rate This Recipe

    Your vote:


    A rating is required
    A name is required
    An email is required
    We use cookies to ensure that we give you the best experience on our website. If you continue to use this site we will assume that you are happy with it.