Simple Whole Roasted Chicken
This simple whole roasted chicken is juicy, tender, and packed with flavor. An easy one-pot recipe for Sunday dinner or a cozy family meal.

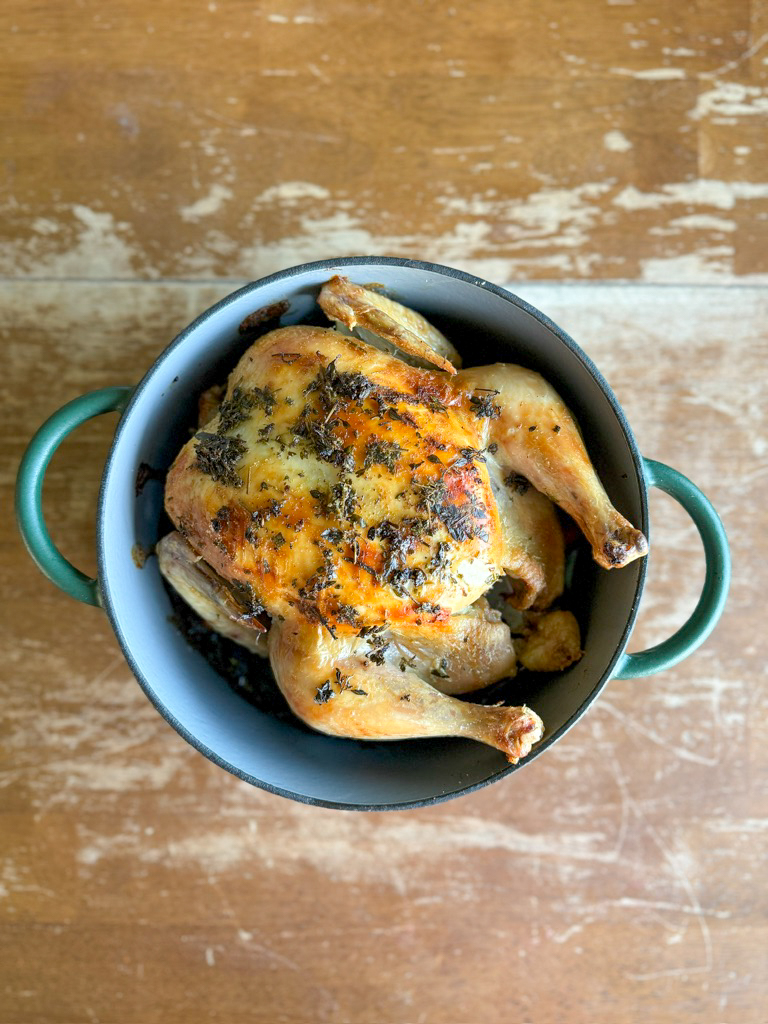
There's nothing more comforting than the smell of a whole roasted chicken filling the kitchen. It's one of those timeless meals that feels just as right on a Sunday evening with family as it does when you're hosting guests. This Super Simple whole roasted chicken recipe is made in a dutch oven and is one of my go-tos because it's simple, foolproof, and results in the juiciest chicken with perfectly crisp skin every single time.
Cooking the chicken in a Dutch oven keeps it tender and moist, while finishing it uncovered at the end gives you that irresistible golden-brown skin. The best part? It all comes together in one pot with vegetables tucked underneath, which means fewer dishes and more flavor.
Ingredients for the Best Roasted Chicken
Let's talk about what makes this recipe work. Each ingredient plays a role in layering flavor and texture, and there's some flexibility depending on what you have on hand.
- Whole chicken - The star of the dish! Look for a fresh whole chicken (about 4-5 pounds). Using bone-in, skin-on ensures maximum flavor and juiciness.
- Butter - Rubbing butter over the chicken helps lock in moisture and adds rich flavor. If you're dairy-free, ghee or even coconut oil can be used instead.
- Olive oil - Combining butter with olive oil keeps the fat from burning and helps the skin crisp beautifully. Avocado oil is another good substitute.
- Fresh rosemary and thyme - These herbs give the chicken that classic, earthy aroma. If you don't have fresh herbs, dried rosemary and thyme will work-just use a smaller amount since dried herbs are more concentrated.
- Salt and pepper - Don't skimp here! Seasoning generously makes the flavors pop and helps crisp the skin.
- Onion - Placed in the bottom of the Dutch oven, onion adds a subtle sweetness as it roasts. Shallots or leeks can also be swapped in.
- Carrots - These serve as a flavorful bed for the chicken while soaking up all the juices. Potatoes, parsnips, or celery are excellent substitutes or additions.
How to Make Dutch Oven Roast Chicken
Step 1: Prep the chicken
Preheat the oven and get your chicken ready by removing any giblets and patting it dry. This step is key for achieving crispy skin.
Step 2: Build the veggie base
Quarter the onion and carrots and place them into the bottom of your Dutch oven. This creates a flavorful rack for the chicken to rest on while it cooks.
Step 3: Make the butter rub
In a small bowl, mix together butter, olive oil, fresh herbs, salt, and pepper. Rub this mixture generously all over the chicken, making sure to cover every bit of the skin for maximum flavor.
Step 4: Roast
Set the chicken breast-side up on top of the vegetables and cover with the Dutch oven lid. Roast until the chicken reaches the proper internal temperature, then uncover for the last bit of cooking to crisp the skin.
Step 5: Rest and carve
Letting the chicken rest before carving locks in the juices and makes for tender, flavorful meat.
Tips for Success
- Use a thermometer - The most reliable way to know your chicken is done is to check that the thickest part of the thigh reaches 165°F.
- Crispier skin: For extra golden skin, brush a little melted butter on top before uncovering it at the end.
- Make it a meal: Toss in baby potatoes, parsnips, or even whole garlic cloves along with the carrots and onion for a full one-pot dinner.
- Save the bones: Don't throw away the carcass-it's perfect for making homemade chicken stock.
What to Serve with Roasted Chicken
This recipe is hearty enough to stand on its own with the vegetables in the pot, but here are some of my favorite pairings:
- Mashed potatoes with gravy made from the pan drippings
- A crisp green salad to balance the richness
- Fresh dinner rolls or crusty bread for soaking up juices
Storing & Reheating
- Refrigerator: Store leftovers in an airtight container for up to 4 days.
- Freezer: Shredded chicken freezes beautifully for up to 3 months.
- Reheating: Warm in the oven at 325°F until heated through, or reheat gently in the microwave.
Final Thoughts
This Dutch oven roasted chicken is the kind of recipe you'll come back to again and again. It's simple, nourishing, and makes your home smell amazing while it cooks. Whether it's Sunday supper or a cozy weeknight meal, this is the kind of comfort food that never goes out of style.
👉 If you make this recipe, be sure to leave a rating and comment below - I'd love to hear how it turned out for you. And for more family-friendly comfort recipes, follow along with me on Instagram @thefarmstyle!
📖 Recipe
Easy Roasted Chicken
Ingredients
Equipment
Instructions
- Preheat oven to 350°F. Remove giblets from interior of the chicken and pat chicken dry with paper towels.
- Quarter onion and carrots and place into the bottom of a 4-6 qt dutch oven.
- In a small bowl combine butter, olive oil, rosemary, thyme, salt and pepper.
- Rub the butter mixture all over the skin of the chicken.
- Place the chicken breast-side up in the dutch oven and cover. Roast for 1 hour 30 minutes to 2 hours, until the thickest part of the thigh registers 165°F on a meat thermometer.
- Remove the lid of the dutch oven for the last 15 minutes of cooking to allow the skin to crisp up.
- Remove from oven and let rest for 10-15 minutes before carving. This keeps the juices locked in.


