• About
  • Nav Social Icons

  • Skip to primary navigation
  • Skip to main content
  • Skip to primary sidebar
  • Skip to footer
  • Home
  • About
  • Blog
    • Mom Life
    • Farm Life
    • Recipes
      • Breakfast
      • Dessert
      • Dinner
      • Sides
      • Snacks
  • Shop
    • Shop – Digital Books
  • Cart
  • My account
  • Mobile Menu Widgets

    Connect

    Search

The Farmstyle

The Farmstyle

by Kayla Zenner

  • Home
  • About
  • Shop
    • Shop – Meal Plans
    • Shop My Favorites
  • Blog
    • Breakfast
    • Dessert
    • Dinner
    • Snacks
    • Sides
    • All Recipes
  • Cart

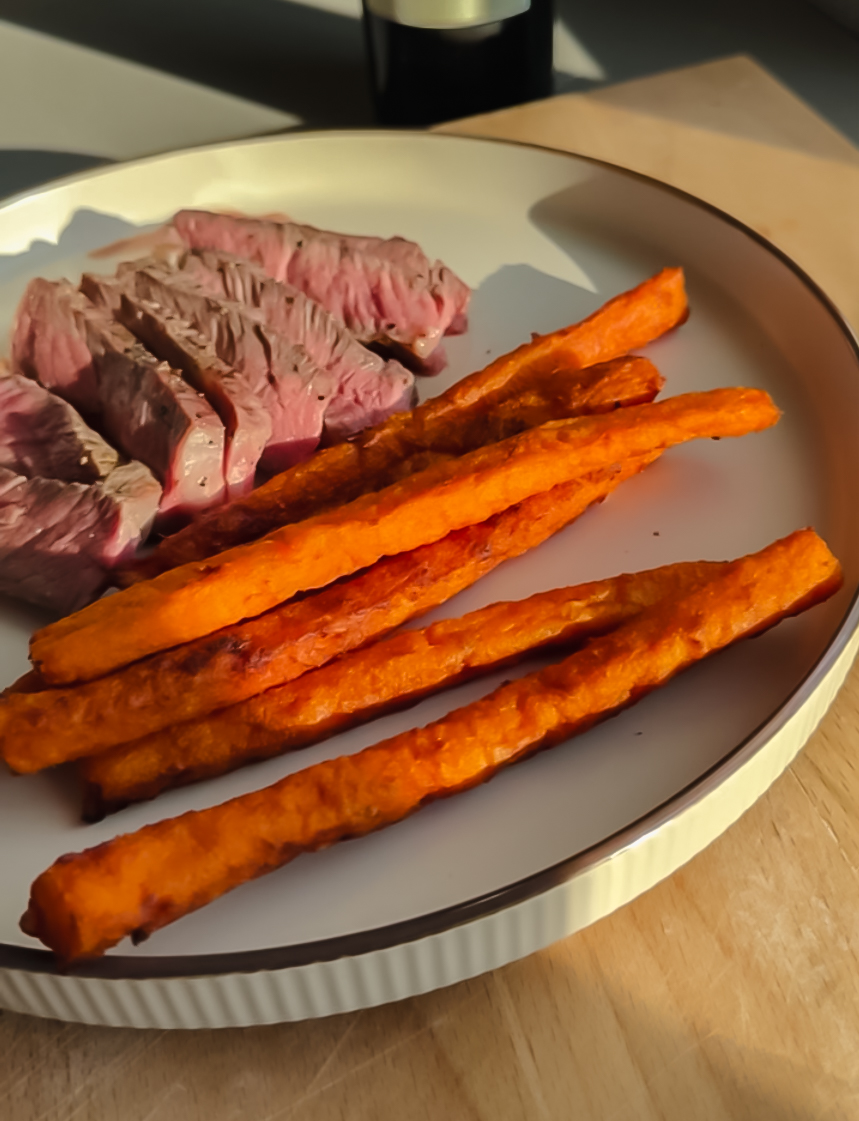
Crispy Sweet Potato Japanese Long Fries

November 7, 2025 · In: Recipes, Sides

FacebookTweetPin
Jump to Recipe Print Recipe

Crispy on the outside and tender on the inside, these Sweet Potato Japanese Long Fries are a savory twist on classic fries. Made with mashed sweet potatoes, herbs, and cornstarch for the perfect crunch, they’re an easy and flavorful side or snack.

If you love crispy, golden fries with a tender center, these Sweet Potato Japanese Long Fries are about to become your new favorite side dish. Made from mashed sweet potatoes shaped into long, fry-like strips, this recipe combines the natural sweetness of sweet potatoes with savory herbs and a light, crisp exterior. The result is a perfectly snackable fry that’s crispy on the outside, soft on the inside, and completely irresistible.

These fries are inspired by the Japanese long fry trend, but made easy for home cooks—no special tools required. They’re perfect for pairing with dipping sauces, adding to a burger night spread, or serving as a fun, elevated appetizer.

Why You’ll Love These Sweet Potato Fries

  • Crispy outside, tender inside: The cornstarch creates that perfect crunch without heavy breading.
  • Naturally flavorful: A blend of herbs and spices enhances the sweet, earthy flavor of the potatoes.
  • Freezer-friendly: You can prep the fries ahead of time and fry them right before serving.

Ingredients

  • Sweet potatoes: The base of the recipe, providing natural sweetness and color. Look for firm, medium-sized potatoes for easier cutting. You can substitute with Japanese yams or purple sweet potatoes for a fun twist.
  • Garlic powder and onion powder: Add depth and savory flavor to balance the sweetness.
  • Italian herb seasoning: Brings in aromatic notes of oregano, thyme, and basil. You can swap this for herbes de Provence or your favorite all-purpose seasoning.
  • Paprika: Adds a subtle smoky flavor and beautiful color. Smoked paprika works great for a bolder flavor.
  • Salt and black pepper: Enhance all the other flavors and bring balance to the dish.
  • Cornstarch: The secret to achieving that crisp, golden exterior. Arrowroot starch or potato starch also work well.
  • Frying oil: Tallow adds incredible richness and crispness, but you can also use avocado oil, vegetable oil, or peanut oil depending on your preference.

Instructions

  1. Peel and chop the sweet potatoes, then boil until fork-tender.
  2. Transfer to a large bowl and let them steam for a few minutes to release excess moisture.
  3. Mash until smooth, then mix in the seasonings and cornstarch until well combined.
  4. Press the mixture evenly into a parchment-lined pan and freeze for 30 minutes.
  5. Slice into long, thin strips to create your “fries.”
  6. Heat the oil to 375°F and fry the fries in small batches for 2–3 minutes until crisp and golden.
  7. Transfer to a paper towel-lined rack to drain, then season lightly and serve warm.

Serving Suggestions

Serve your Sweet Potato Japanese Long Fries with a side of garlic aioli, spicy mayo, or honey butter for dipping. They’re also incredible topped with flaky salt and a sprinkle of Parmesan cheese for a little extra indulgence.

Tips for Success

  • Don’t skip the freezing step—it helps the fries hold their shape while frying.
  • Keep your oil hot! If it cools down, the fries can fall apart or absorb too much oil.
  • These can easily be made ahead and fried right before serving for the best texture.

Sweet Potato Japanese Long Fries

No ratings yet
Crispy on the outside and tender on the inside, these Sweet Potato Japanese Long Fries are a savory twist on classic fries. Made with mashed sweet potatoes, herbs, and cornstarch for the perfect crunch, they’re an easy and flavorful side or snack.
Print Recipe Pin Recipe
Prep Time:25 minutes mins
Cook Time:20 minutes mins
Course: Side Dish
Servings: 4

Ingredients

  • 2-3 Sweet Potatoes about 1.5 lbs
  • 2 tsp garlic powder
  • 2 tsp onion powder
  • 2 tsp Itialian herb seasoning
  • 1 tsp paprika
  • 1 tsp salt
  • 1 tsp pepper
  • 1/4 cup cornstarch.
  • Frying Oil I love tallow

Instructions

  • Peel the sweet potatoes, then chop into small pieces. Add to a saucepan filled with boiling water over medium high heat to boil for 8-10 minutes, until fork tender.
  • Use a slotted spoon to transfer the softened potatoes to a large mixing bowl. Let steam in the bowl for 5-10 minutes.
  • Use a potato masher to make the potatoes into mashed potatoes.
  • Add the spices and cornstarch. Mix with a spatula until combined.
  • Transfer the mashed potatoes a parchment lined quarter sheet pan (or 9×13 pan). Press into an even layer.
  • Freeze for 30 minutes. If making in advance, you can freeze up to the day prior.
  • Transfer potatoes to a cutting board and use a kitchen knife to slice into 1/2″ thick strips.
  • Heat up 3-4″ of frying oil in a large skillet over medium high heat.
  • Once oil has reached 375F, work in small batches of 3-4 long fries at a time to fry until deeply golden, about 2-3 minutes. If you find the fries are falling apart, it’s likely the oil is not staying hot enough.
  • Use a slotted spoon to transfer the golden fries to the paper towel lined baking rack to drain excess oils.
  • Then Enjoy!

Share this:

  • Click to share on X (Opens in new window) X
  • Click to share on Facebook (Opens in new window) Facebook
  • Click to share on Pinterest (Opens in new window) Pinterest

Like this:

Like Loading...
FacebookTweetPin

By: Kayla · In: Recipes, Sides

About Kayla

Hi! I'm Kayla. I'm here to help inspire busy moms to get back in the kitchen and feel beautiful along the way! I'm married to my high school sweetheart and live on a farm with our two busy boys.

you’ll also love

sourdough browniesThe Perfect Fudgy Sourdough Brownies
Ricotta Meatball Bake
Southwest Chicken | Easy Dinner Idea

Reader Interactions

Leave a ReplyCancel reply

Next Post >

Apple Fritter Pancakes

Primary Sidebar

Meet Kayla

Meet Kayla
hello!

LIVING OURFARM(LIFE)STYLE WHERE WE ​JUGGLE THE CHAOS OF MOTHERHOOD ONE ​KITCHEN ADVENTURE AT A TIME!

Read More

Connect

join the list

Categories

  • Blog
  • Recipes

Follow Along

@thefarmstyle


Help me get to my big goal before 2026.


Comment RECIPE for all the details sent to your in
Comment RECIPE for all the details sent to your inbox. 

These Individual Chicken Pot Pies are the ultimate cozy comfort food with a flaky homemade pie crust, creamy chicken filling, and perfectly portioned for easy serving.

Ingredients
Chicken Pot Pie Filling
3 cups rotisserie chicken shredded
1 onion diced
1/2 cup carrots diced
4 tbsp butter
1/4 cup flour
1/4 cup heavy cream
2 cups chicken broth
1 tsp onion powder
1 tsp garlic powder
1/2 tsp rosemary
Pie Crust
2 cups butter cold
4 cups all purpose flour
2 tsp salt
1/4 cup ice cold water

Instructions
Preheat oven to 425 F.

Make the Pie Crust
In a large bowl add cubed butter, salt and flour. Using a pastry cutter or two knives cut together the flour and butte until it resembles crumbly flour.
Slowly add in the ice cold water until the dough starts to come together. Once the dough starts to come together pour onto a counter and use your hands to combine the dough.
Split the dough in 12 section and place onto a floured surface and roll out half the pie crusts to fit your pie pan. If the dough starts to stick to the rolling pin, sprinkle a little flour on top.
Transfer the rolled-out crust to your pie pan, pressing it gently to fit the bottom and sides.

Make the Pot Pie Filling
Melt butter in a cast iron pan and add in onion and carrot. Cook over medium heat until soft. 
Add in flour. Cook for 1-2 minutes.
Add in chicken stock, seasonings, chicken, and heavy cream. Simmer for 5 minutes to thicken sauce. 
Top with biscuits and bake according to biscuit instructions.

Assemble the Pot Pies
Add about 1 cup of filling to each of the prepared pie pans.
Roll out remaining pie crust and place on top of filled pie pans.
Crimp the edges and bake pies for 25-30 minutes, or until crust is golden brown.

Make Ahead Option
After assembling the pit pies, place onto a sheet pan and freeze for 1-2 hours. Wrap each in plastic wrap and freeze for later. 
Bake from frozen at 400F for 45-55 minutes. Covering with foil if the tops brown too fast.


Comment BREAKFAST for all the recipe details.

Th
Comment BREAKFAST for all the recipe details. 

These viral sausage gravy bombs are perfect for Christmas morning! Combining the classic biscuit and gravy into a portable breakfast creation, they are a family favorite!

Ingredients
1 lb ground sausage
1/3 cup flour
2 cups milk
1 Tbsp Roasted Chicken Better than Bouillon
pepper to taste
1 pkg refrigerator biscuits

Instructions
In a large skillet cook the sausage.
Add in flour, stir to coat the sausage and cook for about 2 minutes. Add in milk boulion and pepper. Simmer until thickened.
Roll the biscuits into a small circle, then fill with about 1/4 cup gravy. Pinch up to middle to seal and place seam side down on a baking sheet. Repeat with remaining biscuits.
NOTE: if making these ahead of time you can place these in the refrigerator overnight. Then bake the next morning. 
Bake according to biscuit package.

TIP: I like to double this recipe and freeze the remaining. Pull out what I want the night before to thaw in the fridge, then place in oven on broil for a few minutes to crisp the biscuit up. BECAREFUL not to forget them in the oven and watch carefully.

#christmasbreak #makeaheadbreakfast #biscuitsandgravy


Nothing beats a room full of flour-dusted hands an
Nothing beats a room full of flour-dusted hands and people excited to learn.

Our pie and sugar cookie class with Wendy @thepeacefulhomestead gave 12 students the confidence (and the recipes) to bake treats everyone will be raving about.

These classes are always so much fun and I look forward to it every year.


(ad) A little peek into my everyday life:

School
(ad) A little peek into my everyday life:

School drop-off → recipe testing → editing → errands → cow chores and somewhere in between, I grab a @drinkolipop to keep things moving.

It’s not coffee. It’s not water. It’s just that happy moment in the middle of my day that feels like a treat and supports my wellness goals.

Today’s pick: Ginger Ale

Tomorrow? Who knows — the OLIPOP drawer stays stocked. 😉

Which flavor should I try next?

#OLIPOPpartner #DITL


So excited to get started with my new @breville Ba
So excited to get started with my new @breville Barista Touch! 

Not a perfect shot because I forgot to set the grind size to the correct spot, but stay tuned for tomorrow! 

#breville #espresso


Footer

On the Blog

  • Blog
  • Recipes

Info

  • About
  • Disclosure, Privacy Policy, and Terms

Copyright © 2025 · Theme by 17th Avenue

%d

    Rate This Recipe

    Your vote:


    A rating is required
    A name is required
    An email is required
    We use cookies to ensure that we give you the best experience on our website. If you continue to use this site we will assume that you are happy with it.