• About
  • Nav Social Icons

  • Skip to primary navigation
  • Skip to main content
  • Skip to primary sidebar
  • Skip to footer
  • Home
  • About
  • Blog
    • Mom Life
    • Farm Life
    • Recipes
      • Breakfast
      • Dessert
      • Dinner
      • Sides
      • Snacks
  • Shop
    • Shop – Digital Books
  • Cart
  • My account
  • Mobile Menu Widgets

    Connect

    Search

The Farmstyle

The Farmstyle

by Kayla Zenner

  • Home
  • About
  • Shop
    • Shop – Meal Plans
    • Shop My Favorites
  • Blog
    • Breakfast
    • Dessert
    • Dinner
    • Snacks
    • Sides
    • All Recipes
  • Cart

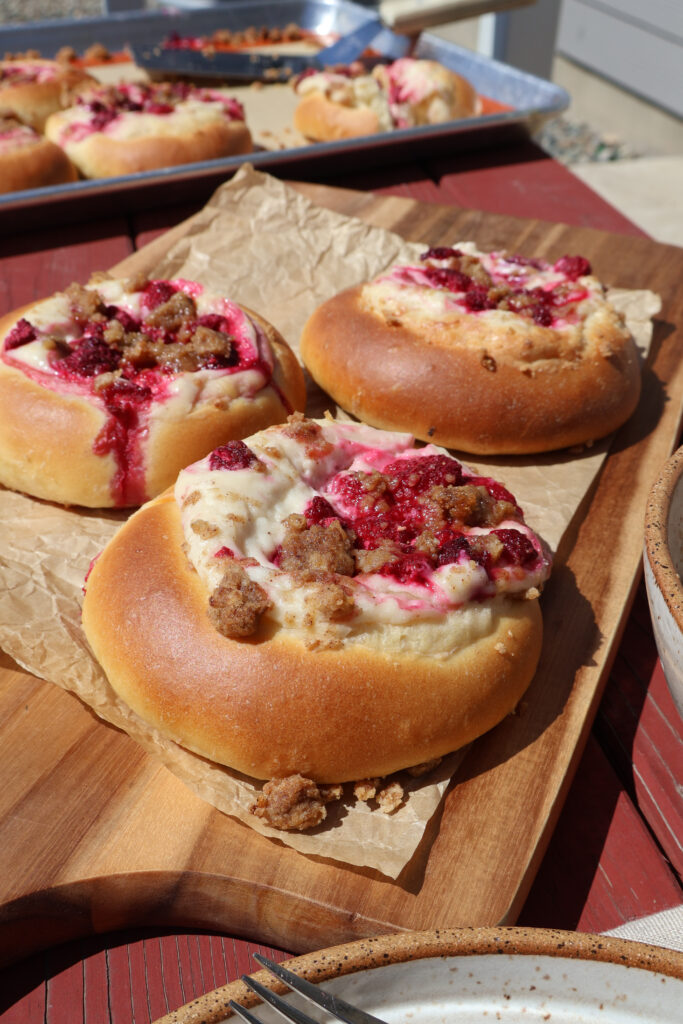
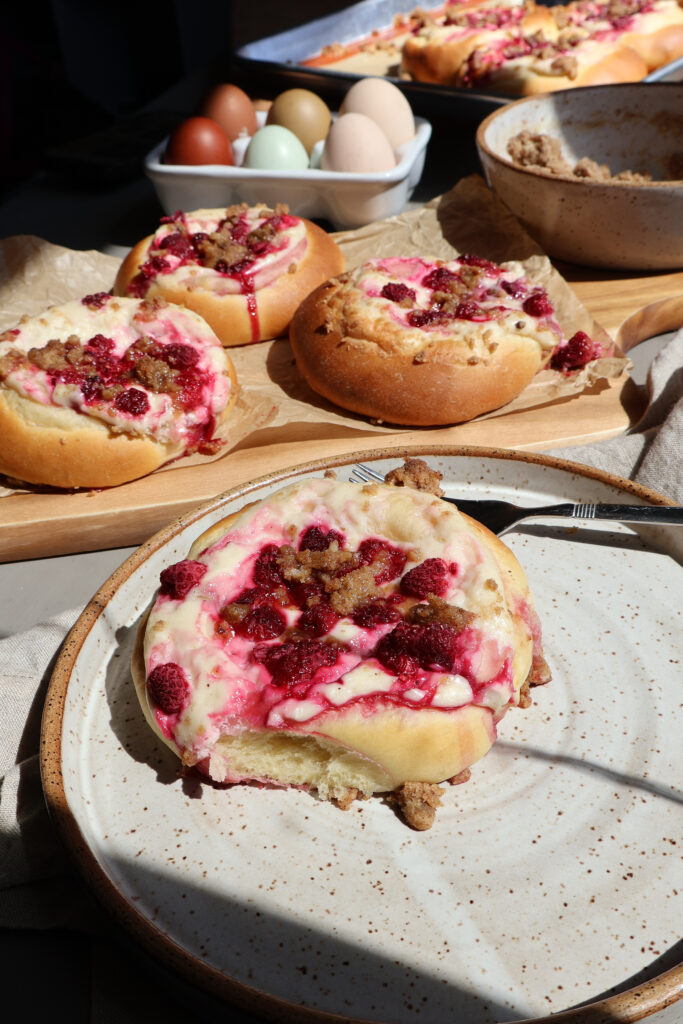
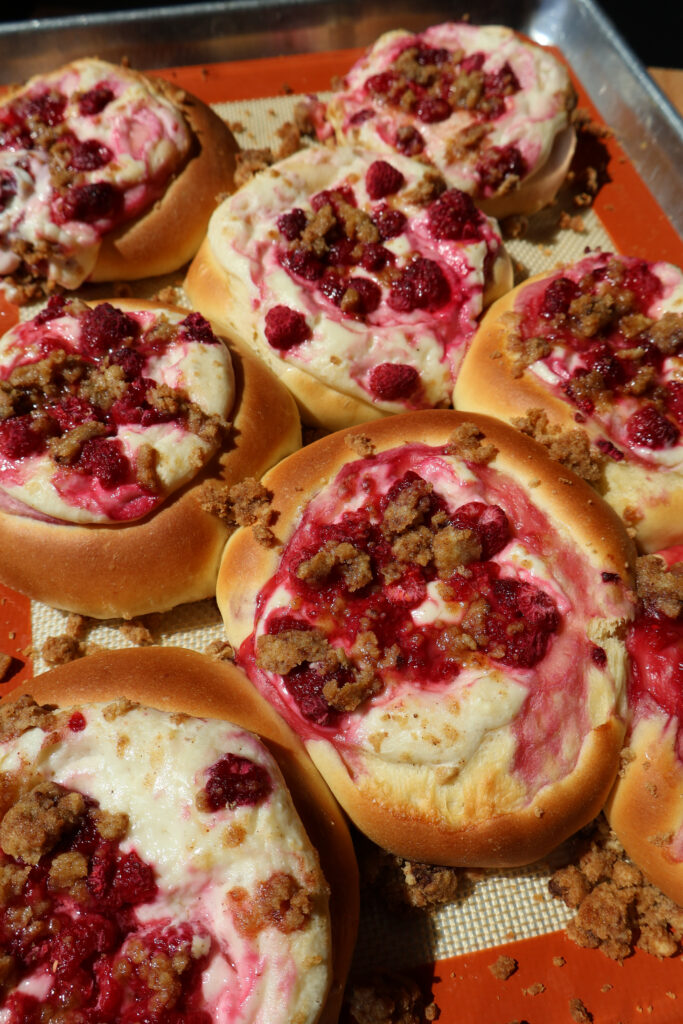
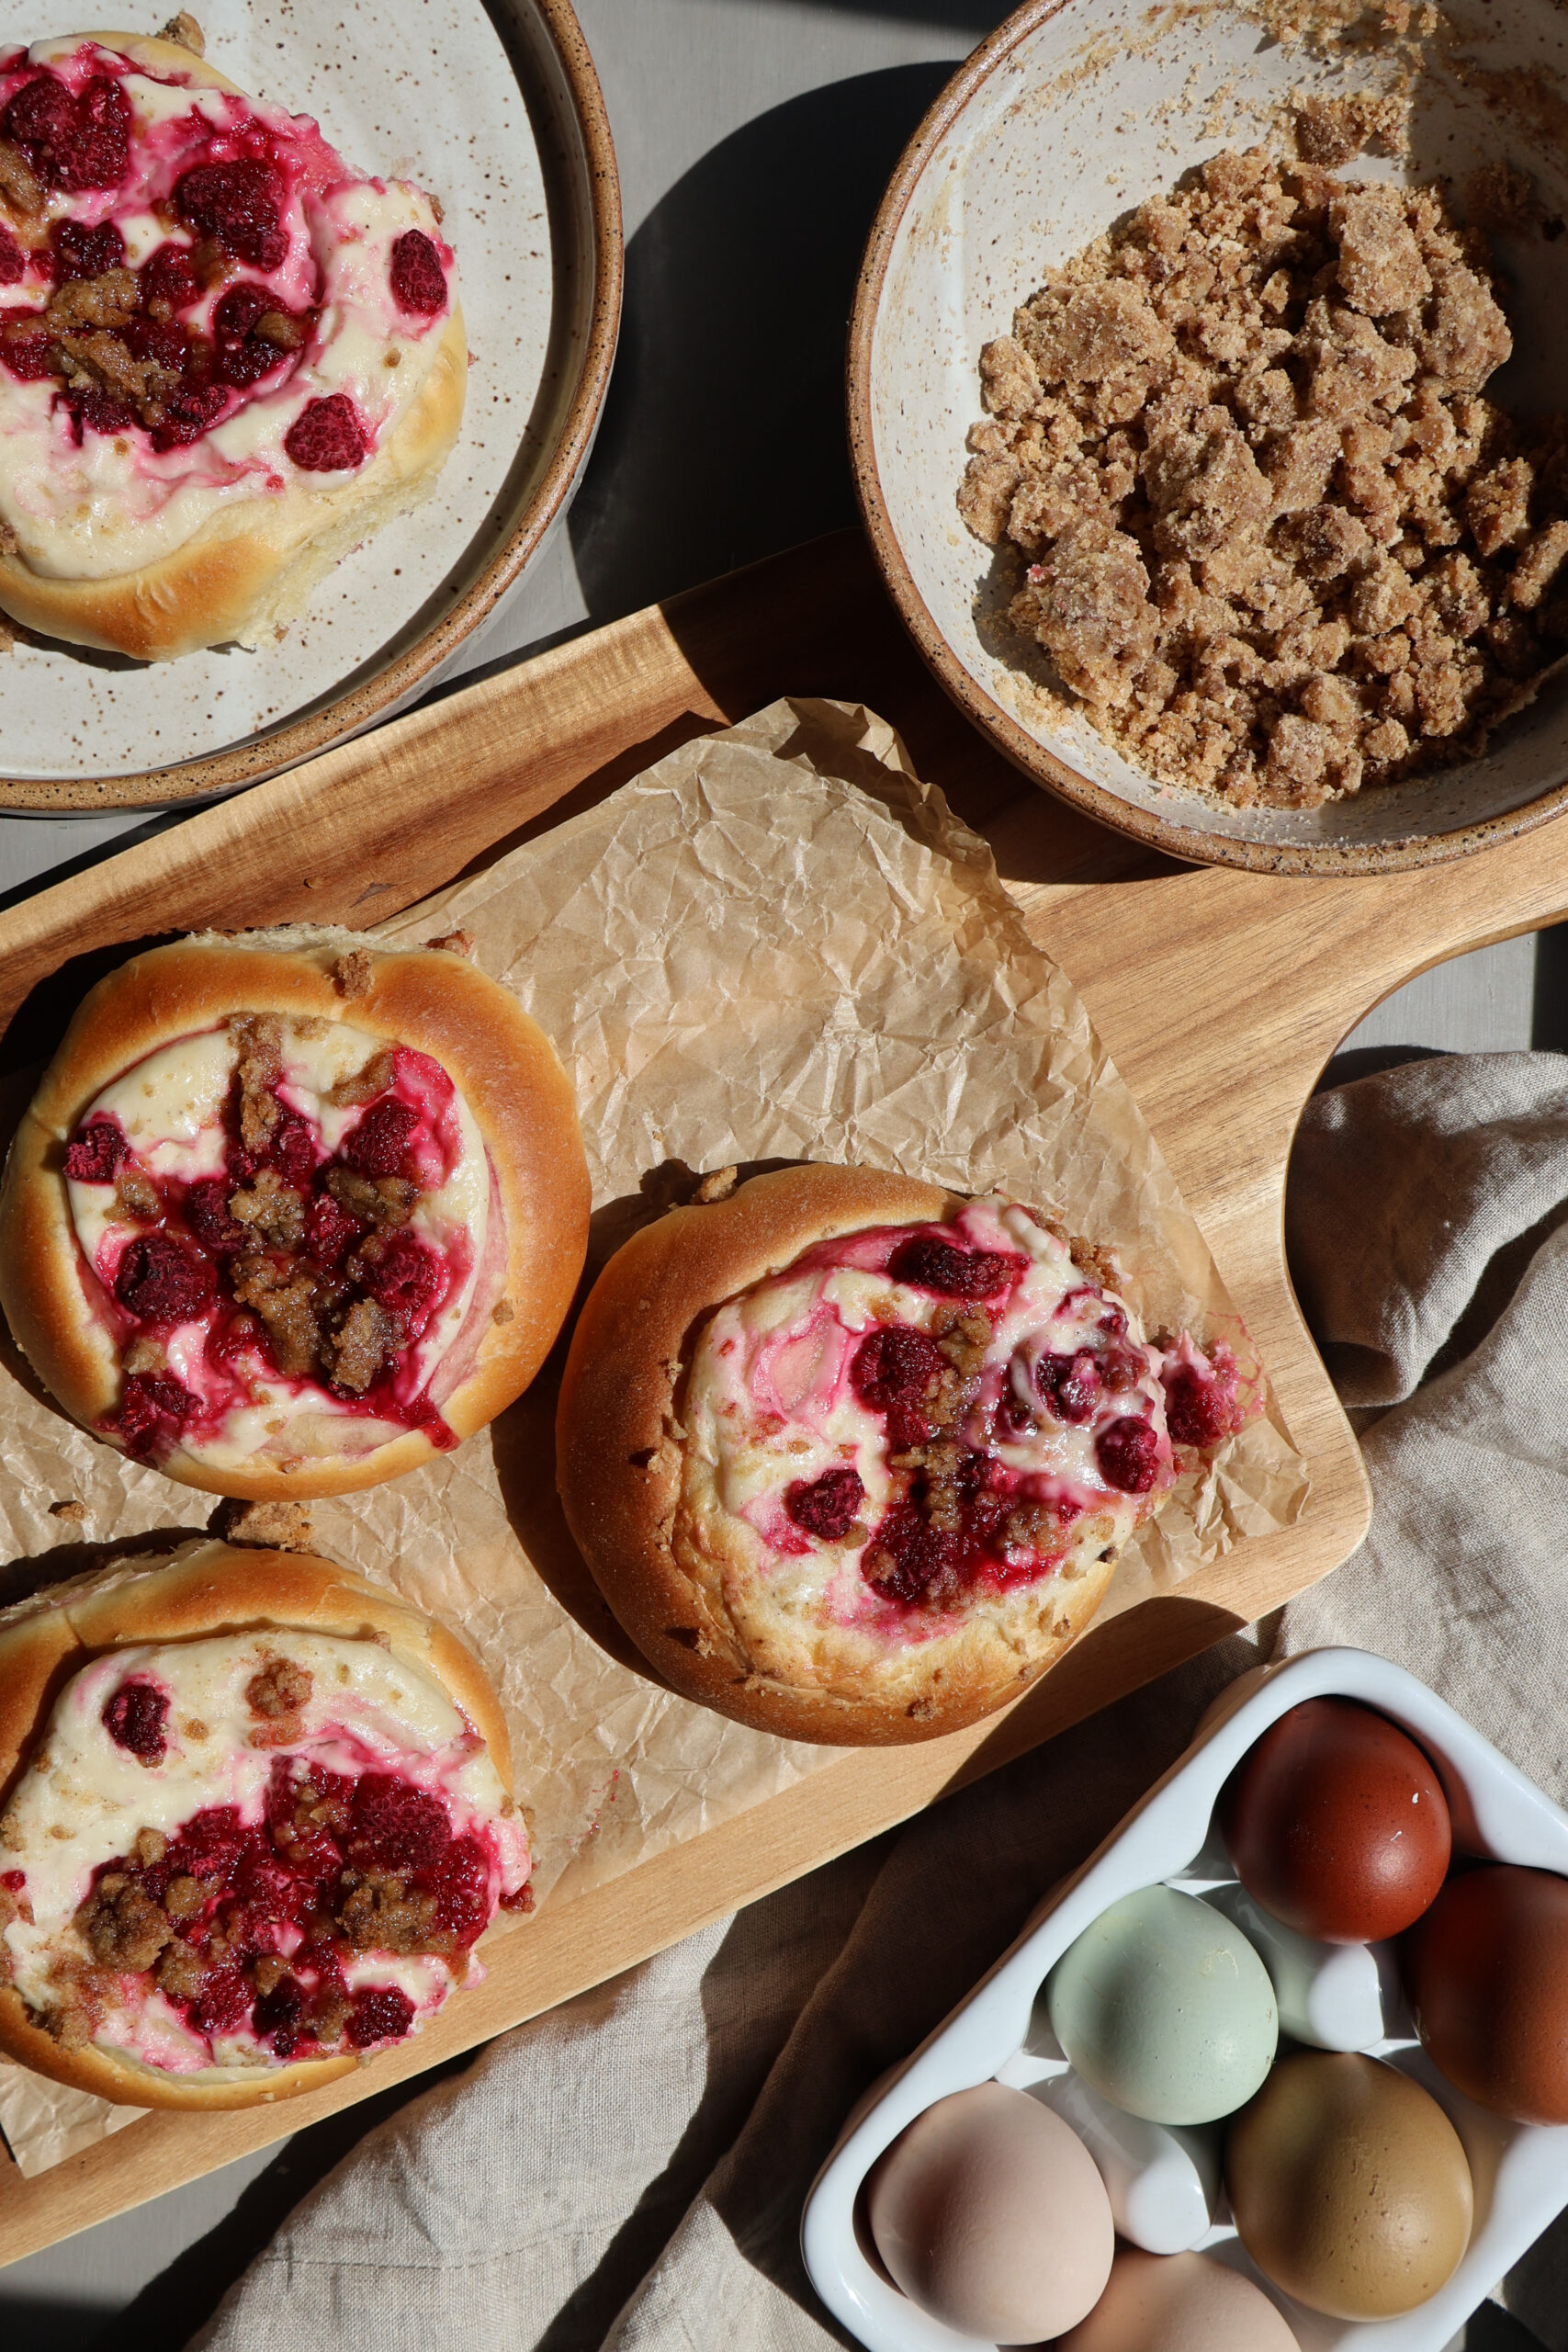
Raspberry Brioche Danishes with a Crumb Topping

April 28, 2025 · In: Breads, Breakfast, Recipes

FacebookTweetPin
Jump to Recipe Print Recipe

These Raspberry Brioche Danishes is soft and fluffy with a vanilla bean cream cheese custard and raspberries topped with a crumb. Absolutely are the perfect for your next brunch at home!

Raspberry Brioche Danishes

Raspberry Brioche Danishes are so soft and fluffy and part of my Dough It All series where I take the same dough base and make endless amounts of recipes! This same dough base is used in my Soft Sandwich Bread, Maple Glazed Donuts, Cheesesteak Biscuit Bombs, Cinnamon Rolls, and more!

Ingredients

  • Flour – All Purpose is preffered for a fluffier danish, but Bread Flour is totally fine also. You will just have a chewier danish. This is also used in the crumb topping.
  • Yeast – I like to use Dry Active Yeast, if you choose to use instant yeast you can skip the very first step of mixing together the yeast, warm water, and sugar. Just add those three ingredients in with the dough ingredients.
  • Milk – This is the my favorite for a fluffy dough, you can swap for water if needed. You also will use milk in the cream cheese filling
  • Butter – Adds buttery flavor to the dough. If you need a dairy free option I have swapped the butter for avocado oil in the dough. The butter is also used in the crumb topping. If you need a dairy free option swap for a dairy free butter or skip the crumb topping.
  • Egg – I have left out the egg before because I ran out, but the egg gives the dough extra structure and fluffiness.
  • Sugar – granulated sugar to help activate the yeast in the dough, powdered sugar in the filling and brown sugar in the crumb topping.
  • Cream Cheese – for the creamy filling
  • Vanilla Bean Paste – this can be swapped for a vanilla bean or regular vanilla extract
  • Raspberries – fresh or frozen work here! I have tested with both and there is no need to thaw the raspberries before adding. You can also swap this for any other berry you would like
  • Cinnamon – for the crumb topping
  • Salt – adds structure to the dough.
Raspberry Brioche Danishes

How to Make Raspberry Brioche Danishes

Brioche Dough

  • Combine 1/4 cup warmed water with yeast and sugar. Set aside until foamy. If your yeast does not foam up, do not proceed to the next step. This means your yeast is not active.
  • Once the yeast mixture is foamy combine all yeast mixture, milk, butter, egg, salt, and 2 and 1/2 cups of flour. Mix to combine, adding in additional flour until the mixture pulls away from the bowl.
  • Knead mixture for 7-10 minutes, or until the dough is smooth. Shape into a ball, place back into bowl, cover, and let rise for an hour, until doubled.
  • Place dough onto counter and divide into 8 sections. Shape each section into a ball and place onto a lined baking sheet. Cover and allow to rise for 30 minutes.
  • Place dough onto individual parchment squares, cover, and let dough rise for another 30-60 minutes.
Raspberry Brioche Danishes

Cream Cheese Filling

  • Preheat oven to 375F.
  • Add all the cream cheese filling ingredients into a medium sized bowl and mix to combine. The mixture should be smooth and creamy.

Make Crumb Topping

  • Combine all crumb topping ingredients in a bowl. Mix until crumb-like texture.
Raspberry Brioche Danishes

Assemble Danishes

  • Bake at 375F for 25-30 minutes and allow to cool for at least 10 minutes before consuming.
  • Using your fingers create a well in the center of each dough ball, leaving about 1/2″ around the edge.
  • Add a scoop of the cream cheese mixture to the center well of each danish and top with a sprinkling of crumb topping.

Share Your Experience

I would love to hear about your experience making and enjoying my Raspberry Brioche Danishes! Feel free to tag me on Instagram or leave a review below. Your feedback helps me improve our recipes and provides inspiration to fellow home cooks.

Save this recipe for later by simply using the pin button on the recipe card or any of the photos above. Happy cooking! 

Raspberry Crumble Brioche Danish

No ratings yet
Print Recipe Pin Recipe Add to Collection Go to Collections
Prep Time 2 hours hrs
Cook Time 30 minutes mins
Course Breakfast
Servings 8 danishes
Calories 1869 kcal

Ingredients


Brioche Dough

  • 2 1/4 tsp yeast
  • 2 tbsp sugar
  • 1/4 cup water warmed
  • 1 1/2 tsp salt
  • 4 tbsp butter
  • 1 egg
  • 3 cups flour
  • 1 cups milk

Cream Cheese Filling

  • 8 oz cream cheese
  • 1/2 cup powdered sugar
  • 1/4 cup milk
  • 1 tsp vanilla bean paste or 1 vanilla bean
  • 2 cups raspberries fresh or frozen

Crumble Topping

  • 1/2 cup all purpose flour
  • 1/4 cup brown sugar
  • 2 tsp cinnamon
  • 3 tbsp butter melted

Instructions
 

Brioche Dough

  • Combine 1/4 cup warmed water with yeast and sugar. Set aside until foamy. If your yeast does not foam up, do not proceed to the next step. This means your yeast is not active.
  • Once the yeast mixture is foamy combine all yeast mixture, milk, butter, egg, salt, and 2 and 1/2 cups of flour. Mix to combine, adding in additional flour until the mixture pulls away from the bowl.
  • Knead mixture for 7-10 minutes, or until the dough is smooth. Shape into a ball, place back into bowl, cover, and let rise for an hour, until doubled.
  • Place dough onto counter and divide into 8 sections. Shape each section into a ball and place onto a lined baking sheet. Cover and allow to rise for 30 minutes.
  • Place dough onto individual parchment squares, cover, and let dough rise for another 30-60 minutes.

Cream Cheese Filling

  • Preheat oven to 375F.
  • Add all the cream cheese filling ingredients into a medium sized bowl and mix to combine. The mixture should be smooth and creamy.

Make Crumb Topping

  • Combine all crumb topping ingredients in a bowl. Mix until crumb-like texture.

Assemble Danishes

  • Using your fingers create a well in the center of each dough ball, leaving about 1/2" around the edge.
  • Add a scoop of the cream cheese mixture to the center well of each danish and top with a sprinkling of crumb topping.
  • Bake at 375F for 25-30 minutes and allow to cool for at least 10 minutes before consuming.

Nutrition

Calories: 1869kcalCarbohydrates: 316gProtein: 51gFat: 42gSaturated Fat: 24gPolyunsaturated Fat: 3gMonounsaturated Fat: 10gTrans Fat: 1gCholesterol: 186mgSodium: 2105mgPotassium: 851mgFiber: 11gSugar: 30gVitamin A: 1389IUVitamin C: 0.1mgCalcium: 381mgIron: 18mg
Keyword bread
Tried this recipe?Let us know how it was!

Share this:

  • Click to share on X (Opens in new window) X
  • Click to share on Facebook (Opens in new window) Facebook
  • Click to share on Pinterest (Opens in new window) Pinterest

Like this:

Like Loading...

Related

FacebookTweetPin

By: Kayla · In: Breads, Breakfast, Recipes

About Kayla

Hi! I'm Kayla. I'm here to help inspire busy moms to get back in the kitchen and feel beautiful along the way! I'm married to my high school sweetheart and live on a farm with our two busy boys.

you’ll also love

Apple Fritter Cake | Skillet Cake Recipe
Banana Bread Bagels
sourdough bread with wheat scoresHow to Make Sourdough Bread | A Beginner’s Guide

Top Posts & Pages

Chicken Bacon Ranch Skillet on the Blackstone
Easy Sheet Pan Kielbasa and Tortellini Dinner
Soft and Fluffy Sandwich Bread

Join the List

Stay up to date & receive the latest posts in your inbox.

Reader Interactions

Comments

  1. Hannah says

    April 29, 2025 at 9:37 am

    Looks incredible!!

    Loading...
    Reply

Leave a ReplyCancel reply

Next Post >

Sheet Pan Quesadilla on the Blackstone Griddle

Primary Sidebar

Meet Kayla

Meet Kayla
hello!

LIVING OURFARM(LIFE)STYLE WHERE WE ​JUGGLE THE CHAOS OF MOTHERHOOD ONE ​KITCHEN ADVENTURE AT A TIME!

Read More

Connect

join the list

Categories

  • Blog
  • Recipes

Follow Along

@thefarmstyle


Homemade butter is one of the easiest things you c
Homemade butter is one of the easiest things you can make at home! It requires one simple ingredient and can be done in a few minutes!

Comment BUTTER for all the details sent straight to your inbox. 

INGREDIENTS 
2 cups heavy cream 
1/2 tsp salt optional

INSTRUCTIONS
Add heavy cream to the bowl of a stand mixer with the whisk attachment.

Gradually increase the speed of the mixer to high and whip until the butter and buttermilk separate. This timing depends on several different factors, but typically when I’m making butter it takes about 15-20 minutes.

You should start to notice your cream has turned into fluffy whipped cream around the 5 minute mark. At this point I will stop the mixer every 5 minutes or so to scrape down the sides of the bowl to make sure that everything gets incorporated.

Once it looks like the cream is starting to break I will place a towel over my stand mixer. As soon as the butter and buttermilk separate the liquid will splash and you will make a mess of the kitchen.

Remove the butter from the liquid (Do not throw the liquid out, this is buttermilk and can be used in other recipes). Gently press the butter between your hands until you get most of the liquid out. Removing all the excess buttermilk will help your butter stay fresher longer.

Once you have pressed as much of the buttermilk out as possible rinse in ice water.

If you want to have salted butter this is where you add it.

Now you have fresh made butter!


This chicken bacon ranch pasta is the ultimate com
This chicken bacon ranch pasta is the ultimate comfort food with a homemade alfredo seasoned with ranch seasoning and topped off with crispy bacon, you cannot get any better.

Comment RANCH for all the details to your inbox. 

INGREDIENTS
2 chicken breasts
1/2 tsp salt
1/2 tsp garlic powder
1/2 tsp onion powder
1/2 tsp parika
1/2 lb bacon
1/2 cup butter
1 and 1/2 cups heavy cream
4 cloves garlic minced
2 cups parmesan cheese freshly grated
2 tbsp dry ranch seasoning
2 cup pasta

INSTRUCTIONS
In a large pot boil salted water and cook pasta according to package. Drain and set aside for later, reserving 1/2 cup of pasta water for later.

In a large skillet over medium heat cook bacon until crispy. Remove from pan and drain grease. Chop bacon into smaller pieces.

Slice chicken or cube chicken into small pieces and season with salt, garlic powder, onion powder, and paprika. Add to pan that you cooked the bacon in. Cooking until the chicken has reached an internal temperature of at least 165.

Remove chicken from the pan and add butter and heavy cream. Simmer over low for 2-3 minutes.

Whisk in garlic and ranch seasoning. Then add in shredded parmesan cheese. Whisking until fully melted. Add in pasta water a few tablespoons at a time if the sauce seems too thick.

Add in cooked pasta, chicken, and bacon. Serve immediately.

#weeknightdinner #weeknightmeals #weeknightdinners #chickenbacon


This super easy sheet pan lasagna is stacked full
This super easy sheet pan lasagna is stacked full of all the lasagna flavors without needing cook the noodles and hassle with layering!

Comment LASAGNA for all the details to your inbox. 

INGREDIENTS
1 lb ground Italian sausage
1 lb ground beef
28 oz marinara
1 & 1/2 cup ricotta cheese
2 tsp italian seasoning
1 tsp garlic powder
1 tsp onion powder
1 egg
2 cups mozzarella cheese shredded
1 cup parmesan cheese shredded

INSTRUCTIONS
Preheat oven to 350.

In a large skillet brown ground beef and Italian sausage until no longer pink. Add in jar of marinara.

In a small bowl combine ricotta, egg, 1/2 cup mozzarella cheese, garlic powder, onion powder, and Italian seasoning. Mix to combine.

Add half of the meat mixture to a large sheet pan (I used a half sheet pan), then break up the noodles into bite size pieces and layer on top of meat mixture.

Add remaining meat mixture and spread evenly over noodles. Since we did not precook the noodles, you will want to ensure that all of the noodles are covered in the sauce.

Sprinkle with remaining mozzarella and parmesan cheese, then dollop ricotta mixture on top.

Bake for 20-30 minutes until cheese is melted and noodles are fully cooked.

OPTIONAL: Broil the mixture for the last 2-3 minutes to crisp up the top.


#ad | This Strawberry No Bake Cheesecake is super
#ad | This Strawberry No Bake Cheesecake is super easy to create using the @zwilling_usa XTEND Cordless System. One battery works across the entire suite, allowing you to navigate the kitchen without the need for an outlet. This is the product you didn’t know you needed.
 
Comment CHEESECAKE for all the details straight to your inbox. 

INGREDIENTS
16 oz cream cheese
1/2 cup granulated sugar
1 cup heavy cream
1 tsp vanilla extract
1 cup strawberries
12 sheets graham crackers
1/2 cup melted butter

INSTRUCTIONS
In a large bowl add cream cheese and sugar. Mix with the Zwilling XTEND Cordless Hand Mixer until light and fluffy. Set aside. 

In another bowl add heavy cream and whip until stiff peaks form using the Zwilling Xtend Hand Blender with the whisk attachment. Set aside. 

Using the Zwilling XTEND Cordless Hand Blender blend strawberries until smooth. 

Add whipped cream and half of the strawberry puree to the cream cheese mixture. Mix to combine.

Using the mini chopper attachment of the Zwilling XTEND Cordless Hand Blender add graham cracker sheets and pulse until fine crumbs form. Add in melted butter and pulse until well combined.

Add the graham cracker mixture to an 10” springform pan and gently press into the springform pan.

Top graham crackers with cream cheese mixture, then drizzle remaining strawberry puree.

Serve immediately for a softer texture or cool in refrigerator for a few hours to set.
 
#zwilling1731 #xtend


I’ve been working all week to get my kitchen gar
I’ve been working all week to get my kitchen garden in and absolutely cannot wait for it to turn into my little piece of summer paradise. 

This year I’m growing peppers, cucumbers, tomatoes, carrots, radishes, zucchini, pumpkins, all the herbs, and flowers galore! Anything else I’m missing?


Homemade brioche bread is our absolute favorite. I
Homemade brioche bread is our absolute favorite. It’s super easy to make and the extra step of letting the dough rise in the refrigerator is really worth the flavor pay off. 

Comment BRIOCHE for all the details to your inbox. 

INGREDIENTS
2 1/4 tsp active dry yeast
¼ cup milk lukewarm
2 tbsp sugar
3 eggs
2.5 cups all-purpose flour
1 tsp salt
½ cup butter chilled and cut into small cubes

INSTRUCTIONS
Mix the yeast, lukewarm milk, and sugar, and let it sit for 5 minutes until foaming.
In the bowl of a stand mixer add flour, salt, and eggs. Once the yeast mixture is foamy add to the flour mixture as well. Mix to combine using the dough hook on the stand mixer.
Add the butter in pieces and knead for another 15 minutes at speed level 2 (your dough should be sticky but comes easily from the bowl using a silicone spatula).
Place the dough in a greased bowl, cover with a damp tea towel, and let it rise at room temperature for one hour. Refrigerate for 4-16 hours. This is what makes your brioche soft & airy.
Take the dough out of the fridge, place on a lightly floured surface, divide into six pieces. Gently form each piece into a small roll and place to fill a 9x5 loaf pan. Let rise at room temperature for another 1.5-2 hours
Preheat the oven to 400 F. Bake for 30-35 minutes until brown. Allow the brioche to cool down on a cooling rack before slicing.


Footer

On the Blog

  • Blog
  • Recipes

Info

  • About
  • Disclosure, Privacy Policy, and Terms

Copyright © 2025 · Theme by 17th Avenue

%d

    Rate This Recipe

    Your vote:


    A rating is required
    A name is required
    An email is required
    We use cookies to ensure that we give you the best experience on our website. If you continue to use this site we will assume that you are happy with it.Ok