• About
  • Nav Social Icons

  • Skip to primary navigation
  • Skip to main content
  • Skip to primary sidebar
  • Skip to footer
  • Home
  • About
  • Blog
    • Mom Life
    • Farm Life
    • Recipes
      • Breakfast
      • Dessert
      • Dinner
      • Sides
      • Snacks
  • Shop
    • Shop – Digital Books
  • Cart
  • My account
  • Mobile Menu Widgets

    Connect

    Search

The Farmstyle

The Farmstyle

by Kayla Zenner

  • Home
  • About
  • Shop
    • Shop – Meal Plans
    • Shop My Favorites
  • Blog
    • Breakfast
    • Dessert
    • Dinner
    • Snacks
    • Sides
    • All Recipes
  • Cart

How to Make Sourdough Bread | A Beginner’s Guide

August 12, 2022 · In: Recipes, Sides

FacebookTweetPin
Jump to Recipe Print Recipe

Making homemade sourdough bread from scratch is so rewarding. Beginners do not need to worry about a million steps with this simple to follow recipe.

This post may contain affiliate links that I earn a small commission on.

If you have been wanting to try your hand at making sourdough bread, I want to encourage you to just give it a try! One thing to know about sourdough before you do get started (and I really do encourage you to get started) is that sourdough is more than just a recipe, it is method and an understanding. While I can follow the exact same recipe each time, my loaf will turn out different each time. In the beginning this may be frustrating, but I really encourage you to persevere. The more you experiment, the better your loaves will become.

While I 100% believe there is no such thing as “bad bread”, I do follow the motto of BAKE BAD BREAD. Your loaves may not turn out how you expected, but they usually either still taste good or you can try to make croutons or breadcrumbs, no bread goes to waste!

WHAT IS SOURDOUGH?

Sourdough is a naturally leavened and fermented food, it uses natural yeast instead of commercial yeast to rise. Sourdough is known for it’s tangy flavor and crunchy crust. The natural fermentation also helps to break down gluten, making it easier to digest. Plus it just tastes good.

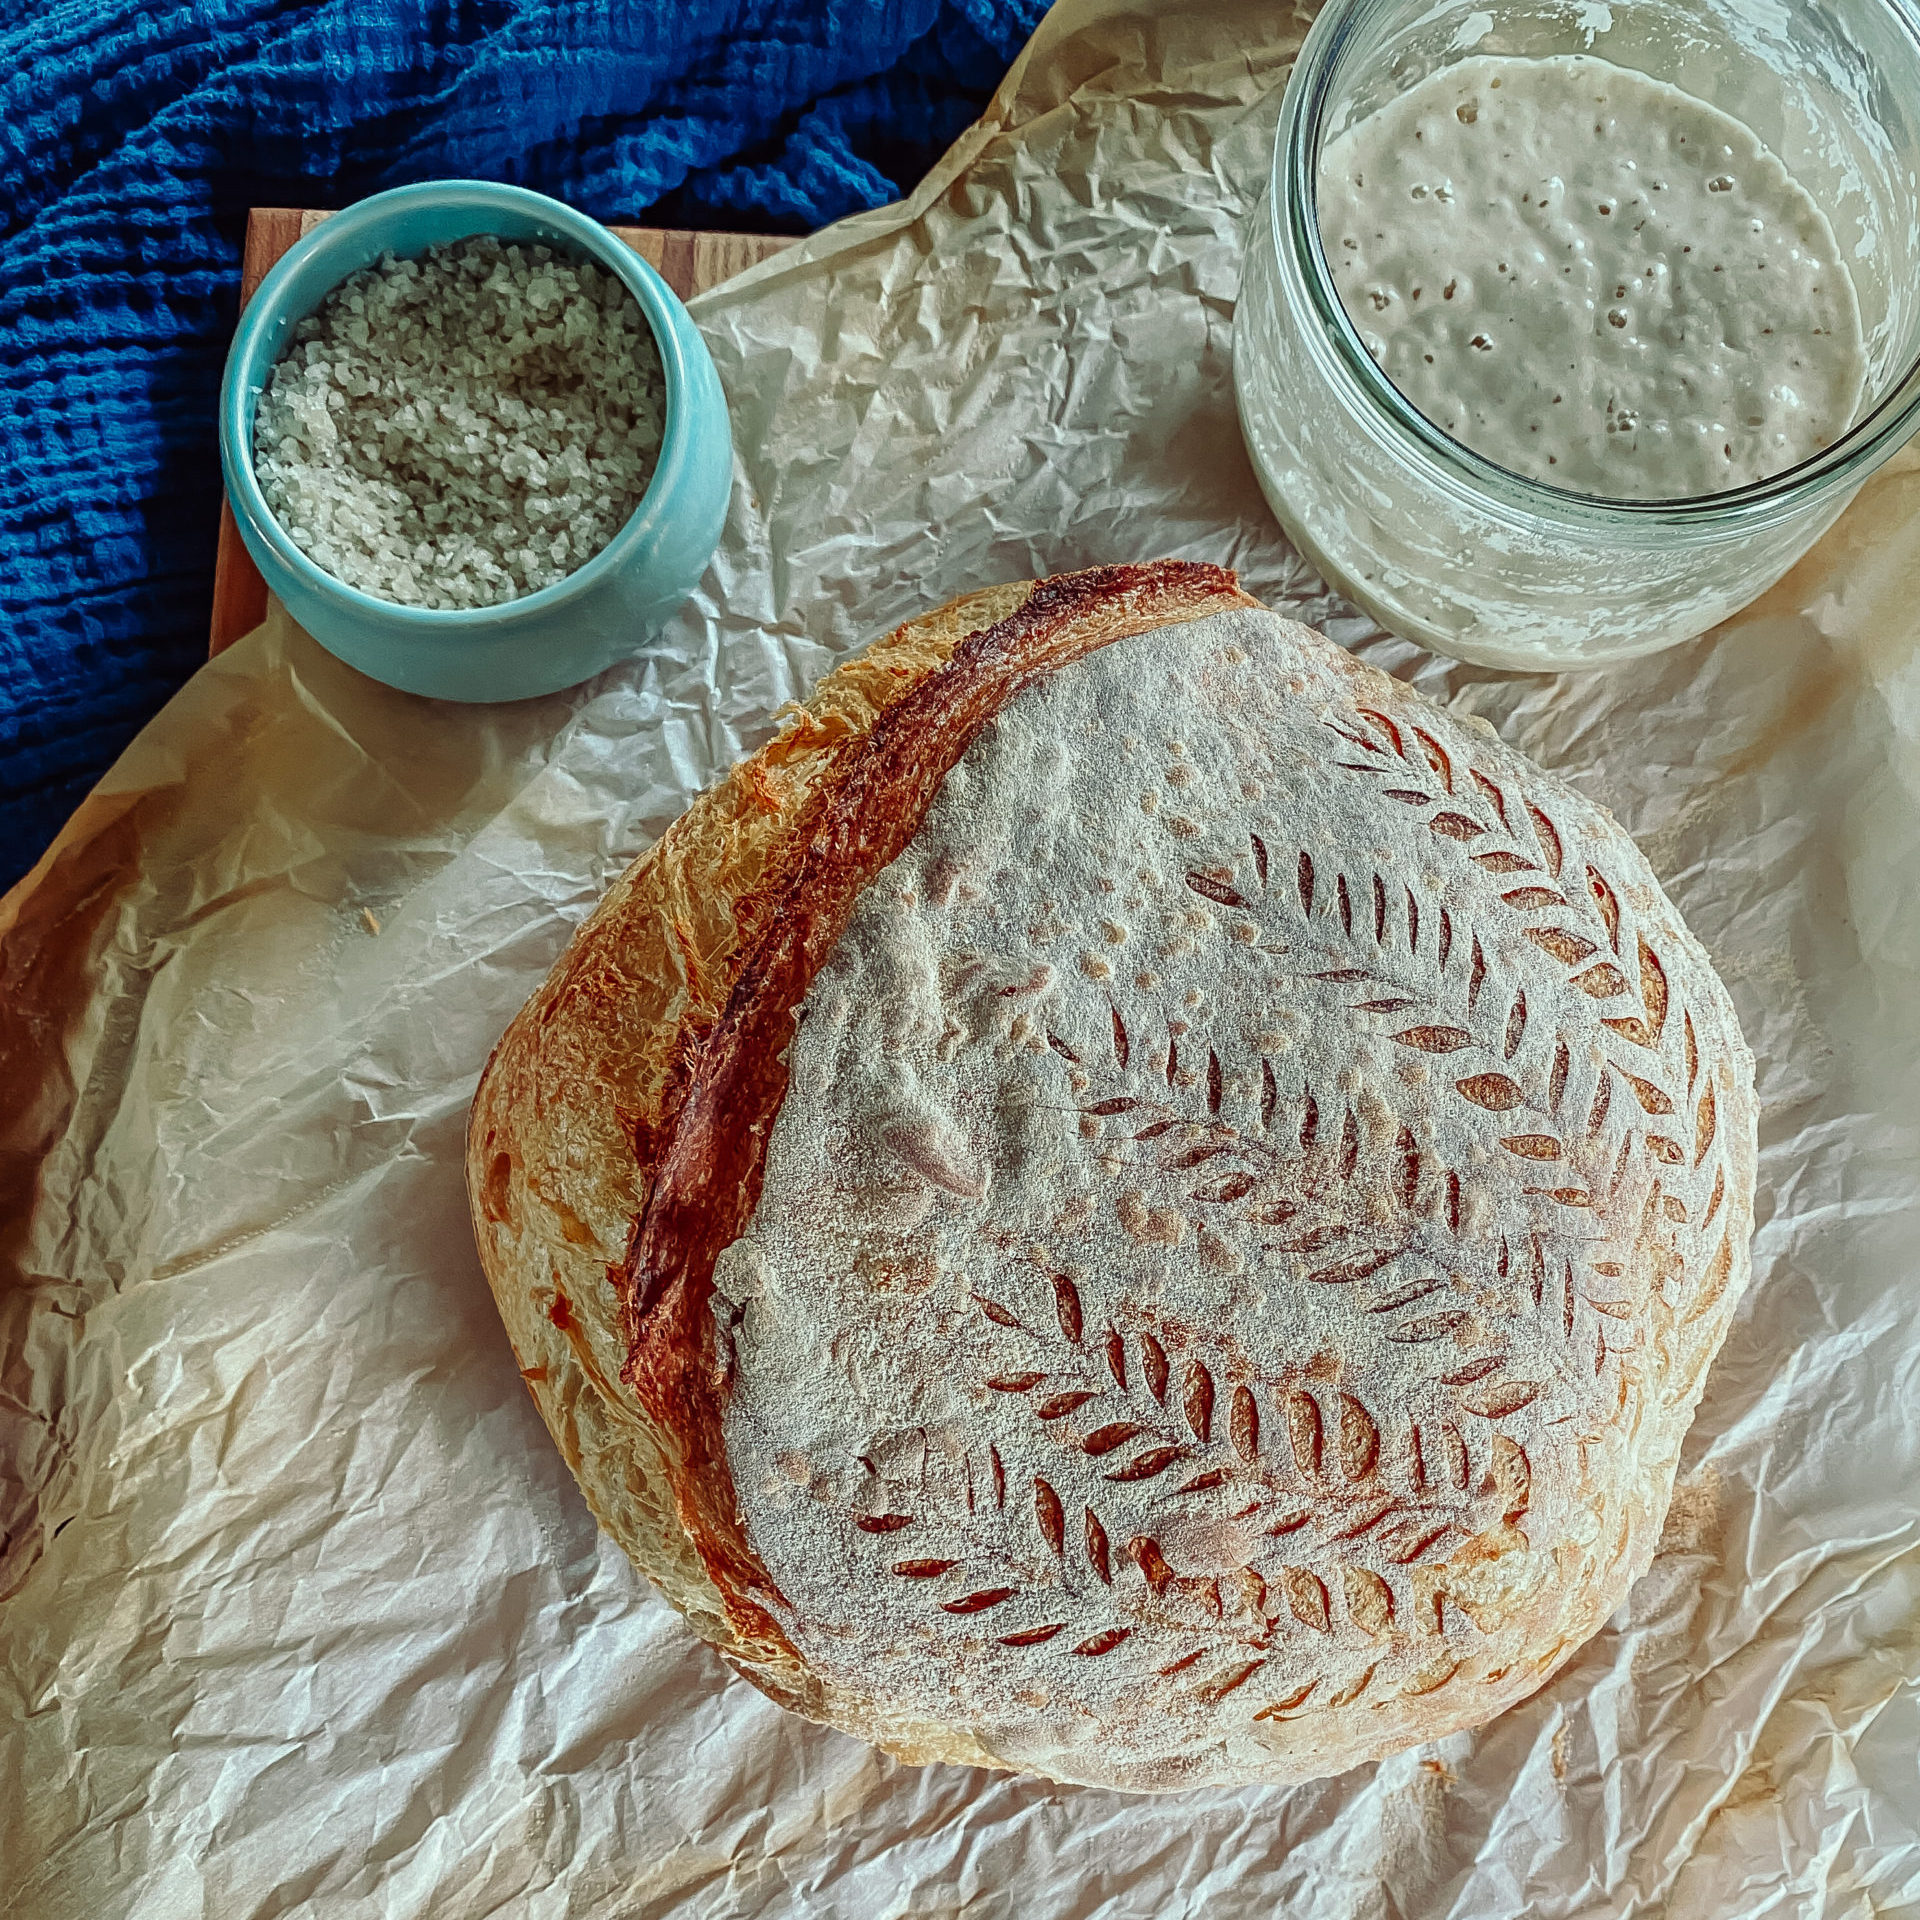
The first thing you will need when making your own sourdough bread is a sourdough starter. You can either get one from a friend, purchase a dehydrated one, or make your own!

When it comes to making sourdough I prefer to use a scale, but I’m going to include cups in the recipe as well.

What do you need to make sourdough bread?

Sourdough Starter – grab one from a friend, order a dehydrated one, or make your own.

Flour – I highly recommend starting out using bread flour. It has a higher protein content making it much easier to work with. As you start to become more comfortable with sourdough, then venture into using different flours.

Salt – salt adds in an important component for your gluten development. It helps to tighten the gluten structure of your dough. Without salt, not only will your bread taste super bland, but it will also slows down the fermentation. Basically, don’t leave the salt out. It serves a purpose.

Water – free of chlorine is preferred.

That’s it! Four basic components (technically three since starter is just flour and water) make up your sourdough bread. Isn’t that amazing? It seriously blows my mind!

sourdough bread

How to make sourdough bread

STEP 1:

I prefer to use a kitchen scale to measure out my ingredients. I feel like it helps minimize any variations, but you can use measuring cups.

In a large bowl combine:⁣
• 100 g (1/2 cup) active sourdough starter ⁣
• 350 g (1 1/2 cup) water⁣
• 500 g (3 1/4 cup) bread flour⁣
• 8 (1 tsp) g salt ⁣
Mix well so that all of the flour has been absorbed. I like to start with a dough whisk, but it is completely optional. ⁣

STEP 2:

Cover and let ferment for 8-10 hours.

As you start getting more into sourdough bread and experimenting, you can add in stretches and before the bulk ferment, but for beginners just mix it up and let it sit.

STEP 3:

Once the dough has doubled in size. Gently stretch into a rectangle and then fold up into a rough ball. Flip the dough over and shape using a push and pull motion. Do this gently, you do not want the surface to tear, but want the folds no longer visible.


Alternatively, you can place the dough into a standard loaf pan if shaping is intimidating.

STEP 4:


Sprinkle the loaf with brown rice flour and place into a small bowl (or banneton basket). Sprinkle a little more brown rice flour, cover and let proof for 30-90 minutes on the counter at room temperature or place into the fridge for at least 3 hours and up to 3 days. ⁣

STEP 5:

When you are ready to bake place your dutch oven in the oven and preheat to 450F. 

Flip your dough onto a piece of parchment paper and score the bread. 

Finally, gently place your parchment lined loaf into your dutch oven. 

STEP 6:


Bake covered at 450 for 20 minutes, then uncovered at 425 for 20 minutes. Your crust should be nice and golden brown when it is done. If you aren’t sure if your loaf is completely cooked, use a thermometer to see if the internal temperature reaches 190 F.


Let me know in the comments if you plan to give this recipe a try. Make sure to save this pin for later and tag me in your stories off you give this recipe a try!

Want more Sourdough Recipes?

Sourdough Sandwich Bread

The Best Sourdough Chocolate Chip Cookies

Perfectly Fudgy Sourdough Discard Brownies

Sourdough English Muffins

Soft and Fluffy Sourdough Cinnamon Rolls

Sourdough Dutch Baby

Share Your Experience

I would love to hear about your experience making and enjoying my Beginners Sourdough Bread Recipe! Feel free to tag me on Instagram or leave a review below. Your feedback helps me improve our recipes and provides inspiration to fellow home cooks.

Save this recipe for later by simply using the pin button on the recipe card or any of the photos above. Happy baking!

sourdough bread with wheat scores

Beginners Sourdough Bread

5 from 1 vote
Making homemade sourdough bread from scratch is so rewarding. Beginners do not need to worry about a million steps with this simple to follow recipe.
Print Recipe
Prep Time:1 day d
Cook Time:40 minutes mins
Course: Side Dish
Keyword: bread, sourdough
Servings: 1 loaf
Calories: 1896kcal

Ingredients

  • 100 g active sourdough starter ⁣ 1/2 cup
  • 350 g water⁣ 1 1/2 cup
  • 500 g bread flour⁣ 3 1/4 cup
  • 8 g salt ⁣ 1 tsp

Instructions

  • In a large bowl combine all ingredients. Mix well so that all of the flour has been absorbed.
  • Cover and let ferment for 8-10 hours.
  • Once the dough has doubled in size. Gently stretch into a rectangle and then fold up into a rough ball. Flip the dough over and shape using a push and pull motion. Do this gently, you do not want the surface to tear, but want the folds no longer visible.
  • Alternatively, you can place the dough into a standard loaf pan if shaping is intimidating.
  • Sprinkle the loaf with brown rice flour and place into a small bowl (or banneton basket). Sprinkle a little more brown rice flour, cover and let proof for 30-90 minutes on the counter at room temperature or place into the fridge for at least 3 hours and up to 3 days. ⁣
  • When you are ready to bake place your dutch oven in the oven and preheat to 450F.
  • Flip your dough onto a piece of parchment paper and score the bread.
  • Finally, gently place your parchment lined loaf into your dutch oven.
  • Bake covered at 450 for 20 minutes, then uncovered at 425 for 20 minutes. Your crust should be nice and golden brown when it is done. If you aren’t sure if your loaf is completely cooked, use a thermometer to see if the internal temperature reaches 190 F.

Nutrition

Calories: 1896kcal | Carbohydrates: 382g | Protein: 63g | Fat: 9g | Saturated Fat: 1g | Polyunsaturated Fat: 4g | Monounsaturated Fat: 1g | Sodium: 3130mg | Potassium: 501mg | Fiber: 13g | Sugar: 2g | Vitamin A: 10IU | Calcium: 87mg | Iron: 5mg

Share this:

  • Click to share on X (Opens in new window) X
  • Click to share on Facebook (Opens in new window) Facebook
  • Click to share on Pinterest (Opens in new window) Pinterest

Like this:

Like Loading...
FacebookTweetPin

By: Kayla · In: Recipes, Sides · Tagged: baking, bread, easy, food, from scratch, sourdough

About Kayla

Hi! I'm Kayla. I'm here to help inspire busy moms to get back in the kitchen and feel beautiful along the way! I'm married to my high school sweetheart and live on a farm with our two busy boys.

you’ll also love

French Onion Sourdough Bread
Raspberry Crumble Croissant Sourdough Loaf
Sourdough Discard Oatmeal Breakfast Cookies

Reader Interactions

Comments

  1. Krista says

    April 20, 2024 at 7:24 am

    5 stars
    This is the first sourdough recipe I ever tried and it’s the only one I use!! So delicious!!

    Loading...
    Reply
  2. Carrie says

    June 3, 2024 at 5:10 am

    am I dumping this onto a floured counter?

    Loading...
    Reply
    • Kayla says

      June 3, 2024 at 5:11 am

      I typically do not dump onto a floured counter. I try not to add additional flour after the bulk rise as it is adding unfermented flour to my loaves. However, you can add flour to the counter if you feel like it needs it.

      Loading...
      Reply
  3. K says

    November 20, 2025 at 1:59 pm

    What consistency should the starter be? I’ve tried this recipe twice and both times my dough is way too sticky to shape and think it might be my starter that is causing this.

    Loading...
    Reply
    • Kayla says

      November 21, 2025 at 11:20 am

      I feed a 1:5:5 or 1:1:1 ratio when feeding my starter. If your home is warm, you may be letting it proof too long resulting in a sticky dough.

      Loading...
      Reply

Trackbacks

  1. The Best Sourdough Chocolate Chip Cookies - The Farmstyle says:
    December 2, 2023 at 6:13 am

    […] baking has been one of my favorite pass times! While I love baking sourdough bread, I also love adding my discard (what’s leftover when you feed your starter) to baked goods, […]

    Loading...
    Reply
  2. Sourdough Cinnamon Roll Focaccia Muffins - The Farmstyle says:
    May 24, 2024 at 6:56 am

    […] the best bite they have ever had, BUT they wished that they were easier to bite into. I had used my sourdough bread recipe which results in a nice crunchy crust, amazing for bread, but can be a little bit harder to bite […]

    Loading...
    Reply

Leave a ReplyCancel reply

Next Post >

Confetti Pie Crust with Strawberry Peach Filling

Primary Sidebar

Meet Kayla

Meet Kayla
hello!

LIVING OURFARM(LIFE)STYLE WHERE WE ​JUGGLE THE CHAOS OF MOTHERHOOD ONE ​KITCHEN ADVENTURE AT A TIME!

Read More

Connect

join the list

Categories

  • Blog
  • Recipes

Follow Along

@thefarmstyle


Help me get to my big goal before 2026.


Comment RECIPE for all the details sent to your in
Comment RECIPE for all the details sent to your inbox. 

These Individual Chicken Pot Pies are the ultimate cozy comfort food with a flaky homemade pie crust, creamy chicken filling, and perfectly portioned for easy serving.

Ingredients
Chicken Pot Pie Filling
3 cups rotisserie chicken shredded
1 onion diced
1/2 cup carrots diced
4 tbsp butter
1/4 cup flour
1/4 cup heavy cream
2 cups chicken broth
1 tsp onion powder
1 tsp garlic powder
1/2 tsp rosemary
Pie Crust
2 cups butter cold
4 cups all purpose flour
2 tsp salt
1/4 cup ice cold water

Instructions
Preheat oven to 425 F.

Make the Pie Crust
In a large bowl add cubed butter, salt and flour. Using a pastry cutter or two knives cut together the flour and butte until it resembles crumbly flour.
Slowly add in the ice cold water until the dough starts to come together. Once the dough starts to come together pour onto a counter and use your hands to combine the dough.
Split the dough in 12 section and place onto a floured surface and roll out half the pie crusts to fit your pie pan. If the dough starts to stick to the rolling pin, sprinkle a little flour on top.
Transfer the rolled-out crust to your pie pan, pressing it gently to fit the bottom and sides.

Make the Pot Pie Filling
Melt butter in a cast iron pan and add in onion and carrot. Cook over medium heat until soft. 
Add in flour. Cook for 1-2 minutes.
Add in chicken stock, seasonings, chicken, and heavy cream. Simmer for 5 minutes to thicken sauce. 
Top with biscuits and bake according to biscuit instructions.

Assemble the Pot Pies
Add about 1 cup of filling to each of the prepared pie pans.
Roll out remaining pie crust and place on top of filled pie pans.
Crimp the edges and bake pies for 25-30 minutes, or until crust is golden brown.

Make Ahead Option
After assembling the pit pies, place onto a sheet pan and freeze for 1-2 hours. Wrap each in plastic wrap and freeze for later. 
Bake from frozen at 400F for 45-55 minutes. Covering with foil if the tops brown too fast.


Comment BREAKFAST for all the recipe details.

Th
Comment BREAKFAST for all the recipe details. 

These viral sausage gravy bombs are perfect for Christmas morning! Combining the classic biscuit and gravy into a portable breakfast creation, they are a family favorite!

Ingredients
1 lb ground sausage
1/3 cup flour
2 cups milk
1 Tbsp Roasted Chicken Better than Bouillon
pepper to taste
1 pkg refrigerator biscuits

Instructions
In a large skillet cook the sausage.
Add in flour, stir to coat the sausage and cook for about 2 minutes. Add in milk boulion and pepper. Simmer until thickened.
Roll the biscuits into a small circle, then fill with about 1/4 cup gravy. Pinch up to middle to seal and place seam side down on a baking sheet. Repeat with remaining biscuits.
NOTE: if making these ahead of time you can place these in the refrigerator overnight. Then bake the next morning. 
Bake according to biscuit package.

TIP: I like to double this recipe and freeze the remaining. Pull out what I want the night before to thaw in the fridge, then place in oven on broil for a few minutes to crisp the biscuit up. BECAREFUL not to forget them in the oven and watch carefully.

#christmasbreak #makeaheadbreakfast #biscuitsandgravy


Nothing beats a room full of flour-dusted hands an
Nothing beats a room full of flour-dusted hands and people excited to learn.

Our pie and sugar cookie class with Wendy @thepeacefulhomestead gave 12 students the confidence (and the recipes) to bake treats everyone will be raving about.

These classes are always so much fun and I look forward to it every year.


(ad) A little peek into my everyday life:

School
(ad) A little peek into my everyday life:

School drop-off → recipe testing → editing → errands → cow chores and somewhere in between, I grab a @drinkolipop to keep things moving.

It’s not coffee. It’s not water. It’s just that happy moment in the middle of my day that feels like a treat and supports my wellness goals.

Today’s pick: Ginger Ale

Tomorrow? Who knows — the OLIPOP drawer stays stocked. 😉

Which flavor should I try next?

#OLIPOPpartner #DITL


So excited to get started with my new @breville Ba
So excited to get started with my new @breville Barista Touch! 

Not a perfect shot because I forgot to set the grind size to the correct spot, but stay tuned for tomorrow! 

#breville #espresso


Footer

On the Blog

  • Blog
  • Recipes

Info

  • About
  • Disclosure, Privacy Policy, and Terms

Copyright © 2025 · Theme by 17th Avenue

%d

    Rate This Recipe

    Your vote:


    A rating is required
    A name is required
    An email is required
    We use cookies to ensure that we give you the best experience on our website. If you continue to use this site we will assume that you are happy with it.